SCOUT HARD SHELL ROOFTOP TENT Installation Manual
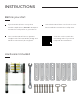
INSTRUCTIONS Before you start If you have back, knee or any other Your vehicle MUST have a roof rack or cross health complications, DO NOT attempt to bars installed to mount the rooftop tent. mount the rooftop tent on your vehicle. The cross bars MUST have a dynamic Scan the code to watch the weight load of at least 165 lbs (75 kg) and mounting video if you need MUST be at least 30” (76 cm) apart.
INSTRUCTIONS Crossbar or mounting rack minimum width is 35mm and Min distance: 31.49” max is 85mm. The minimum height is 25mm and max is 45mm Min distance: 33.46” Max distance: 47.24” Make sure the tent is centered with the vehicle to keep it balanced at all times. This will help maintain the vehicle safe at higher speeds.
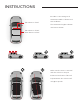
INSTRUCTIONS Mounting instructions With the help of another person, lift the tent from the front and back and place it on top of the rack or crossbars. Slide the bolt in the rail and position the crossbar in between the bolts. Use the help of another person to lift the tent. Place a plate under the crossbar aligning the holes with the bolts. Use two nuts to secure the mounting plate to the bolts.
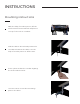
INSTRUCTIONS Opening the tent Set the ladder to help you gain enough height to push open the tent. Open the lock mechanism and lift up the tent. The tent will automatically open. Place the awning rod inside of the holder. Finally insert the hook end of the rod into the hole on the awning.
INSTRUCTIONS Warnings Place the tent opening side towards the back to prevent accidental openings from the Wind wind, and to minimize drag. Make sure to always secure the locks to prevent air to get in the tent while driving. Never place the tent with the opening side against the drag. Never drive with the tent open as it can be dangerous and cause damage. Always place the opening towards the back of the car.
INSTRUCTIONS Before using the ladder 1. Please ensure that you are fit enough to use the ladder. It is not recommended to use the ladder when under the influence of alcohol and other drugs. 2. Make sure the ladders are secure when transporting it to prevent damage. 3. Inspect the ladder before and after each use. 4. Do not use a damaged ladder. 5. Maintain the ladder clean from mud, wet paint oil and snow. 6.
INSTRUCTIONS Using the Ladder 1. Do not exceed the maximum total load. 2. Do not over reach. Take one step at the time. 3. Do not step off a leaning the ladder at a higher level without additional security. 4. Do not stand use the ladder in dangerous weather conditions. 5. Do not let children play near the ladder. 6. Make sure to keep secure grip when assenting and descending the ladder. 7. Face the ladder when ascending and descending. 8. Do not use the ladder as a bridge. 9.
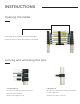
INSTRUCTIONS Opening the ladder Each rung of the ladder has two locking pins that lock in place when the ladder is extended Locking and unlocking the pins UNLOCKED PIN LOCKED PIN The pins are unlocked are if they are The pins are locked are if they are placed placed to the left side. to the right side. Slide to the right to lock. Slide to the leftt to unlock.
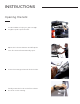
INSTRUCTIONS Fully extended ladder The ladder should be on firm and leveled ground. Expand each rung one by one starting from the top checking that the pins are locked. You should hear a locking sound but it is still recommended to check on each step. Partially extended ladder Place ladder on firm and leveled ground. Expand each rung one by one starting from the bottom checking that the pins are locked. Make sure arms are completely extended.