
Installation Guide
FRAMING
• Apply these lap siding products horizontally on
walls and gables that meet racking requirements.
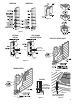
• Follow product specic nailing pattern
(see Fig. 4).
• Framing must not exceed 16 in. on center (o.c.).
• Although not recommended, where 24 in. o.c.
vertical framing is used, nail to framing 24 in. o.c.
with intermediate nailing 12 in. o.c. to sheathing
with a 6d galvanized ring shank nail. This
eectively creates a 12 in. o.c. nailing schedule.
SHEATHING
• Sheathing is required for all siding products.
Recommended sheathing is a minimum of 7/16
in. OSB or 1/2 in. exterior grade plywood.
• Foam sheathing or other composite sheathing
may be substituted. Collins Products LLC will not
be responsible for problems related to crushing
of the foam during or after siding applications, or
moisture accumulation in the wall cavity.
VAPOR BARRIERS, VENTILATION
AND MOISTURE CONTROL
• Roofs, gutters, roof to wall transitions, windows,
doors, decks and attachments shall be designed,
ashed and installed to prevent moisture entry
into the siding or wall cavity or accumulation
of water against the siding other than ambient
moisture.
• Siding must have 2 in. clearance from masonry,
concrete, brick, stone, stucco or mortar, or be
properly ashed (see Fig. 7).
• A continuous vapor barrier rated 1 perm or less is
required across the interior side of all walls to be
sided.
• A vapor barrier rated 1 perm or less must be
installed between the wood sill, wood framing
and the foundation wall.
• A vapor barrier ground cover must be used in
crawl spaces.
• Crawl spaces, attics and living spaces must be
ventilated at least to the minimum specied in
HUD standards.
FLASHING
• In areas where the bottom drip edge of the siding
is adjacent to ashing, provide a minimum 3/8 in.
gap between bottom drip edge of the siding and
the ashing (see Fig. 7).
• Install ashing in a manner that creates proper
out-sloping (see Fig. 7).
• Kick out ashing is required in areas where the
roof and gutters are adjacent to the siding.
Provide a 1 in. clearance between the gutter end
and the siding (see Fig. 8).
INSTALLING
• Start by ripping 1 1/2 or more inches o the top
edge of the siding. The bottom portions of the
ripped siding may be used for the top courses.
Align starter strip with the bottom edge of the
sill plate.
• Make sure to prime and paint all exposed cut
edges.
• For Standard Lap products overlap successive
courses at least 1 in.
• Place nails 5/8 in. to 3/4 in. up from the drip edge.
Make sure that nails penetrate through both
pieces of siding and into studs (see Fig. 4).
• Periodic checks are necessary to ensure the
horizontal lap remains level. Make adjustments as
necessary.
• Vertical butt joints must be located only on studs.
Each piece of siding must be nailed top and
bottom to studs.
• When butting siding to inside or outside corners,
use a minimum 1 in. thick dry wood material.
TruWood Trim is recommended (see Fig. 3).
2