
Use and Care Manual


Tsurumi’s Operation, Service, and Repair Manual
Removal/Installation
63
15. Insert engine wiring through small hole in back of control box (45). Connect wiring as required.
(Refer to the wiring diagrams in Troubleshooting.)
16. Install front panel and control box (see Removal/Installation of Front Panel and Control
Box. Install fuel tank (see Replacement of Fuel Tank), and engine muffler (see Replacement
of Engine Muffler).
6-13
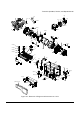
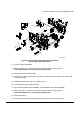
Replacement of Generator Stator
NOTE: Refer to exploded view in Replacement Parts section for parts information. The item numbers
in the following procedure are identical to those in the Replacement Parts exploded views.
A. Drain and remove fuel tank (18) (refer to Replacement of Fuel Tank for removal instructions).
1. Remove the muffler (H-10) and shields (H-6 and H-8) to gain access to generator (refer to
Replacement of Muffler for removal instructions).
2. Remove screws (2) and cover (1). Pull bushing (5) from slot in rear bracket (3).
3. Disconnect ground wire by removing screw (6).
4. Remove tube (7) from the rear cover (7). Pull the wires out of the access opening in the rear
cover. Tag and disconnect the wires.
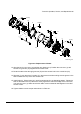
5. Remove bolts (4). Use a plastic, rubber, or other soft-faced hammer to loosen the rear cover
(3). Alternately tap upward on the generator mounting lugs until the rear cover can be
removed by hand.
6. With the rear cover loosened, carefully position the rear cover so you have access to ground
screw (6).
7. Remove the stator cover (8.1).
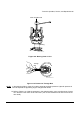
WARNING: TO AVOID BEING INJURED, BE PREPARED TO LIFT THE HEAVY STATOR
(APPROXIMATELY 37 POUNDS).
NOTE: It is suggested that you have second person assist with stator removal. While you tap upward
with the hammer, the other person should lift the stator from the front cover.
8. Use a plastic, rubber, or other soft-faced hammer to loosen the stator. Tap upward on the side
of the laminations. Tap upward and alternate tapping the near side and far side of the stator
until loosened enough to remove by hand.
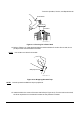
9. Move the removed stator away from the work area.
10. Position the replacement stator (8) with the wires as shown in Figure 6-6. Put stator (8) over
rotor (12) and against the front cover (14).
11. Install stator cover (8.1) evenly over the stator.