TCL多媒体科技控股有限公司 版 本 号: R0 PR ODUC TION FOR M 物 料 编 号 : 70-P6ST10-QSG1A 内 容 : QSG (简易操作指南˅ 型 号 : 43S517/MST10V 时 间 :2017-10-17 备注: 此物料如是环保物料, 则在BOM中体现。 NA-T C L 牌子名称(BRAND NAME): H3-43P60HU-USAAWAA B.O.M.编号: 采购部 往(TO): PMC 部 IQC 水墨印刷 丝印 种类(TYPE OF JOB.
Hi! Let’s get started.
DO NOT RETURN TO STORE WE ARE READY TO HELP contact us first with any questions TCL SUPPORT: www.tclusa.com/support 1-877-300-8837 TAKE CARE WHEN REMOVING THE TV VISIT US AT WWW.TCLUSA.
Important Information This symbol indicates that this product incorporates double insulation between hazardous main voltage and user accessible parts. When servicing, use only identical replacement parts. CAUTION RISK OF ELECTRIC SHOCK. DO NOT OPEN. Caution: To reduce the risk of electric shock, do not remove cover (or back). No user serviceable parts inside. Refer servicing to qualified service personnel.
Important Safety Instructions 1. Read these instructions. 2. Keep these instructions. 3. Heed all warnings. 4. Follow all instructions. 5. Do not use this apparatus near water. 6. Clean only with dry cloth. 7. Do not block any ventilation openings. Install in accordance with the manufacturer’s instructions. 8. Do not install near any heat sources such as radiators, heat registers, stoves, or other apparatus (including amplifiers) that produce heat. 9.
What’s in the box TCL Roku TV AV Input cable adapter TV stands 4 x Stands screws 2 x VESA mount spacers 4 x VESA screws M5X25mm for models of 49” M5X18mm for models of 43” TVremote 2 PCs: M6X30mm 2 PCs: ST3X10mm 2 x AAA batteries for remote What you need Make the most of your Smart TV Phillips head screwdriver Router + Internet Connection (needed for streaming) For additional support , please see User Manual at: www.TCLUSA.
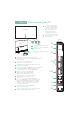
Step 1 Set up your TV Ready for the step-by-step? You’re only minutes away from TV bliss! Remove your TV from the box Be careful, it’s heavy! To use the stand A To prevent damage to the screen, carefully place your TV on a soft, cushioned surface. B Put the column of the stands into the TV, align the stands with the screw holes located on the TV. C Secure the stands to the TV with four (4) screws.
Step 1 Set up your TV To mount on a wall Preparation must be done before mounting your TV on a wall. First, connect all the cables, fix the AV terminal cover onto the TV (refer to page 4). VESA mount spacers Screw off the 2 screws on the back of the TV. Put the plastic VESA mount spacers into the VESA holes in the back cover. Screw the VESA bracket tightly onto the back cover with the VESA screws attached in the accessary bag. If you are mounting your TV to the wall, don’t attach the stands.
Step 2 Power up In this step, we’ll make sure all systems are GO! Power your TV remote by inserting the included batteries. Connect your power cable to the TV, then plug it in to the wall outlet. Connect other devices by referencing port label and descriptions on the bottom of page 8. Power Tip! Always replace dead batteries with two brand-new batteries from the same manufacturer. Never use damaged batteries.
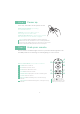
Step 4 Get to know your TV A TV FRONT STATUS LIGHT Glows when the TV is in standby, flashes when the TV is busy, flashes once with each button press of the remote control. IR RECEIVER Receives signal from the TV remote. A B C POWER CABEL Connect your TV to the power source with the power cable. TV SIDE D C VOLUME Raise and lower volume. D INPUT Press once to bring out the AV inputs menu. E RESET F USB TV BACK ETHERNET E RESET BUTTON Press once to restart your TV.
Step 5 Complete guided setup It’s the final stretch—hurray! Let’s Connect Your TV will automatically detect wireless networks in your area. Have your network name and password handy and follow the easy on-sceen instructions. You can also connect using an Ethernet cable. Your Roku account: Once connected, your TV will walk you through a guided setup, where you'll be prompted to create (or sign into) your free Roku account online at roku.com/link.
Viewing 4K Ultra HD and HDR Content 4K Spotlight Channel The Roku 4K Spotlight channel features many movies and TV shows available in 4K UHD resolution from streaming services such as Netflix, Amazon Video, VUDU, and more. Key things to know: A paid subscription or other payments may be required for some channels. Channel availability subject to change and varies by country. 4K and HDR content will not be available on all channels.
TTE Technology, Inc. (“TTE”) Limited Warranty All LCD/LED Models. What your warranty covers: Defects in materials or workmanship to the original owner of this TCL product when purchased as new from an Authorized Dealer of TCL brand products in the United States and packaged with this warranty statement. New LCD/LED Televisions (Non-Commercial Use) For how long after your purchase: One (1) year from date of purchase for parts and labor for non-commercial use.
TTE Technology, Inc. (“TTE”) Limited Warranty LIMITATION OF WARRANTY THE WARRANTY STATED ABOVE IS THE ONLY WARRANTY APPLICABLE TO THIS PRODUCT. NO VERBAL OR WRITTEN INFORMATION GIVEN BY TTE TECHNOLOGY, INC., ITS AGENTS OR EMPLOYEES SHALL CREATE A GUARANTEE OR IN ANY WAY INCREASE OR MODIFY THE SCOPE OF THIS WARRANTY. REPAIR OR REPLACEMENT AS PROVIDED UNDER THIS WARRANTY IS THE EXCLUSIVE REMEDY OF THE CONSUMER. TTE TECHNOLOGY, INC.
Troubleshooting Having trouble completing the guided setup? Don’t worry, it’s usually an easy fix. 4K Picture Quality Cannot connect to wireless network (Wi-Fi) đƫ 4K picture quality is largely dependent on the source. Make sure your source content is 4K. đƫ Select the correct wireless network name and verify the password entered (case sensitive). đƫ To stream 4K, we recommend a broadband speed of 25Mbps for optimum viewing.
This product incorporates HDMI technology. The terms HDMI and HDMI High-Definition Multimedia Interface, and the HDMI logo are trademarks or registered trademarks of HDMI Licensing Administrator, Inc. in the United States and other countries. Manufactured under license from Dolby Laboratories. Dolby, Dolby Vision, Dolby Audio, and the double-D symbol are trademarks of Dolby Laboratories.