
User's Manual


8
Step 5
Complete guided setup
It’s the final stretch—hurray!
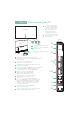
Let’s Connect
Your TV will automatically detect wireless networks in your area. Have your network name and
password handy and follow the easy on-sceen instructions. You can also connect using an
Ethernet cable.
Once you’re connected, your TV will automatically update with the latest software—plus you can
/0.0ƫ/0.!)%*#ƫ0$!ƫ!*0!.0%*)!*0ƫ5+1ƫ'*+3ƫ* ƫ(+2!ċƫ*(%'!ƫ+0$!.ƫ/Čƫ5+1.ƫ*!3ƫƫđƫ+'1ƫƫ
automatically receives regular software updates in the background when it’s connected to the
internet. This allows it to give you a better and better experience.
If you aren’t ready to connect your TV to a wireless network, you can still use it as a regular TV.
And setup is done…congratulations!
Continue using the remote to personalize your Home screen and channel line-up, stream movies,
and so much more.
If you have an antenna or cable connected, just click the tuner tile to watch broadcast TV channels.
The fun has just begun!
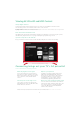
Your Roku account: Once connected, your TV will walk you through
a guided setup, where you'll be prompted to create (or sign into) your
free Roku account online at roku.com/link. Your TV will generate a
unique code that links your TV to your account.
Roku accounts are free, and while a valid credit card is recommended, it is not
required. If you choose to register with a credit card, you will be able to
seamlessly rent movies, TV shows and download apps without having to enter
in your credit card information each time. A unique PIN can be added to the
account to prevent unauthorized purchases.