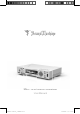
SMC-1030 Music Streamer User Manual SMC-1030 manual_ 20191118.
Introduction Sound Machine Premier is a Hi-Res music streamer for Hi-Fi home audio system, which can connect various inputs, like Bluetooth, USB, DVB-C and connect to your old traditional radios, amplifier, Hi-Fi receivers. The best is, you can enjoy high quality audio sound! ˙ Streaming music from mobile phone, tablets and desktops wirelessly via Bluetooth, Wi-Fi. ˙ NFC tag and pair : simply tag, pair, and play via Bluetooth from Android mobiles.
Table of Contents 1 Product Specifications 1 Product Specifications ................................................................. 3 CPU and Storage 2 Interface ............................................................................................. 4 Host CPU DRAM Internal Storage 2.1 Front Panel ..................................................................................................... 4 2.2 Rear Panel ................................................................................
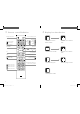
2 Interface 1 2 3 4 5 6 7 8 9 10 IR.BL 2.1 Front Panel 2.2 Rear Panel 1. STANDBY: Green in POWER-ON mode Red in Standby mode Blinking red / green light during Scan / Reset mode 2. DVB-C: DVB-C mode 3. USB: USB mode : USB storage stick, CD player, Turntable 4. SPOTIFY: Spotify Connect mode 5. NETRADIO: NETRADIO mode 6. DISPLAY: Audio information display 7. BACK: Previous action 8. USB Port: Inputs from USB storage stick, CD player, Turntable 9. MENU: Home MENU button 10. Nevigation Key: 1.
3 4 Display Icon Introduction Remote control Definition Standby / Power mode Previous channel Pause and play Next channel Go to the next play mode DLNA Netradio APP USB Bluetooth Spotify Turntable CD Volume down Connection error / Network down Bluetooth is ready to pair Bluetooth pairing successful UP Down Delete wrong input / Favorite channel Volume up Wi-Fi connection successful Information Right Left OK /Select Mute Connection errors / Network down DVB-C Home MENU Fav Successful con
5 Operating instruction 5.1 WIFI Connection 5.2 WIFI Disconnect 1. Select Wi-Fi connection 1-1. Click Ÿź to select Wi-Fi connection. 1-2. Press OK to enter. 1. Select Wi-Fi connection 1-1. Click Ÿź to select Wi-Fi connection. 1-2. Press OK to enter. 2. Connect : 2-1. Select Connect for Wi-Fi connection. 2-2. Press OK to confirm. 2. Disconnect : 2-1. Press Ÿź to select Disconnect. 2-2. Press OK to confirm. 3. Scanning : Start Scanning available Wi-Fi networks. 3.
5.3 Bluetooth Pairing & Despairing 5.4 Spotify Connect Pairing Introduction 1. Select Bluetooth 1-1. Click Ÿź to select Bluetooth. 1-2. Or press Bluetooth on the remote. 1-3. Press OK to confirm. 2. Bluetooth enabling Start enabling Bluetooth. 3. Bluetooth Enabled The Bluetooth icon on the bottom pops out when Bluetooth is enabled. Spotify Connect supports streaming audio controlled from Spotify APP on multiple smart devices.
Spotify Connect APP Ensure the smart device is connected to the same WiFi network as the one shown on SMC-1030 display. Spotify Connect Instructions 1. Select Spotify Connect 1-1. PressŸź to go to Spotify Connect in Home Menu. 1-2. Press OK to enter. Note : Please go back to the last page for Spotify Connect Instruction to see the connected WiFi network. 2. Ensure WiFi connection 2-1. Ensure WiFi network or LAN network is connected before entering Spotify Connect. 2-2.
5.5 USB 2. Laptop & Desktop 2-1. Log in to play a desired song. to connect to a device in the bottom-right to bring out the Device Menu. 2-2. Click 2-3. Select to connect to SMC-1030 from the Device Menu to output to SMC-1030. USB Storage Stick 1. Install USB Storage Stick Insert your USB Device into USB port. 2. Select USB Drive 2-1. Click Ÿź to select USB Drive. 2-2. Or press on the remote control. 2-3. Press OK to enter. 3. Play List 3-1. Click Ÿź to select a desired songs. 3-2. Press OK to play. 4.
5.6 Net Radio CD Drive 1. Install CD Player Connect to CD Player via USB port. .BLF TVSF 4.$ JT DPOOFDUFE UP UIF JOUFSOFU CFGPSF PQFSBUJOH /FU 3BEJP :PV DBO connect to the internet either simply through LAN port, or through Wi-Fi network. Internet Connection : LAN Local Area Network 1 .Connect to Internet Connect the Ethernet cable to the LAN port, and wait for 5 ~ 10 seconds to identify the network to confirm the connection. IR.BL 2. CD Drive 1-1. Click Ÿź to select USB Drive.
Keyword Recent 1.Recent 1-1. Click Ÿź to go to Recent in NetRadio Menu. 1-2. Press OK to enter. 1. Search Keyword 1-1. Press Ÿź to go to Search in NetRadio Menu. 1-2. Press OK to enter. 2. Play in Recent List 2-1. The recent played radios stations are listed in Recent. 2-2. Play a desired radio station from the list. 2. Input Keyword 2-1. Press Alphabet keys on the remote control to input keywords. 2-2. Press OK to search. 3. Play 3-1. The search result shows on the display. 3-2. Press OK to play.
5.7 DVB-C IR.BL 1. Plug in DVB-C Cable Plug DVB-C cable into RF in port. DVB-C cable 2. Select DVB-C 2-1. PressŸź to go to DVB-C in Home Menu. 2-2. Press OK to enter . There are 2 scan methods available below : 1. Scan Channel Map is to scan all frequencies for when if the frequency information is not clear. 2. Range Scan is for when the frequencies information is available from your local cable service operator. Scan Channel Map 1. Scan Channel Map 1-1.
5.8 FM 5.9 DNLA FM output frequency Introduction IR.BL LAN cable DLNA device Coaxial cable DLNA device Network Hub or Network Router Wireless Wireless DLNA device Connect to Hi-Fi Audio System or Radio Plug coaxial cable into FM out to connect to Hi-Fi audio system or radios. FM 1. Select FM Frequency 1-1. Press Ÿź to go to FM Frequency in Home Menu. 1-2. Press OK to enter . 2. Frequency Tuning Tune to an available frequency where there is no radio broadcasting. 3.
5.10 Information Internet Connection : LAN Local Area Network 1. Plug in Ethernet jack Make sure the Ethernet is plugged into LAN port properly. IR.BL Ῠ⪹佁彾佩 憲㔴佁彾彾䛀⟷ 2 .Connect to LAN Network The Ethernet icon pops up on the display once the LAN network is connected successfully. 1.Select Information 2-1. PressŸźto select Information in Home Menu. 2-2. Press OK to enter. 2.Version The display says the current version installed. Internet Connection : Wi-Fi Network Go to 5.
5.11 Updating Version 5.12 Time Zone Settings *Warning : do not turn off while updating.* 1. Network connection 1-1. Ensure the local network connection either LAN port is plugged properly, or Wi-Fi connection is successful. 1-2. If no connection, please go to Wi-Fi Network chapter. 2. Select Software Update 2-1. Press Ÿź to select Software Update. 2-2. Press OK to confirm. 3.Comfirm update 4. Software Update Available pops up on the display when The icon software update is available. 5.
Manufactured under license from Dolby Laboratories. Dolby, Dolby Audio, Pro Logic, and the double-D symbol are trademarks of Dolby Laboratories. 5.13 Recovery Mode IR.BL Network Ethernet cable pull out 1. Reboot & Ethernet Connection 1-1. Reboot the power by unplugging and plugging again the power cord. 1-2. Ensure the Ethernet cable is plugged into LAN port properly. 2. Recovery mode 2-1. Long press Standby button and Standby light goes red/ green blinking. 2-2.
APP Store Search SoundMachine to download and install APP Google Store Search SoundMachine to download and install APP QR Code TTI Technology Corporation. c 2019. All rights are reserved. The information contained herein is the exclusive property of TTI and shall not be used, distributed, reproduced, or disclosed in whole or in part without prior written permission of TTI. It thereof does not convey or imply any licenses under patent rights or other industrial or intellectual property rights.