
Instructions / Assembly


6
3
3
4
4
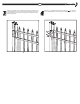
Start post installation with a gate or a corner – if a gate is not in your plans. Dig
post holes to appropriate depth, approximately 6" wide. Fill bottom of hole with
approximately 6" of peastone/gravel and place post onto gravel. Fill holes with
concrete and tamp down around each post leaving concrete about 2" from ground
level.
The opening between the posts should be 1
1
⁄
1
⁄
1
2
⁄2⁄
" wider than the gate width to allow
for hinges. (Example: Use a 48" opening for a 46
1
⁄
1
⁄
1
2
⁄2⁄
" wide gate.)
Be sure posts are level and plumb. Brace the posts as necessary while the
concrete is setting.
1
1
2
2
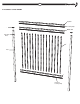
Use a rubber mallet to gently drive the post tops onto the posts. Be
careful not to damage the post top.
Mix the concrete on the dry side to allow the posts to set faster. See
chart below to determine the minimum depth for your fence.
NOTE: In areas where ground frost occurs, the concrete footing should
be extended below the frost line (generally 12" below). This will
account for frost "heave, in which ground water freezes and expands
upwards. By providing this 12" drainage you can keep the frost heave
from affecting the posts. Verify depths meet all local building codes.
First Post Installation (Gate Post)
Leave 2" from
ground
Frost Line
6" Gravel
6"
6" Gravel
6"
Leave 2" from
ground
Width of Gate + 1
1
⁄
1
⁄
1
2
⁄2⁄
"