TuneUp Utilities 2014 User Manual Document revision 2014.02 (8/20/2013) C opyright AVG Technologies C Z, s.r.o. All rights reserved. All other trademarks are the property of their respective owners. T uneU p U tilities 2 0 1 4 © 2 0 1 3 C opyright A V G T ec hnologies C Z, s .r.o. A ll rights res erved.
Contents ........................................................................................................................ 4 1. Welcome to TuneUp Utilities! .......................................................................................................... 4 1.1 System Requirements 4 1.2 Help and .......................................................................................................... Support .....................................................................................
.......................................................................................................... 71 10.2 Checking the Hard Disk for Errors .......................................................................................................... 73 10.3 Restoring Deleted Files .......................................................................................................... 75 10.4 Managing Running Processes ..................................................................................
1. Welcome to TuneUp Utilities! Congratulations on choosing TuneUp Utilities! You have just acquired a comprehensive collection of over 30 different tools to optimize your PC. Use this software to revitalize PCs, notebooks or netbooks with a minimum effort. With TuneUp Utilities, you can restore the full performance capabilities of your operating system, games and programs.
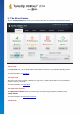
2. The Start Center The new TuneUp Utilities Start Center is the central access point for all functions and optimization options. The PC mode In the PC mode area, you can decide which mode should be turned on for your Windows operating system. For more information, see PC Modes. The Flight mode This area is only active on laptops, otherwise it is grayed out. A simple switch allows to turn off all wireless network activity on your laptop. For more information, see Flight Mode.
In the menu bar, you have access to the central settings dialog of TuneUp Utilities and to information about the program and individual modules. For more information, see Menu Bar. The five categories The main area in the TuneUp Utilities Start Center comprises five categories, giving you fast access to the key features of TuneUp Utilities sorted by topic. The five categories in the Start Center represent the key task areas of TuneUp Utilities.
3. PC Modes In the PC mode area, you can decide which mode should be turned on for your Windows operating system. Economy Mode Using TuneUp Economy Mode, you can reduce the energy consumption of your computer by turning off the screen, hardware components or unnecessary functions. For more information, see Economy Mode. Standard Mode Standard Mode represents the normal operating state of Windows. For more information, see Standard Mode.
Economy Mode. How Can I Tell How Much Energy Has Been Saved in Economy Mode? The Economy Mode Configuration Wizard uses a traffic light system to show you how much energy you are actually saving with your settings. If the bar to the right of the total saving is green, your energy savings are high. A yellow bar represents moderate energy savings and a red bar represents low energy savings.
Please note that if the Economy Mode is already switched on, you don't have to run the Wizard again. You can alter Economy Mode settings directly in central configuration dialog of your TuneUp (the Economy Mode item). Simply check (or uncheck ) the appropriate boxes and click Apply. Now prepare your own Economy Mode by selecting which hardware components, services and features may be temporarily turned off in order to save energy when Economy Mode is turned on.
Wireless adapter energy-saving settings (only in Windows Vista and 7): This option determines the extent of energy saving for the wireless adapter when the Economy Mode is on. Connection to external devices Synchronization with mobile devices: This setting will prevent synchronization of addresses, e-mails, music files, etc. with your cell phone or portable media player and the related program will not start automatically when the device is connected while Economy Mode is on.
Tip: This is a popular way of increasing the performance of netbook s on a sustained basis. Visual effects Visual special effects for windows: This setting turns off transparency effects and shadows of windows, the preview window in the taskbar and three-dimensional navigation between windows when Economy Mode is on. Classic window style: This setting uses the classic Windows design for the appearance of windows, menus and buttons when Economy Mode is on.
therefore turned off so that all of the PC's processing power is available to the required programs. In addition to those programs that you are currently using (green), many others are also running in the background that are really not that important for your work (blue). If such background processes suddenly start to require a great deal of processing power, they are assigned a lower priority so that your other programs can continue to run smoothly.
Start Center, selecting the Optimize category and clicking the Configure Turbo Mode link (in the Reduce system load area). Please note that if the Turbo Mode is already switched on, you don't have to run the Wizard again. You can alter Turbo Mode settings directly in central configuration dialog of your TuneUp (the Turbo Mode item). Simply check (or uncheck ) the appropriate boxes and click Apply.
on. Switch to classic window design: This setting uses the classic Windows design for the appearance of windows, menus and buttons when Turbo Mode is on. Also, in Windows XP the colorful Windows interface is disabled, whereas in newer Windows transparency effects and thumbnails of windows in the taskbar are disabled. Step 4: Configure computer resources for optimum performance Your computer's resources are in demand.
onto a domain. Turn off network communication services: When Turbo Mode is on, this setting turns off network communication services that are rarely used, e.g. fax or peer-to-peer services. Step 7: How long should Turbo Mode stay switched on? The Turbo Mode can either be switched off automatically when the computer is shut down, or stay on until you switch it off manually. If you leave Turbo Mode on constantly, this can also speed up the startup process.
4. Flight Mode This feature is only active on laptops, otherwise the whole section is grayed out. The Flight Mode switch allows you to partly turn off wireless network activity on your laptop. This includes: Wifi – technology that allows an electronic device to exchange data or connect to the internet wirelessly using radio waves. Bluetooth – wireless technology standard for exchanging data over short distances using shortwavelength radio transmissions.
5. Optimization Potential The Optimization Potential is your personal indicator of optimization progress. You can find it on the TuneUp Utilities Start Center next to the PC mode area. What is the Optimization Potential? The Optimization Potential uses a graph and associated notifications to show you how extensively you are already using the options of TuneUp Utilities to increase performance and maintain the system and where there is still potential to optimize your system further.
For this section to be considered as optimized, one of the following conditions must be fulfilled: Automatic Maintenance must be activated with all the necessary maintenance tasks enabled, or TuneUp 1-Click Maintenance is carried out within 14 days of use with all the necessary maintenance tasks, or TuneUp Registry Cleaner and TuneUp Shortcut Cleaner are run within 14 days and Temporary files are deleted within 14 days of use. To delete Temporary files, open the Clean Up category in the Start Center.
6. Menu Bar In the menu bar, you have access to the central settings dialog of TuneUp Utilities and to information about the program and individual modules. The "Settings" Menu Clicking on Settings takes you to the central configuration dialog of TuneUp Utilities. Here you can adapt the program to your requirements, apply maintenance settings and configure TuneUp Live Optimization, TuneUp Turbo Mode, the update check and many other modules of TuneUp Utilities.
7. Dashboard The Dashboard category displays the current status for the three most important function areas provided to you by TuneUp Utilities. In the event of warnings or recommendations, you can use the appropriate button to immediately address the problem behind the warning or view the recommendations. In the fourth area, you can see whether the TuneUp Rescue Center protection is enabled, so that you can undo any changes at any time.
increasing the performance of your computer. For example, you may receive recommendations for increasing the speed of your Internet, uninstalling programs that haven't been used for a while or upgrading your hardware. However, in order to get the most out of performance recommendations that are personalized to your requirements, you must first answer some questions regarding your usage profile.
7.1.1. 1-Click Maintenance 1-Click Maintenance is particularly suited to those users who would rather set the time for maintenance themselves and wish to monitor its progress. The link for starting 1-Click Maintenance can be found in the status field of the Maintenance category in the Start Center. After maintenance has been performed by 1Click Maintenance, further details on any problems found are also displayed.
choose whether - if it was determined that defragmentation was necessary - a thorough or a quick defragmentation should take place, or whether this should depend on the result of the analysis. Solid-state drives (SSD) are detected by TuneUp Utilities. They are not analyzed or defragmented, as it is not possible to optimize solid-state drives through defragmentation and they could be damaged by defragmentation. 7.1.2.
Defragment hard disks checkbox. 7.2. Increasing Performance In this chapter, you will find out why it is important to do so and how you can use Increase performance to increase the performance of your system, by turning off unnecessary tasks and services. You can improve your system performance by turning off tasks and services that run in the background and that you rarely, if ever, need for your day-to-day work. For tablet PC compatibility (i.e.
Applying Recommendations In the Internet settings and Visual effects tabs you can perform all the optimization recommendations found by clicking Optimize all. Alternatively, you can click on a recommendation in the left column. In the righthand area of the window, a detailed description will appear and you can apply the recommendation by clicking on the button on the bottom right.
How Many Days Should a Program Remain Unused Before We Recommend Removing it? Your computer is checked for programs that have not been used for a long time. These are then displayed with the recommendation that they are removed so that they do not slow down your computer unnecessarily. Based on your user behavior, you specify here after how many days a program that has not been used is considered to be potentially unnecessary and displayed with the recommendation that it is removed.
7.4. System Protection In the following chapters, you will find out how to use the TuneUp Rescue Center module to undo changes that you made with TuneUp Utilities. You can also use TuneUp Rescue Center to perform system recoveries, i.e. to undo changes that you did not make with TuneUp Utilities. System Recovery The TuneUp Rescue Center even lets you undo changes made not by TuneUp Utilities but by other applications.
7.4.2. System Restore Start the TuneUp Rescue Center module by clicking Undo changes button that can be found in the Dashboard category of the Start Center (Rescue Center area) Alternatively, you can start the module by going to All functions in the Start Center and selecting the Undo changes entry under TuneUp Utilities. Click on System Recovery. In the right-hand column, TuneUp Rescue Center shows you a list of all stored backups and also the time at which each entry was changed.
Every TuneUp Utilities module is protected by TuneUp Rescue Center as standard. You can disable this support for individual modules by clearing the relevant checkboxes. Backups Here you can set how long the individual backups of TuneUp Rescue Center should be stored for. The standard setting is for backups to be automatically deleted after two weeks and for a maximum of 60 backups to be stored. Do not restrict the TuneUp Rescue Center protection too much in order to save disk space.
8. Optimize Your computer does not always work quite how you would like it to. Often it seems to take an eternity to call up individual programs or to save files and you start to doubt the performance capabilities of your computer. But in many cases this has nothing to do with the hardware. The problem is caused by the programs that are started, without you being aware of them, or remnants of programs that were not completely removed from your computer during an uninstallation process.
system entries and data to ensure a quicker startup of programs and files. For more information, see Optimizing registry and performance. 8.1. Reducing System Load Disabling Programs The TuneUp Program Deactivator module shows you to what extent the installed programs are loading the system at various times (system startup, operation, shutdown).
computing power, it will be assigned a lower priority so that the programs you are currently using will run more smoothly. This also enables speedy workflows even at high capacity. Configuring Economy Mode The TuneUp Economy Mode from TuneUp Utilities is an intelligent module for saving energy, which can also increase the performance of your computer at the same time. TuneUp Economy Mode provides immediate energy saving whenever you need it.
All installed programs In the All installed programs area, you can see an overview list of all the programs installed on your system together with their load status. In the Name column, the programs are sorted according to their load: high, medium or low. Programs that do not place any load on the system have the status "none" and are not listed by name. The value for the load is always the highest value for startup, operation or shutdown.
Current status In the Current status column to the right, there is further information about the current status of a program. Permanently enabled The program is fully functional and is causing a system load even when you are not using it. Disabled until program startup The program is fully disabled and will not cause any load on the system until you start it again manually. It will be disabled again afterwards.
Required by system The services of the program that run continuously in the background have been turned off. Impactless The program cannot be disabled because it does not have a negative impact on the system load. Status description To the right of the Current status column, the Status description column contains further information about the current status of the program in question.
How to Configure Program Deactivator In the upper right corner of the Start Center you can find the menu bar. By clicking on Settings you open the central setting dialogue of TuneUp Utilities which offers you a list of the most important settings of TuneUp Utilities along with their respective options, sorted by modules. Click on Program Deactivator on the left in order to open the settings for TuneUp Program Deactivator.
Note that disabling startup does not remove the program itself. It only disables the startup and therefore speeds up system startup and the speed of your computer. How to Configure Your System Startup Launch the TuneUp StartUp Manager module by going to the Optimize category in the Start Center and selecting Disable startup programs in the Reduce system load area.
To have the system automatically run additional programs on system startup, simply add them to the list. 1. On the toolbar select the Add button. Alternatively you can right-click to open the context menu and select the Add program entry. 2. From the list, select the program that is to start automatically each time the system is started. If this does not happen, click Browse and select the program you want from the list that opens.
Description If you select a startup program in the list, the database will supply a description of the program to make the decision easier for you. In the case of very unusual programs, TuneUp StartUp Manager might not recognize a program. If so, you can obtain information on this program by searching online via a link. In addition, you can also help ensure that a description of this program appears here in future, by providing TuneUp with information on this program via the Report program link.
Before the program starts, the startup screen may appear for the Rating function for programs. Here you can decide whether to enable this feature and click OK. TuneUp Uninstall Manager shows you a list of all installed programs. In the menu bar, click Organize to sort the table by column or select a filter under View to display only selected programs. This will help you quickly identify what programs you no longer use or which take up the most space.
Live Optimization entry on the right-hand side of the Dashboard category. Alternatively, you can open the module by going to All functions in the Start Center and selecting the Configure Live Optimization entry under TuneUp Utilities. Or click on Settings in the Start Center menu bar and select the Live Optimization area. Here you can select the two optimization methods. Since both of these are intelligent optimizations in real time, they do not always take effect immediately.
For a short period immediately after the program is started (orange) the processing power of the computer is temporarily redistributed, giving the program in question a separate performance boost. This boost is achieved by temporarily prioritizing the program in question. No other programs (green and blue) are affected. How do I know when Live Optimization was enabled? The great thing about Live Optimization is that it works intelligently in the background.
rearranging the individual blocks of data. This significantly increases the speed of system startup and the loading times for documents and programs. TuneUp Drive Defrag gives you the choice of two different defragmentation types: one is particularly thorough, the other is particularly quick. For more information, see Defragmenting the Hard Disk . 8.2.1.
Display problems Click Display problems to display detailed descriptions and exclude any individual problems from the cleanup (see Additional Functions in TuneUp Registry Cleaner Main Menu). Fix Problems Immediately Select Fix problems immediately and click Next to fix all detected problems immediately. Your registry is now free from all unnecessary ballast and your system is more stable.
programs are uninstalled, these entries are often not deleted. File Types Entries in this area of the registry link one or more file extensions (e.g. .txt or . doc) with various information (such as the program that should be used to open them). Such entries can become invalid through the uninstallation of programs, for example. Database Drivers During installation, some programs store entries on database drivers and data sources in the registry.
Windows Firewall The Windows firewall saves the programs that may accept incoming network connections and stores an entry for each one in the registry. These entries can become incorrect or invalid if, for example, one of these programs is uninstalled. It should be clear therefore that deleted files can leave behind a lot of "ghosts" in the registry. TuneUp Registry Cleaner finds all of these orphaned entries and can delete them in a targeted fashion. We therefore recommend that you perform the full scan.
module - with the confidence that you have removed a great deal of junk from your system. Functions for Advanced Users If you are sure that you want to exclude individual areas from cleanup, or want to look at the entries in the registry or even edit them, you will find the following functions useful: Ignore Problems You can remove individual problems from the list so that they are not found by the analysis. For this, perform the following steps: 1. Select a problem from the list of corresponding areas. 2.
keys). In addition, each newly installed program and every newly connected hardware is entered in the registry where it records keys and values. This causes the registry to get bigger and bigger. However, the bigger the registry, the longer the system needs to find certain information requested at any given moment by a program - Windows then becomes slower.
8.2.3. Optimizing System Startup and Shutdown In this chapter, you will find out how to optimize the startup and shutdown of your computer in next to no time. Here you receive recommendations for disabling unnecessary startup programs. These recommendations help to optimize system startup and shutdown. For example, common startup services that are not needed immediately after system startup are simply scheduled to start up at a later time.
For example, if you never use a printer, you can turn off all background programs that are related to print control. Simply specify this here. If you never need to access a company network or domain, you can turn off all related background programs and services. Simply select the applicable answer from the list.
A simple way to speed up your system is therefore to defragment the hard disk. As the conventional defragmentation often takes a long time, TuneUp Drive Defrag offers you two different modes. You either decide for yourself how defragmentation should take place, or allow TuneUp Drive Defrag to make the decision for you.
We recommend this option for you. Once analysis is complete, you decide for each hard disk whether you would like to run a fast or thorough defragmentation. You can also decide here to go without defragmentation. Automatically as recommended TuneUp Drive Defrag makes the decision for you and defragments each hard disk as soon as the analysis is complete using the mode suited to the degree of fragmentation.
If your hard disks still use the FAT file system, you can carry out a very simple conversion. Although conversion is considered very secure, you should mak e a back up of your saved data before attempting this. Click the Windows Start icon to open All Programs, go to Accessories and click Command Prompt. If you enter CONVERT.EXE C:/FS:NTFS in the command line, conversion will start. Replace C: with another drive letter to convert a different partition.
9. Clean Up In the same way as your home can get cluttered, your computer can also get clogged up with unnecessary ballast, which uses up valuable disk space. We recommend that you carry out some spring cleaning from time to time and delete unnecessary files from your system. All modifications to your system will be monitored by TuneUp Rescue Center and can be undone if necessary.
subsequently remove them, thus freeing valuable disk space. For more information, see Finding and Removing Duplicate Files. Finding and Deleting Large Amounts of Data Use the TuneUp Disk Space Explorer module to find large files and folders on your system. You can then archive this data or delete it fully if you are sure you will not need it again in the future. This is a way of freeing up valuable disk space in one go. For more information, see Finding and Deleting Large Amounts of Data.
it. You can also click the Show item(s) button to view the full list of files or backups recommended for removal. 2. Click Cleanup. Cleanup may take several minutes. While the cleanup is taking place, very occasionally it can appear that TuneUp Utilities is not responding. This is for technical reasons and is no cause for concern. As soon as the cleanup is complete, operations will continue normally, and a message indicating that the cleanup was successful will be displayed. You can close this dialog. 9.1.
Program history lists Many programs create history lists, which may log which files you were last working on, for example. These are stored in the registry as references. By deleting or moving the files, these entries become invalid. 9.2. Cleaning up browser As you surf the Internet, your browser saves various kinds of data on your computer.
Form data Data entered in web forms, such as address details, is saved in the browser. Saved passwords Passwords for certain websites can be saved. These passwords should only be deleted by experienced users. Index.dat files Internet Explorer's URL caches are saved in what are known as index.dat files. Please note that these files should only be cleaned up by experienced users. Internet history The addresses of all the websites you have visited are saved in the Internet history.
OpenOffice©, Windows Media Player and Nero©. These lists contain references to the files most recently accessed in the programs. These entries will also be checked here. If some point to files that no longer exist or which have been moved, you can delete them. This means that your system is free from unnecessary ballast; it also means that you no longer have to waste time trying to call up broken links. 9.3.1.
otherwise use. You can of course reactivate it at any time. Windows Messenger Windows Messenger is a program that lets you exchange instant messages with friends. If you do not use Windows Messenger, you can easily remove it from your computer here. Index for Windows Desktop Search Desktop Search is a Windows function that allows you to find files and folders quickly. It creates a search index with entries for each file and folder.
After you select one or more duplicate files, the Remove selected button in the lower-right corner of the dialog becomes active. Click it and confirm that you really want to move selected files into Windows Recycle Bin. The removal process itself usually takes only a few seconds. The list of categories and files will be appropriately updated. Now you can either close the module, or click the arrow button in the upper-left part of the dialog to start searching for duplicates anew. 9.5.2.
Analyzing folders You can save a lot of time by analyzing individual folders. If you want to analyze an individual folder, you must enable Analyze folders. Click Select to open a tree structure of all your folders, from which you can select just one folder by highlighting it and clicking OK. Click Next to start the analysis. The analysis may take a while depending on the size and usage of the selected drives or folders.
Computer With regard to the first table, the Computer view represents an exception. Instead of an overview of the largest files and folders, it will show the occupied space for each drive. Computer (Windows XP: My Computer) With regard to the first table, the Computer (or My Computer) view represents an exception. Instead of an overview of the largest files and folders, it will show the occupied space for each drive.
The top edge of the window displays buttons for Images, Documents, Compressed files, Music files, Video files and Other. Click on one of these buttons or on the respective entry in the overview to display all files of the respective file type. Advanced: Which file extensions are included? Each file type category includes files with many different file extensions. Images, for example, includes the file extensions .bmp, .jpg, .gif, .tif and .png.
the default when deleting files and folders. The standard deletion method Move to Recycle Bin is particularly recommended for beginners, as accidentally deleted files can be restored. However, please note that the Windows Recycle Bin can only hold a limited amount of data. If the storage limit of the Recycle Bin is exceeded or if Windows needs more space, the oldest files in the Recycle Bin will be permanently deleted over time.
When you delete a file, it generally ends up in the Recycle Bin. In Windows, this Recycle Bin is simply a folder that collects files for deletion. Retrieving a file from the Recycle Bin is child's play and therefore many users regularly empty the Recycle Bin or delete their files without sending them to the Recycle Bin, in order to feel that the file has been securely deleted.
deletion, the program detects whether this contains subfolders and you have the opportunity to exclude these from the search. 2. Click Select. A tree structure opens in your folder. Select here a folder to be deleted and click OK. Alternatively, enter into the text field the full path of the folder to be deleted. The Delete allocated free disk space option overwrites the space reserved for the files in the selected folder, thereby increasing deletion security.
Prior to deletion, the files are overwritten with special data patterns multiple times, destroying the original contents so effectively that even expensive examinations of the magnetic structure of the disk in a special laboratory would not allow the data to be recovered. Secure deletion, Gutmann method This method, named after its inventor Peter Gutmann, overwrites the files to be deleted 35 times with random values in a special pattern and then deletes them.
10. Fix Problems Unfortunately, things sometimes don't go quite as you expected when you are working with a computer. With Fix problems, TuneUp Utilities offers you various functions for discovering and rectifying any problems that occur. In addition, the program helps you to recover accidentally deleted files. Under Frequently corrected problems, you will find the troubleshooting functions that you use most often, which can be opened by clicking on them.
For more information, see Check ing the Hard Disk for Errors. Restoring Deleted Files The TuneUp Undelete module allows you to restore files that have already been deleted from the Recycle Bin. You can search for deleted files using various criteria. A particularly exciting feature here is that files can also be restored on external storage media (e.g. a USB flash drive). For more information, see Restoring Deleted Files.
clicking again on Next. The repairs are now carried out. Click Finish to close the module. 10.2. Checking the Hard Disk for Errors In this chapter, you will find out how you can analyze your drives using the TuneUp Disk Doctor module and why it is important to do so. When working with your computer, files are constantly being read and written – regardless of whether you are editing a text document, looking at pictures or simply starting an application.
If no errors have been found, click Finish to exit the module. In some cases it is necessary to restart your computer in order to successfully complete the analysis or repair process. This can happen, for example, when active programs or Windows itself are using the selected drive and thus prevent TuneUp Disk Doctor from having exclusive access. If a system restart is necessary, TuneUp Disk Doctor will show you a corresponding message.
Only thorough analysis Checking file data (NTFS only) All sectors of the disk that currently contain files are checked. This will ensure that no read errors take place when working with files, If sectors are found that require multiple read attempts to successfully read the data, the file data contained will be moved to a sector that is free of errors. The sector is then marked as defective. This prevents future problems.
Restrict your search. You can refine your search through the entry of search terms. This is recommended if you can remember the name of the file or even just part of the name. Search tip: Use the wildcards * and ? When you enter search terms you can use wildcards. These function in exactly the same way as in many standard search engines. The use of wildcards when searching is useful if you cannot remember the precise name of the file or only wish to search for a certain file extension.
important information at this point: you receive a very accurate prediction of whether a file can be restored again in full. Good condition If the condition of a file is likely to be good, the place the file originally took up on the hard disk will not yet have been replaced with another file. It is therefore highly probable that the file can be successfully restored.
The module also offers real-time graphs for processor and memory usage and provides up-to-date information on what your computer is doing at any given time. 10.4.1. How to Manage Running Processes Launch the TuneUp Process Manager module by going to the Fix problems category in the Start Center and selecting Display and close running processes from the Manage processes and show system information area.
There is also a menu bar and a toolbar. Some of the functions here adjust the content of the active tab. These are described in the sections above. The general functions of the File, Tools and Help menus are always displayed. General menu bar functions Menu "File" In the File menu, you can use the New application entry to call up the well-known Windows Run dialog to start a new application or open a file. Click Exit Windows to shut down or restart the computer so that new settings can take effect.
Overview The overview displays summarized information on the most important components of your computer. This quickly shows you what processor is installed, the system RAM, the graphic card performance, the mouse in use, and any available information regarding the disk drives. Windows Here you can find out what version of Windows and of Internet Explorer you are using and when you last booted your computer.
11. Personalize Using the Personalize category, you can specifically configure how your Windows should look and function, thereby personalizing your computer. Under Frequently used settings, you will find the elements and areas of Windows that you often personalize and you can open these with a simple click. All modifications to your system will be monitored by TuneUp Rescue Center and can be undone if necessary.
11.1. Personalizing Options and Behaviors Start the TuneUp System Control module by going to the Personalize category in the Start Center and clicking on the Personalize options and behaviors entry in the Modify Windows settings area. Alternatively, you can start the module by going to All functions in the Start Center and selecting the Modify Windows settings entry under Windows.
Wizards Here you will find the Copy Settings wizard. It copies your settings to other user accounts and to the Windows logon screen: Wizards 11.1.1. Display Animations and Effects Effects Here you can change settings that relate to the display and operation of the Windows user interface. Under Settings, there are numerous options that you can enable or disable using the checkboxes. To learn more about an option, simply select it with your mouse. Several lines of explanatory text open under Description.
adjustment of ClearType smoothing to your screen. File Types Menu Operations Under Drives and folders, you can configure their context menus. The Show "Open Command Prompt Here" entry opens the command prompt at the desired location. You can execute DOS commands via the command prompt. Under Files and folders you can specify what commands are to be shown in the context menus of files and folders. Here, the four commands Send To, Move To Folder, Copy To Folder and Encrypt/ Decrypt can be displayed.
Under Window, you specify (in Windows XP) whether the tree view of directories in a folder window is always to be visible, whether the folder window last opened on logon is to be restored, whether compressed ZIP files are to be displayed as folders, and whether a details bar is to be displayed. (in Windows 7) whether the menu bar in a folder window should always be visible, whether compressed ZIP files should be displayed as folders and whether a details bar should be shown.
Advanced Here you can set what elements are to be displayed on the Desktop and under Computer (or My Computer in Windows XP). You can easily hide entire drives and specify how the address bar in Explorer, Internet Explorer and the Run dialog should behave. 11.1.2. Usage Input Options Mouse Functions Under Swap mouse buttons you can swap the left and right mouse button. You would then click with the right-hand button and open the context menu with the left-hand button.
Under Flashing cursor, you can set how the cursor flashes at the point at which data is to be input (e. g. in a word processing program). Tip: Look in the small preview to the right of your current settings and the changes made. Use the slide control to specify the frequency of flashing. If desired, you can also set the cursor width to your liking and enter a value in pixels. Modern keyboards are made with a special Windows key with the Windows logo printed on it.
Windows Vista: Under Power off button you can set what action is to be carried out when you click on the Power off button. By default, the computer is put into Power save mode. If you would prefer to shut down your computer quickly (or you are missing this function entirely in Windows Vista), you are advised to select Shut down computer. This saves you from having to open the submenu and selecting Shut down there. The third option is to put your PC into hibernate mode.
should be retained, the option Enable flashing taskbar buttons must be turned on. Under Flashing speed you specify how rapidly the button on the taskbar should flash. You have two options to choose from: The first one lets a window button in the taskbar flash until it is clicked again. The second option restricts flashing to a certain number specified by you. The default setting is 7.
Under Quality of Service (QoS) service, you can prevent Windows from reserving part of your Internet connection bandwidth for important packets. Disable Reserve bandwidth if you always want to have your full bandwidth for surfing. Passwords (Windows XP only) Saving your passwords means that you don't have to enter your password every time you dial into the Internet, access protected shares, etc. However, hackers may be able to access and misuse these passwords.
exe). Navigation In the Website behavior section, you can specify how Internet Explorer should react when links are called up. For example, you could specify that pop-ups or links opened in other programs are always opened in a new tab in the current window. In the Start pages section, specify which websites should automatically open when Internet Explorer is launched. Several sites can be selected for this. Use the Up and Down buttons to change the order of the pages.
For Mozilla Firefox 2 and more recent versions, you can also specify whether the Load address button should appear beside the address bar. Under Open submenus you can specify how long before a submenu automatically opens when you hover over it with the cursor. Windows This is where you can specify how popup windows and links should be displayed in Mozilla Firefox and how much influence websites can have on the display of the popup window.
If the icon file you select is valid, the icon is displayed immediately. If the icon file you select is invalid, the standard Opera icon is reinstated. Operation This is where you can make changes regarding the usage of Opera. Under Autocomplete for web addresses you can specify that addresses will be automatically completed in the address bar, i.e. Internet addresses appear automatically in the address bar after you have entered the first few letters of the address.
E-Mail and Chat Outlook Express (Windows XP only) You can change the font here which is displayed in the application title bar. You can also decide whether the application should show a splash screen when starting up. Here you can also configure the security function that blocks executable e-mail attachments. If you do not wish to have such attachments blocked, you can disable this function. But please note that such attachments may also contain malware such as viruses that are run when you click them.
Cover Tracks Here you can configure settings to cover your tracks when working with documents and surfing the Internet. Under Delete history lists you can click Delete now to clear the list of recently opened files in the Start menu. Under Clear Internet Explorer cache enable the Clear Internet Explorer cache when closing option if the web browser should clear its cache as soon as it closes.
11.1.4. Administration User Logon General Windows XP: Here you can choose between the Welcome screen and the logon prompt. The default setting in Windows XP is the Welcome screen. This shows a list of all available user names, which can be selected with a mouse click. Alternatively, you can select the option Use the old logon dialog. This brings up the secure logon prompt, where you are required to enter your logon details manually.
Drives General (Windows XP only) Here you make certain settings concerning your hard drives. For example you can enable UDMA66 support, which can speed up access to your drives. Under NTFS file system, you can set two options that relate to the new Windows NTFS file system: Save the date of the last access to a file and Save short (DOS) file names.
Here you can set whether the computer should reserve more RAM for the programs or for the system cache. Advanced Clicking on the corresponding buttons here, takes you to the TuneUp StartUp Manager and TuneUp Process Manager modules, which you can use to configure the system startup and manage running programs. Startup and Maintenance System startup Here you can make general settings about how Windows should proceed when starting up the system.
Here you can specify how the system should behave in the event of errors. Under Audible signals, you can enable the Play acoustic signal when errors occur option to specify that the system should make a sound if there is an error message or incorrect entry. Under System errors, you can select from the dropdown list what should happen if the system has been stopped due to a critical system error. You can also specify that the event should be entered in the system log.
Special Folders Here you specify the physical paths to which special folders such as "My Documents" should link. Highlight a predefined path and click on Edit to change it to your requirements. Command prompt You can configure the appearance and behavior of the command prompt here. Under Completion, you can specify which key combinations are to be used to complete file and folder names.
Under Screensaver password prompt, you can specify how long the screensaver has to be running before the password protection is activated (if this option is enabled). The default value is 5 seconds. 11.1.5. Wizards In this category you will find the Copy settings wizard. It copies your settings to other user accounts and to the Windows logon screen.
6. System Elements 7. Managing Icon Packages 8. File System 9. Appearance of Icons 10. Repair 11. Visual Style 11.2.1. How to Change the Appearance of Windows Start the TuneUp Styler module by going to the Personalize category in the Start Center and clicking on the Personalize the appearance of Windows entry in the Change Windows appearance area. Alternatively, you can start the module by going to All functions in the Start Center and selecting the Change Windows appearance entry under Windows.
can improve the appearance of the startup process exactly how you want. Click on a boot screen. This is automatically opened with TuneUp Styler and added to the list. Adding Boot Screens from a File In the top left, click Add under Boot screens. Select Load boot screen from a file . An Explorer window opens and you can select any given file on your computer. The following formats are supported: Type File extensions Description .TBS The individual format of TuneUp Styler. Stardock Bootskin .
for a boot screen (640 x 480 pixels). Under Background, you can specify the color to be used for areas not covered by your image. For technical reasons, this includes the background of the progress bar. You can also set position, foreground color and edge color to suit your individual taste. Position the progress bar at a location that does not interfere with the overall picture. Save the new boot screen to the TuneUp Styler list under a name of your choosing. You can also enter the name of an author.
startup logo without making risky interventions in the system. This is how it works: Start the TuneUp Styler module by going to the Personalize category in the Start Center and clicking on the Personalize the appearance of Windows entry in the Change Windows appearance area. On the navigation bar, click in the left-hand window area on Startup logo. TuneUp Styler lists all available startup logos. You can now add additional predesigned startup logos or create your own startup logo.
You can also enter the name of an author. The startup logo you added now appears in the list. Restoring the default If you no longer want to use your new startup logo, you can of course restore the Windows default at any time. Click on the Use default. The default startup logo is then automatically selected from the list and a preview opens. Click Apply to apply it. To preview the startup logo you want, select it in the list. You can even animate the preview by clicking on the Play button. Click Apply.
Adding Logon Screens from a File Click Add in the top left under Logon screens. Select the entry Load logon screen from a file . An Explorer window opens and you can select a file on your computer. However, only files in TuneUp Styler format (with the .TLS extension) are supported. In addition, all available logon screens can be directly installed with the file Logonui.exe or in Stardock LogonStudio format (LOGONXP).
Select the desired logon screen from the list to preview it. Click Apply. Most welcome screens are in English, but not all. For this reason, your system may greet you in a different language the next time you start your computer after installing a new screen. Then, instead of "Click your user name to log on," the screen might read "Klick en Sie auf Ihren Benutzernamen, um sich anzumelden," for example.
At the bottom right of the window, click Accept to carry out the change. How to undo changes You can discard any changes not yet accepted for an element by selecting them in the list and clicking on Discard unsaved changes made to this element. Any changes already made to an element can be undone by selecting the element and clicking Reset element to Windows default. Please note that this link is only displayed if the element does not currently correspond to the Windows default.
address and website address. Package name and description: Enter a meaningful package name here. If you wish, you can add additional information on the package in the Description field. Optimize package size: Use the options in this step to ensure that your package is not too large, so that it can be sent via e-mail without problems. Creating icon package: The icons are now collected and optimized if necessary, after which they are saved together in an icon package.
Select an icon. Click OK to apply your changes immediately. Undoing Individual Changes To undo a change, select an item in the list and click Reset element to Windows default. Undoing Multiple changes If you want to undo several changes at once, you may find the Restore backup from a previous session link useful. It starts TuneUp Rescue Center and enables you to undo the changes carried out with TuneUp Styler on a certain date. 11.2.9.
an error occur with this file, all icons could be corrupted. Luckily, this error can be repaired directly from TuneUp Styler. Note that you may need to restart your computer or log on again for this repair to tak e effect. 11.2.11. Visual Style Here you can change what is known as the visual style. This defines the appearance of windows and Windows buttons.
Microsoft Visual Styles .MSSTYLES This Microsoft format often includes additional files that can be found in the same folder or in subfolders. Compressed archives .RAR, .ZIP Archives are searched for all file types in this list, and decompressed automatically if such files are found. Self-extracting archives .EXE These files are searched for compressed archives in RAR or ZIP format, which are treated according to the description of the Compressed Archive file type.
12. All Functions On the far right of the Start Center, you will see the All functions menu. Opening this menu gives you a list of all functions that TuneUp Utilities offers - clearly sorted according to application area. Clicking on the wrench icon next to an entry opens the settings for that entry, which you can adapt to your personal requirements. You will find most of these functions in this view and in one of the five categories.
Shows all the programs installed on your PC with detailed information about them, and allows you to select programs to uninstall. See also How to Uninstall Programs. Hard Disk Defragment Rearranges blocks of data on your hard disk, providing more disk space and quicker loading times for documents and programs. See also How to Defragment Your Hard Disk. Check for errors Checks the surface of your hard disk and your file system structure for errors and fixes them to prevent data loss.
can be safely removed from the hard disk without any negative impact on your system. See also How to Clean Up Windows and Programs. Clean up browser Cleans up the cache, cookies and Internet history of your browser, reliably removing traces of your surfing activities. See also How to Clean Your Browser. Remove broken shortcuts Searches your system for shortcuts and references that are no longer valid and deletes them. This prevents error messages when these references are called up.
Puts all tuning services and features at your disposal, without restriction. See also Standard Mode. Turn on Turbo Mode Allows you to temporarily turn off unnecessary background programs or maintenance processes to give your computer a performance boost. See also Turbo Mode. Start 1-Click Maintenance Checks your system for optimization options and then allows you to implement these optimizations directly. See also 1-Click Maintenance.
See also Optimizing the System. Windows Fix common problems Shows you a list of common Windows problems and allows you to easily remedy your problems. See also How to Fix Common Problems. Modify Windows settings Allows you to modify visual effects, browser options, the desktop, the user logon and much more to your personal requirements. See also Personalizing Options and Behaviors. Modify Windows appearance Allows you to change the Windows user interface to your personal wishes and requirements.
Allows you to customize TuneUp Utilities to suit your needs, apply maintenance settings, and configure Live Optimization, Turbo Mode and the updates check for TuneUp Utilities. Configure Live Optimization Allows you to activate two optimization measures for increasing the response rate and system startup speed. See also Configuring Live Optimization. 12.1. Editing the Registry In this chapter, you will find out how you can edit the registry using the TuneUp Registry Editor module.
TuneUp Registry Editor offers you comprehensive search options here. Showing a bookmark and setting a bookmark Select Set bookmark from the context menu of a folder in the tree structure so that you can find individual folders more quickly in the future. Additional functions In the menu bar, you will find numerous additional functions for editing your registry. For example you can export or print individual areas or indeed the entire registry.
You receive a list of the available updates with a short description of the new or modified functions. Click Next to install the updates. If No Updates Exist If there are no updates, your TuneUp Utilities is already up to date and you can close the wizard by clicking Finish. 12.3.
13. Rating Function for Programs You can turn on the useful Rating function for programs in the TuneUp Program Deactivator, TuneUp StartUp Manager and TuneUp Uninstall Manager modules. It shows you how useful other users of TuneUp Utilities found the programs that you have installed. You can use the rating function to help you decide which programs you really need in your day-to-day work. In this chapter, you can find out why it is helpful and how you can turn on the Rating function for programs.
2. Click on the number of stars that you wish to award the program. So, if you wish to give three stars, click on the third star. 3. Your rating is automatically saved and transferred to the TuneUp Utilities server. If you wish to change your rating, you can proceed in exactly the same way as for the initial rating. T uneU p U tilities 2 0 1 4 © 2 0 1 3 C opyright A V G T ec hnologies C Z, s .r.o. A ll rights res erved.
14. The TuneUp Utilities Gadget Another function of TuneUp Utilities is the gadget. This is not supported by Windows XP and is therefore only available to you with Windows Vista and Windows 7. The practical gadget can be displayed on the desktop. It keeps you constantly informed of the status of your computer. You no longer need to start TuneUp Utilities to find out whether optimization potential has been identified in the Dashboard category. TuneUp Utilities can also be launched from here.
In Windows 7, proceed as follows: 1. Right-click on a free space on the desktop and select Gadget from the context menu. 2. Select TuneUp Utilities Gadget and enable it with a double-click. T uneU p U tilities 2 0 1 4 © 2 0 1 3 C opyright A V G T ec hnologies C Z, s .r.o. A ll rights res erved.
15. TuneUp Utilities in Taskbar Notification Area The notification area is the area on the right-hand side of the Windows taskbar. This displays, for example, the time, status icons or program shortcuts. TuneUp Utilities has a notification area icon that shows you the current status of your system and provides an entry point to TuneUp Utilities. When you double-click on the notification area icon, TuneUp Utilities starts up.
settings in the context menu that appears. This takes you to the configuration dialog, where you can configure your settings. In addition to the icon, you can choose to have messages displayed in the form of balloons. If the icon is not displayed on your computer, call up this dialog by going to the Settings menu in the TuneUp Utilities Start Center and selecting the Notification area icon entry. T uneU p U tilities 2 0 1 4 © 2 0 1 3 C opyright A V G T ec hnologies C Z, s .r.o. A ll rights res erved.