R60 OWN E R'S M AN UAL P. 2-9 BE TRIE BS AN L E ITUN G S. 10-18 M OD E D 'E M PL OI P. 19-27 H AN D L E ID IN G P. 28-36 M AN UAL E D 'US O P. 37-45 M AN UAL D E L US UARIO P. 46-54 BRUKS AN V IS N IN G S. 55-62 KÄY TTÖOH JE S. 63-71 w ww.t un tu ri. co m S E RI AL NUMBE R S E RI E NNUMME R NUME RO DE S E RI E S E RI E NUMME R NUME RO DI S E RI E NÚME RO DE S E RI E S E RI E NNUMME R S ARJ ANUME RO R60.indd 1 5.10.
CONTENTS ASSEMBLY ................................................................ 3 EXERCISING ............................................................. 3 USE ............................................................................ 4 CONSOLE .................................................................. 6 TRANSPORT AND STORAGE .................................. 8 MAINTENANCE ......................................................... 9 MALFUNCTIONS ................................................
OWNER'S MANUAL • R60 GB the purchase. Registering will extend the warranty in home use. Further information on warranty terms can be found in the warranty booklet included with the product. Please note that the warranty does not cover damage due to shipping or negligence of adjustment or maintenance instructions described in this manual. • The equipment must not be used by persons weighing over 135 kg. • Do not attempt any servicing or adjustments other than those described in this guide.
cross bar and attach the loop to the hook. Do not climb on the rowing machine when it is in storage position! EXERCISING Aerobic exercise should above all be pleasant. You should perspire, but you should not get out of breath during the workout. You should exercise at least three times a week, 30 minutes at a time, to reach a basic fitness level. Maintaining this level requires a few exercise sessions each week.
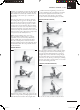
OWNER'S MANUAL • R60 and belt over a light shirt, moisten the shirt slightly at the points where the electrodes touch the shirt. The transmitter automatically transmits the heart rate reading to the console up to a distance of about 1 m. yourself backwards straightening your back and your legs simultaneously. Continue the movement until you lean slightly backwards and flex your armsat the same time. Return to the starting position, lean forward and straighten your arms.
frame and grasp hold of the bar. Straighten your arms and pull the bar over your head. CHEST MUSCLES IMPORTANT! Always make sure that the pull wire is not kinked. NOTE! Make sure the wire hook does not fray the wire! CONSOLE KEYS 1. SET Selection of the goal values. The same button is also on the remote control of the pull bar. 2. RESET. Zeroing the exercising values, ending the exercise and return into main display 3. “+ / -“ Setting the goal values.
OWNER'S MANUAL 00.0 – 99.99 km / miles 5. Speed (timer for a 500m distance, kmh/mph) time 0-9.59/500m, 00.0-99.9 kmh / mph 6. Energy consumption (Kcal Estimated total energy consumption during the exercise, 0 –9999 kcal 7. Clock (Clock) Real time clock 8. Thermometer (Temp C / Temp F) Measures the room temperature either in Celsius or Fahrenheit 9. Hygrometer (Humidity %) Measures the room humidity, 0-100%. 10.
training within this time, simply press the START/ STOP key again to continue. 8. You can stop exercising by pressing RESET when the console is in the pause mode. 9. If you have set a goal value, the console gives a signal and the displayed value starts blinking after the goal has been reached. Reset the display by first pressing START/STOP and thereafter RESET.
OWNER'S MANUAL machine and lift the device to an upright position so that it is supported by the front end support legs. Store the rowing machine in the storage position against a wall in such a way that the front frame cannot fall on anyone by accident. • R60 GB (3V lithium cell CR2032). Open the cover of the battery box on the back of the pull bar by removing the attachment screw. Replace the battery; make sure you place it in the right direction inside the holder. Replace the cover.
MODE D'EMPLOI TABLE DES MATIERES ASSEMBLAGE ......................................................... 20 EXERCICE ............................................................... 21 UTILISATION............................................................ 21 UNITE DES COMPTEURS ...................................... 23 MAINTENANCE ...................................................... 26 TRANSPORT ET RANGEMENT .............................. 26 CARACTERISTIQUES TECHNIQUES ...................
• N’effectuez jamais d ’autres opérations de réglage et d ’entretien que celles mentionnées dans ce guide et suivez bien les conseils d’entretien qui y sont donnés. que soit votre objectif, nous sommes persuadés que cet appareil est celui qui vous y conduira. Adressez-vous à WWW.TUNTURI.COM pour plus d'informations. ASSEMBLAGE • L’appareil ne doit pas être utlisé par des personnes pesant plus de 135 kg. • Cet appareil peut être utilisé à la maison.
MODE D'EMPLOI TRANSFORMATEUR Branchez la borne du transformateur dans la fiche située dans le cadre de support. Branchez le câble d’alimentation du transformateur dans une prise de courant. Débrnachez toujours le câble d’alimentation de la prise et de l’appareil à la fin de l’exercice. Assurez-vous que le cordon ne passe pas pardessous l’appareil. ATTENTION! L’appareil est livré avec un anneau et un crochet à l’aide desquels le rameur peut être solidement bloqué en position de rangement.
UTILISATION REGLAGE DE LA RESISTANCE Vous pouvez régler la résistance pendant l’exercice à l’aide des touches + / -. Pour augmenter la résistance, appuyez sur la touche +; pour la diminuer, appuyez sur la touche -. génèrent de l’électricité statique, ce qui peut entraîner un manque de fiabilité de la mesure du rythme cardiaque.
MODE D'EMPLOI • R60 FLECHISSEURS DES BRAS MUSCLES PECTORAUX Prendre la barre par en-dessous, allonger les jambes, les pieds dans les courroies et tendre complètement les bras. Plier les bras. Il est également possible de travailler le biceps en effectuant le mouvement normal de canotage, mais avec prise de la barre par en-dessous. Vous pouvez également développer vos biceps en vous levant devant l’appareil et en faisant des exercices de flexion avec un bâton à chaque supination ou pronation.
UNITE DES COMPTEURS TOUCHES 1. SET (RÉGLAGE) Sélection des valeurs souhaitées. Cette touche se trouve également sur la télécommande de la barre d’exercice. 2. RESET (MISE À ZÉRO) Mise à zéro des valeurs d'entraînement, fin de l'exercice et retour en mode prêt au démarrage 3. + / Réglage des valeurs souhaitées. Ces touches se trouvent également sur la télécommande de la barre d’exercice. 4. RECOVERY (RÉCUPÉRATION) Mesure du rythme cardiaque de récupération 5.
MODE D'EMPLOI touche + ou - jusqu’à ce que le texte Manual s’inscrive sous l’écran de chiffres principal. 3. Appuyer sur la touche SET, ce qui vous permet d’accéder aux réglages des valeurs que vous pouvez déterminer. 4. TIME = régler la durée souhaitée de votre exercice avec les touches +/-. La touche SET vous permet de passer au réglage suivant. 5. DISTANCE = régler la distance souhaitée de votre exercice avec les touches +/-. La touche SET vous permet de passer au réglage suivant. 6.
appuyant sur la touche START/STOP (le compteur affiche le texte Over). Les informations du programme sont conservées durant 5 minutes dans la mémoire du compteur, vous pouvez donc continuer votre exercice en appuyant de nouveau sur START/STOP. Vous pouvez arrêter votre exercice en appuyant sur la touche RESET lorsque le compteur est en mode pause. Si vous effectuez le profil complet, le compteur émet un signal sonore et la valeur de l’écran se met à clignoter une fois l’objectif atteint.
MODE D'EMPLOI • R60 F d'achat, le modèle et le numéro de série. Vous trouverez la liste des pièces détachées à la fin de ce mode d'emploi. Seules des pièces mentionnées dans la liste des pièces de rechange peuvent être utilisées dans l'appareil. CARACTERISTIQUES TECHNIQUES Baissez précautionneusement le cadre de support entre les barres et bloquez-le au moyen de l’attache située sur la pièce de support du siège. Veillez à bien bloquer le cadre de support. 4.
R60 • OWNER'S MANUAL 1 2 3 4 5 6 7 9 10 11 12 13 14 15 16 17 18 19 20 21 22 23 24 25 26 27 28 29 30 31 32 33 34 35 36 37 - 233 2017 4232030 693 2005 KA 35x12 WN-1411 173 2028 M5x12 DIN 7985 363 2007 363 2008 533 2028 453 2001 173 2030 M10x65 DIN 912 M10 DIN 125 M10 DIN 934 643 2010 M5x14 DIN 7500 103 2029 533 2030 523 2024 523 2022 M8x20 ISO 7380 173 2027 M5x12 DIN 7985 M6x16 DIN 912 443 2011 213 2010 213 2003 173 2031 523 2025 693 2002 M6x40 DIN 933 M6 DIN 6796 503 2018 M6x35 DIN 912 443 2012 153 2012 7
OWNER'S MANUAL • R60 GB 73 R60.indd 73 5.10.
R60.indd 74 5.10.
R60.indd 75 5.10.
www. tu ntu ri. c o m TUNTURI OY LTD P.O.BOX 750, FIN-20361 Turku, Finland Tel. +358 (0)2 513 31 Fax +358 (0)2 513 3323 www.tunturi.com 583 2011 A R60.indd 76 5.10.