
Owner's manual


Part #24941 2 10/91,7/99,4/02,3/03,12/06,3/14
Installation Instructions
FIRST, READ INSTRUCTIONS CAREFULLY, THEN PROCEED TO INSTALL VALVE BODY BY FOLLOWING EACH
STEP INDIVIDUALLY.
Valve Body 1
- 24941 Valve Body
Kit Includes: 1 - 24047 Pressure Regulator Spring
1 - 24112 Valve Body Plate
1 - 24148C Pan Gasket
2 - 24157 Valve Body Gaskets
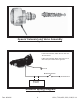
1 - 24158 Solenoid O-Ring
1 - 24280A Solenoid (Two Wire)
1 - 24282 Special Solenoid Valve
1 - 24284 Special Solenoid Valve Spring
1 - 24285 Rear Servo Spring
16 - 24286 Direct Clutch Springs
1 - 24287 Special Manual Valve
2 - 00781A Terminals (Female)
2 - 00782A Terminals (Male)
2 - 50093 Contingency Decals
STEP #1: Remove transmission from vehicle.
STEP #2: Remove oil pan.
STEP #3: Remove transmission filter. If 1968-Up newer model, remove retaining bolt, hold pipe that filter is
connected to and then pull filter off.
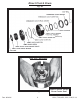
STEP #4: Before loosening valve body, note how the gear selector lever connects to the manual control valve in
the valve body. Fig. #1
STEP #5: Remove bolts from valve body and then carefully remove governor tubes and valve body together.
AVOID bending governor tubes. If 1970 or newer model, disconnect white wire from the valve body.
Also, be sure the manual control valve doesn’t slide out.
STEP #6: Remove the two bolts holding the downshift solenoid and valve body spacer plate. Make sure you
support the spacer plate with your hand. Lower the plate with steel balls carefully. If unit has manual
valve body, this solenoid may already be removed.
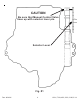
STEP #7: Remove intermediate front servo piston, washer, pin, retainer and spring from transmission case. See
Fig. #2 for location of your servo parts. They will no longer be used.
NOTE: Suggest using a factory manual with the following steps:
STEP #8: Remove front pump assembly.
STEP #9: Remove forward clutch assembly.
STEP #10: Remove direct clutch drum assembly.
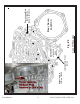
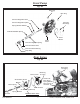
STEP #11: Remove direct clutch drum piston (Fig. #3).
STEP #12: Drill 0.093 (3/32) hole in direct drum as shown (Fig. #4). Be sure to keep hole below area that the
piston lip seal rides on.
STEP #13: Remove direct clutch drum center seal (Fig. #4). Do not remove seals from the direct clutch piston!