
Owner's manual


Part #24941 3 10/91,7/99,4/02,3/03,12/06,3/14
STEP #14: Reinstall piston with 16 new springs and set clearance to 0.060 - 0.070.
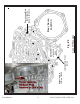
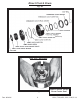
STEP #15: Be sure to install a special intermediate sprag with 34 cams Turbo Action #24109. This will prevent
loss of second gear. Fig. #3. (Requires sprag type drum 1965-70).
STEP #16: Suggest using Turbo Action #24038 teflon sealing rings on center support and front pump.
STEP #17: Before reinstalling direct drum, remove front intermediate band.
STEP #18: Reinstall forward clutch drum assembly.
STEP #19: Install #24047 pressure regulator spring and one horseshoe spacer into front pump (Fig. #5).
CAUTION: When removing snap ring on pump, be careful as it is under tremendous pressure.
STEP #20: Reinstall pump assembly.
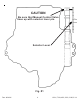
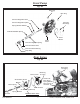
STEP #21: If unit had a Turbo Action Manual Valve Body or other brand aftermarket kit before, be sure to check
Fig. #2 and remove any plugs, etc. from hole shown.
STEP #22: Remove rear servo. Discard inner accumulator piston rings and also old large return spring. Fig #6.
Caution: Some late cores have a reducer plug in case and must be removed (Fig. 2).
STEP #23: Reinstall rear servo with new Rear Servo Spring #24285.
STEP #24: Remove modulator and modulator valve.
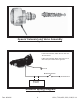
STEP #25: Install Solenoid Valve Spring #24284 and special Solenoid Valve #24282 (Fig. #7).
STEP #26: Install Solenoid #24280A.
STEP #27: Install special Valve Body #24941, Plate #24112 and Gaskets #24157. NOTE: You must use the special
Manual Valve #24287 that is supplied with this valve body. Be sure all bolts are started before
tightening and also be sure manual valve is connected to selector lever (Fig. #1). No balls used with
this valve body. Torque bolts 8-10 ft/lbs.
STEP #28: Install oil filter being sure of good fit. CAUTION: If filter is not properly installed, a loss of oil pressure
will occur. Recommend using our filter #24006 (1965-67) models and #24011 (1968-Up) models. If
1968 or newer models, reinstall retaining bolt.
STEP #29: Replace old pan gasket with new one #24148C and bolt up oil pan.
STEP #30: Remove four bolts from governor cover, which is located to the rear of the transmission on the
passenger side.
STEP #31: Remove governor assembly by pulling out slowly.
STEP #32: Replace governor cover and bolts, leaving the governor assembly out of transmission.
STEP #33: This valve body, #24941 has no automatic features. The transmission must be shifted manually. The
valve body shift pattern is “PRN123.” No engine braking in 1st or 2nd gear.
STEP #34: Hook up trans brake wiring same as (Fig. #8). NOTE: A Turbo Action #00774 switch with stretch cord
for steering wheel mount is ideal.
STEP #35: Refill transmission with a good brand of Dexron Mercon or Type “F” transmission fluid. Warm
transmission up and select all gears with foot on brake. If you do not do this, you will not feel the shifts
if on the jackstands. Place gear selector in park. Then check to make sure transmission level is on
the add mark. Take vehicle out and shift through the gears at no more than 4000 RPM, at least two (2)
times. Then recheck oil level. Add oil if necessary to bring to the full mark. DO NOT OVERFILL!