For service contact: German Knife Inc. 1-800-500-3519 www.turboairinc.com OWNER & OPERATOR INSTRUCTION MANUAL Model No. GS-10LD GS-12LD IMPORTANT SAFETY NOTICE To ensure safe and trouble free performance of you new German knife slicer, we suggest that all personnel who will use and maintain the slicer read and understand the manual before operating the equipment. Should there be any questions or if we can be of further assistance, please call us toll free at (800) 500-3519. www.turboairinc.
TABLE OF CONTENTS PAGE Attention-Warning-Caution 3 Components of the Slicer 4 GS Series Slicer Safety Tips 5 Installation 6 Operation 7 Cleaning 8 - 10 Knife Sharpening 11 - 12 Belt Changing 13 Simple Maintenance 14 - 15 Troubleshooting Guide 15 Warranty Information 16 German Knife Industries 4184 E. Conant St., Long Beach, CA 90808 Phone : 800-500-3519 Fax : 310-900-1066 www.turboairinc.
ATTENTION OWNERS AND OPERATORS German Knife’s equipment is designed to provide safe and productive processing of food products as long as the equipment is used in accordance with the instructions in this manual and is properly maintained. Unless the operator is adequately trained and supervised, there is a possibility of SERIOUS INJURY.
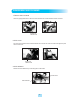
KEY COMPONENT OF GERMAN KNIFE SLICER Sharpener Knife Cover End Weight Food Chute Slice Deflector Food Chute Handle Knife Cover Release Knob Food Chute Release Knob Power Cord Receiving Area On/Off Switch Slice Thickness Dial Feet GS-12LD Slicer Sharpener Knife Cover End Weight Food Chute Handle Food Chute Board Suppor Knob Slice Deflector Food Chute Release Knob Knife Cover Release Knob Slice Thickness Dial Power Cord Receiving Area Feet GS-10LD Slicer 4 On/Off Switch
GS SERIES SLICER SAFETY TIPS SHARP KNIFE TO AVOID SERIOUS PERSONAL INJURY • NEVER touch this machine without training and authorization from your supervisor. You must be at least 18 years old. Read owner and operator manual first. • ONLY install on level non-skid surface in clean ; well-lighted work area away from children / visitors. • ALWAYS ground slicer utilizing proper power source. • NEVER TOUCH KNIFE. Keep hands and arms away from all moving parts.
INSTALLATION UNPACKING Immediately after unpacking the slicer, check for possible shipping damage. If the slicer is found to be damaged, save the packaging material and contact the carrier within 15 days of delivery. Prior to installing the slicer, test the electrical service to assure it agree with specifications on the machine data plate. The data plate is located on the right side of the slicer base. UNPACKING This machine is provided with a three-prong grounding plug.
OPERATION SHARP KNIFE TO AVOID SERIOUS PERSONAL INJURY Safety devices incorporated in this slicer must be in their correct operating position anytime the slicer is in use. • With the slicer turned off, pull the food chute completely toward you and place the food product on the food chute. Slice only boneless, unfrozen product with the slicer. Use the end weight to hold the food product in place. • Make sure all knob are tightened prior to using the slicer.
CLEANING This machine must be thoroughly cleaned and sanitized after each days operation or after being idle for an extended period of time. This machine components are easily disassembled without the use of special tools. SHARP KNIFE TO AVOID SERIOUS PERSONAL INJURY • The slicer knife is very sharp. Exercise extreme caution when working near the knife. • Unplug machine power cord and turn the thickness dial fully clockwise before cleaning.
DISASSEMBLE AND CLEANING 1. Remove the food chute Close the gauge plate and turn the food chute release knob counterclockwise until it comes off. Food chute release knob 2. Knife cover Turn knife cover release knob counterclockwise until it comes off. Push the knob inside again to push out the knife cover. Knife cover release knob 3. Knife deflector Remove the knife deflector by unscrewing the 2 small knobs. 2 small knobs.
DISASSEMBLE AND CLEANING 4. Knife cleaning Wash and rinse both side of knife by wiping outward from the center carefully. Never clean any part of the slicer with steel pads. Do not exceed chemical manufacturer’s recommended concentrations for detergent of sanitizer. Solution with concentrations greater than 200 ppm will accelerate corrosion of metals. 5. Reassemble the knife cover and deflector Carefully reassemble the knife cover over the blade.
KNIFE SHARPENING • Sharpen the knife when necessary, too frequent sharpening results in unnecessary knife wear. But in high volume applications where it is a practice to sharpen the knife frequently or even daily, the knife will be expended in a shorter time. • Never touch rotating knife. • Always keep hands clear of all moving parts. 1. Turn the slicer off and unplug power cord. 2. Turn the slice thickness dial fully clockwise to close the gauge plate. 3.
KNIFE SHARPENING 6. Plug in the slicer power cord and turn on the slicer. 7. Push the button on the back of sharpener for 5 seconds to sharpen back side of knife and then release. IF necessary, repeat sharpening for another 5 seconds. 8. Push the button on the front of sharpener for 0.5-1 seconds to remove the tough burr which developed on the front knife. 9. Turn off and unplug the slicer before inspecting. 10.
BELT CHANGING • After a long time using, belt should be changed to keep the machine in good condition. 1. Take out the knife cover as forenamed. 2. please screws to take out the blade. 3. Release screws to take out the board. 4. Release screws to take out the motor. 5. Take out the belt from the belt wheel and change a new one. Put everything back and machines can be used again.
SIMPLE MAINTENANCE LUBRICATION Various slicer parts need to be lubricated periodically using German Knife oil (supplied). Do not use vegetable oil to lubricate. Vegetable oil will damage this slicer. FOOD CHUTE SLIDE ROD (WEEKLY) 1. Put 4-5 drops directly on the slide rod weekly (depends on usage). 2. When excessive drag is felt, put 4-5 drops directly on the slide rod. 3. After dropping the oil, push the food chute forth and back several times to distribute the oil on the slide rod.
TROUBLESHOOTING GUIDE SYMPTOM POSSIBLE CAUSE POSSIBLE SOLUTION Power cord not plugged in Plug in power cord Switch off Turn switch on V-belt broken Call for service to replace V-belt Dull Knife Sharpen the knife Too much grinding on the front side of knife Resharpen the knife Knife is worn Sharpen or replace the knife Knife gauge plate gap too wide Call for service to adjust gauge table Knife is too small Replace the knife Hard to push food chute No lubrication Lubricate slide rod Meta
LIMITED WARRANTY Warranty Claims... All Claims for parts or labor must be made directly through German Knife or Radiance. All claims should include the model number, serial number, proof of purchase, date of installation and all pertinent information supporting the alleged defect. All warranty claims must be authorized by German Knife or Radiance prior to the purchase of parts or labor. Failure to comply with these warranty policies will result in the voiding of warranty claims. Products Under Warranty...