
Installation Sheet

1. CLEANING THE INTERIOR AND EXTERIOR
- The interior and exterior of the unit can be cleaned using warm water and soap.
- Do not use an abrasive cleaner because it will scratch the surface.
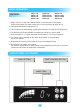
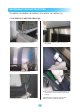
2. CLEANING THE CONDENSER COIL
- To maintain proper refrigeration performance, the Condenser coil must be free of
dust, dirt, and grease. This will require periodic cleaning. Condenser coil should
be cleaned at least every three months (90 days) or as needed.
- To clean the condenser, unplug the power cord. Condenser can be cleaned with
vacuum, brush, or CO2 (high pressure air).
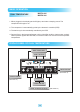
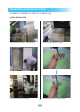
3. CLEAN THE DRAIN PAN
- Periodically, empty the drain pan which is located under the unit.
-
When reinstalling the Drain Pan, make sure the drain hose is placed back into the pan.
4. CHECK AFTER CLEANING
1) Check the unit again for safety.
2) Plug unit back in and turn on power switch.
3) Check that the unit is operating properly.
12
CLEANING
CAUTION
Before cleaning, unplug the unit and disconnect the power.
Wipe and clean the inside and outside of appliance with a damp cloth.
1. POWER CORD
- Be sure the power cord is connected to the proper voltage.
- A protected circuit of the correct voltage and amperage must run for connection of
the line cord.
- Turn ‘off’ the power switch before disconnected the power cord, whenever
performing maintenance functions or cleaning the refrigerated cabinet.
- Compressor warranties are void if compressor burns out due to low voltage.
2. RESTARTING
- If disconnected, wait 5 minutes before restarting.
3. POSITIONING GOODS
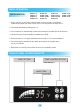
- Do not obstruct the air inlet which is located at the back inside of the unit.
NOTE: For a self-cleaning condenser equipped model, condenser cleaning is not
required. However, it is recommended to blow the condenser coil out with Nitrogen
once or twice a year. Note that the condenser cleaner may not remove grease.