High h Batch Service Manual Accelerating the World of Cooking TM 800.
For further information call: Customer Service at . Sales & Marketing at .
The information contained in this manual is important for the proper installation, use, maintenance, and repair of this oven. Follow these procedures and instructions to ensure satisfactory baking results and years of trouble-free service. Errors – descriptive, typographic, or pictorial – are subject to correction. Specifications are subject to change without notice. PLEASE CAREFULLY READ THIS MANUAL AND RETAIN IT FOR FUTURE REFERENCE.
Table of Contents Safety Instructions Important Safety Information – Please Read First General Safety Information Reducing Fire Risk Preventing Oven Damage Grounding Instructions Power Cord Replacement i i i ii ii ii Theory of Operation, Specifications and Installation Theory of Operation Certifications Dimensions Construction Electrical Specifications North America (except Canada)/South America Canada Europe/Asia/Pacific United Kingdom/Ireland Installation Lifting and Placing the Oven Setup 1 1 1 2 2 2
Programming Recipes Adjusting the Cook Chamber Temperature Modifying Recipes Loading Menu from Smart Card Saving Menu to Smart Card Checking Recipe Counter 11 12 12 14 14 16 Diagnosing an Issue Fault Codes: Descriptions, Clearing Instructions, and Troubleshooting F1: BLOWER (Blower Running Status Bad) F2: LOW TEMP (Cook Temperature Low) F6: EC TEMP (Electrical Compartment Temperature High) F7: THERMO (Thermocouple Open) F8: HEAT LOW (Heat Rise Low) Status Indicators Door Heater A Heater B Blower Testing O
Rack Oscillator Motor Thermocouple – Cook Chamber Thermocouple – Electrical Compartment Thermostat – Cooling Fan Thermostat – Hi-Limit Voltage Sensor Troubleshooting No Keypad Input No Display – Screen is Blank 40 42 42 43 44 45 46 46 47 The Oven Door Serviceable Components Door Gasket Door Hinge Door Switch Troubleshooting “Cook Door Open” Message when Door is Closed 49 50 51 51 52 52 The Impingement Circuit Serviceable Components Blower Motor Heater Element Jetplates (Top and Bottom) Swing Arm Assembl
SAFET Y INSTRUCTIONS IMPORTANT SAFET Y INFORMATION – PLEASE READ FIRST Improper installation, adjustment, alteration, service, or maintenance of this equipment can cause property damage, injury, or death. Thoroughly read the installation, operating, and maintenance instructions before installing or servicing this equipment.
ii SAFET Y INSTRUCTIONS PREVENTING OVEN DAMAGE o o o o x o x o x o x o When servicing this appliance, do not tear insulation to get to components. Rather, find the edge of the insulation and remove the tape that holds it in place. Operate the oven only when food is in the Cook Chamber. Clean the oven daily. Clean the oven only with TurboChef Oven Cleaner. DO NOT clean with a water jet. DO NOT slam or mishandle the oven door. DO NOT frequently open and close the door to check the cook status of the food.
Theory of Operation, Specifications, and Installation
THEORY OF OPERATION, SPECIFICATIONS AND INSTALL ATION THEORY OF OPERATION DIMENSIONS The TurboChef ® High h Batch speed cook oven uses high heat transfer rates developed by force air impingement to rapidly cook food. The High h batch utilizes top and bottom Jetplates that have been optimized for specific food items. The plates can be easily removed and replaced to facilitate either higher or lower heat transfer rates.
2 THEORY OF OPERATION, SPECIFICATIONS AND INSTALL ATION o CONSTRUCTION Exterior o Stainless steel front, top, sides, and back o 4′′ (102 mm) matte black legs o Cool-to-touch coated handle o Removable drain pan o Removable cook door for cleaning Interior o 304 stainless steel interior o Drain system helps prevent debris buildup o Removable Jetplates for deep cleaning ELECTRICAL SPECIFICATIONS North America (except Canada)/South America o HHB (P/N: HHB-8601-1) Phase 1 Voltage* 208/240 VAC Frequency 50/60
THEORY OF OPERATION, SPECIFICATIONS AND INSTALL ATION 2. Lift from bottom of oven. 3. Place oven on surface at least 30′′ (762 mm) deep and capable of supporting 167 lbs (76 kg). Setup Once oven is properly positioned on the counter: 1. Remove packing material and/or foreign objects from within Cook Chamber. 2. Install Oven Rack by placing it over support pins. 3. Plug in oven to appropriate electrical outlet.
Operating the Oven
OPERATING THE OVEN LEFT RIGHT LEFT 2 2 RIGHT 1 3 4 5 6 : High h Batch Keypad This section contains information on: o Control Display and Key Identification o Powering up o Powering down o Cooking Instructions o Cooking Options o Programming Recipes o Using the Options Menu CONTROL DISPL AY AND KEY IDENTIFICATION Reference Figure 2. 1. Display Displays operational information. 2. Soft keys Six (6) keys used for different functions depending on what is adjacently displayed. 3.
6 OPERATING THE OVEN NOTE: To expedite the cooling process, open the Oven Door. Menu Descriptions 1. Edit Menu Menu from which operator/technician can modify Cook Chamber temperature, recipes, and recipe settings. WARNING: The oven door is hot. To prevent possible burns, ensure that the door is not blocking a throughway or aisle when opened to expedite cooling process. 2. Options Menu Menu from which operator can enable/disable various operative functions. COOKING INSTRUCTIONS 3.
OPERATING THE OVEN LEFT RIGHT Press the Soft Key that corresponds to the desired food group. In this example, pressing the top right Soft Key would access all Food Items in the “1st Group”. NOTE: Press the “DOWN” Key to view Food Groups 7-12. : Selecting a Food Group LEFT RIGHT Press the Soft Key corresponding to the desired food item. In this example, pressing the top right Soft Key would initiate a Cook Cycle for the “First Item”. : Selecting a Food Item 5.
8 OPERATING THE OVEN ENTER COOK TIME 02:00 LEFT START RIGHT Press the “START” Soft Key (bottom right) to initiate a Cook Cycle. Use the “UP” and “DOWN” Keys to adjust time in 5 second increments. : Time Screen DONE LEFT PLEASE REMOVE FROM OVEN SAVE TIME COOK MORE RIGHT Press the “SAVE TIME” Soft Key (bottom left) to save an adjusted time. Press the “COOK MORE” Soft Key (bottom right) to cook an item longer.
OPERATING THE OVEN EDIT MENU ON OVEN OPTIONS ERASE MENU WRITE CARD Step: 1 OFF TIME SCREEN ON DONE SCREEN ON DEMONSTRATE OFF LEFT RIGHT Here the “Edit Menu” is turned on. Step: 2 To access the Options Menu, simultaneously press and hold for 5 seconds.
10 OPERATING THE OVEN EDIT MENU ON OVEN OPTIONS ERASE MENU WRITE CARD Step: 1 OFF TIME SCREEN ON DONE SCREEN ON DEMONSTRATE LEFT OFF RIGHT Here the “Write Card” function is turned off. Step: 2 To access the Options Menu, simultaneously press and hold for 5 seconds.
OPERATING THE OVEN EDIT MENU ON OVEN OPTIONS ERASE MENU WRITE CARD OFF TIME SCREEN ON DONE SCREEN ON DEMONSTRATE LEFT OFF RIGHT Here the “Done” Screen function is turned on. Step: 1 Step: 2 To access the Options Menu, simultaneously press and hold for 5 seconds. : Enabling/Disabling the Done Screen EDIT MENU ON OVEN OPTIONS ERASE MENU WRITE CARD OFF TIME SCREEN ON DONE SCREEN ON DEMONSTRATE LEFT OFF Demonstration Mode is turned off.
12 OPERATING THE OVEN SET TEMP 475ºF LEFT PRESS “ENTER” RIGHT Step: 3 & 4 Step: 5 : Adjusting the Cook Chamber Temperature 1ST GROUP Step: 5 EDIT GROUP 4TH GROUP 2ND GROUP 5TH GROUP 3RD GROUP 6TH GROUP LEFT RIGHT In this example, pressing the top right Soft Key would access all Food Items in the “1st Group”. NOTE: Press the “DOWN” Key to view Food Groups 7-12. : Modifying Recipes – Step 5 Adjusting the Cook Chamber Temperature (Figure 14) 1.
OPERATING THE OVEN 1ST GROUP FIRST ITEM Step: 6 FOURTH ITEM SECOND ITEM FIFTH ITEM THIRD ITEM SIXTH ITEM LEFT RIGHT In this example, pressing the top right Soft Key will allow the operator to modify the first food item in the first food group. : Modifying Recipes – Step 6 < 1ST GROUP> EVENT % TIME % AIR TEST Step: 6a COOK TIME RACK ON 1 100 100 The field selected to be modified will be bracketed.
14 OPERATING THE OVEN < 1ST GROUP> EVENT % TIME % AIR TEST Step: 8 COOK TIME RACK ON 1 100 100 Step: 7a 2 0 100 00:00 FIRST ITEM LEFT 3 0 100 WARMING UP 4 0 100 Step: 7d Step: 7c RIGHT Step: 7b Step: 7e Step: 10 Step: 9 : Modifying Recipes – Steps 7-10 7. From “Food Item” Screen (Figure 18, page 14), the operator can: a. Enter/change food group name. b. Enter/change food item name. c. Set cook time by using the “UP” and “DOWN” Keys (5-second increments). d.
OPERATING THE OVEN Smart Card Reader Slot Smart Card - Notice orientation of chip : Inserting Smart Card into Reader LOADING . . . FROM CARD LOADING . . . DONE FROM CARD LEFT RIGHT Step: 3 Step: 4 : Loading from Smart Card SAVING . . . TO CARD SAVING . . .
16 OPERATING THE OVEN 1ST GROUP FIRST ITEM SECOND ITEM THIRD ITEM FOURTH ITEM FIFTH ITEM SIXTH ITEM ZERO COUTNERS? Step: 1 0 1 LEFT 0 RIGHT 0 0 0 PRESS “ENTER” At any point, the operator can zero out the counters for a given group. Step: 2 Step: 3 In this example, the second item (recipe) in the first group has completed one cook cycle. : Checking the Recipe Counter 2. Verify Write Card function is enabled (for instructions, see page 9). 3.
Diagnosing an Issue
DIAGNOSING AN ISSUE To help in troubleshooting, this section contains information on o Fault Codes: Descriptions, Clearing Instructions, and Troubleshooting o Control Display and Key Identification o Oven States and Menu Access o Status Indicators o Testing Options and/or reverting to the Off State. The oven will automatically attempt to restart every 2 seconds until the fault is cleared. To clear this fault: 1. Turn the oven on. The Control System may be able to successfully restart the Blower Motor. 2.
18 DIAGNOSING AN ISSUE Troubleshooting: F1: BLOWER (Blower Running Status Bad) YES Is the wiring harness properly connected? Is Status Indicator A backlit on the “Test” Screen? (see page 23) NO YES Is the Blower Motor spinning freely? Replace Blower Motor (page 53) or remove obstruction. Check the Motor Controller, Blower Motor, and I/O Control Board. NO (See page 61 for schematic.
DIAGNOSING AN ISSUE Troubleshooting: F2: LOW TMP (Cook Temperature Low) YES Is wiring from the Door Switch to the I/O Control Board OK? (See page 61 for schematic.) Does the Display read “Cook Door Open” when the door is closed? NO Correct wiring. NO YES Replace Door Switch. (page 36) If problem persists, replace the I/O Control Board. (page 39) Reset and determine why it tripped – excess grease buildup, etc.
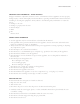
20 DIAGNOSING AN ISSUE : Location of Hi-Limit Thermostat Reset Button F6: EC TEMP (Electrical Compartment (EC) Temperature High) This fault displays if the Electrical Compartment (EC) temperature exceeds 158°F (70°C). The Control System checks the EC Thermocouple once per minute. To clear this fault: The Control System must detect continuity on the thermocouple circuit. Troubleshooting: F7 Fault To troubleshoot an F7 Fault, see the diagram on page 21.
DIAGNOSING AN ISSUE Troubleshooting: F6: EC TEMP (Electrical Compartment (EC) Temperature High) YES Does the oven have room to ventilate? (not tightly enclosed by other appliances or fixtures?) NO YES Are both Cooling Fans rotating? NO Is the oven in an area of moderate temperature (120ºF (49ºC) or cooler)? NO Relocate oven to cooler area. Move oven to open area or remove items that are in close proximity.
22 DIAGNOSING AN ISSUE Troubleshooting: F8: HEAT LOW YES Is the Hi-Limit Thermostat tripped? YES Reset and determine why it tripped – excess grease buildup, etc. (Figure 25, page 20) NO Is the Blower Motor blowing air? NO Is the Heater Element defective? YES See page 17 to troubleshoot F1: BLOWER (Blower Running Status Bad) NO Is the Solid State Relay defective? Replace defective heater. (page 54) Verify Solid State Relay is not shorted across output. YES Replace SSR.
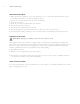
DIAGNOSING AN ISSUE LEFT RIGHT : Test Mode Menu, Screen 1 of 2 STATUS INDICATORS TESTING OPTIONS Displayed in Test and Diagnostic Modes, Status Indicators help in troubleshooting. The following oven parts are represented by letters at the bottom of the display (Figure 26).
24 DIAGNOSING AN ISSUE LEFT RIGHT Step: 1/2 Airflow increases 10% each time the “BLOWER” Soft Key is pressed. Status Indicator “A” should not be backlit. Simultaneously press and hold for 1 second to get to the Test Mode Menu (Screen 1). NOTE: Oven must be in the Off or Cool-down State. Step: 3 : Testing the Blower Motor LEFT RIGHT Step: 1 In this example, test shows the oven has logged one (1) F1 Fault.
DIAGNOSING AN ISSUE LEFT RIGHT Step: 1/2 In this example, the Temperature Offset is set at 20ºF (approximately 11ºC). Simultaneously press and hold for 1 second to get to the Test Mode Menu (Screen 1). NOTE: Oven must be in the Off or Cool-down State. Step: 3 : Adjusting the Temperature Offset LEFT RIGHT In this example, Heater A is on. Step: 1/2 Simultaneously press and hold for 1 Step: 3 second to get to the Test Mode Menu (Screen 1).
26 DIAGNOSING AN ISSUE LEFT RIGHT In this example, Heater B is on. Step: 1/2 Simultaneously press and hold for 1 second to get to the Test Mode Menu (Screen 1). NOTE: Oven must be in the Off or Cool-down State. Step: 3 : Checking Heater B LEFT RIGHT In this example, the Rack Oscillator is on. Step: 1/2 Simultaneously press and hold for 1 Step: 3 second to get to the Test Mode Menu (Screen 1). NOTE: Oven must be in the Off or Cool-down State.
DIAGNOSING AN ISSUE LEFT RIGHT Step: 2/3 In this example, the oven has completed 10 Cook Cycles. Press the “COOKS” Soft Key again to view the cumulative cook time. Step: 1 Simultaneously press and hold for 1 second to get to the Test Mode Menu (Screen 1). NOTE: Oven must be in the Off or Cool-down State. Step: 4 : Viewing the Cook Counter/Cumulative Cook Time Testing the Rack Oscillator (Figure 32) NOTE: The Oven Rack will not oscillate if it is not properly set on the support pins.
28 DIAGNOSING AN ISSUE LEFT RIGHT Step: 2 Step: 1 In this example, the oven has been on for 15 hours and 30 minutes. Simultaneously press and hold for 1 second to get to the Test Mode Menu (Screen 1). NOTE: Oven must be in the Off or Cool-down State. Step: 3 : Viewing the Cumulative Operating Time LEFT RIGHT In this example, the EC Temperature is 110ºF (43ºC) Step: 2 Step: 1 Simultaneously press and hold for 1 second to get to the Test Mode Menu (Screen 1).
DIAGNOSING AN ISSUE LEFT RIGHT In this example, the temperature is being measured in Fahrenheit. Step: 2 Step: 1 Simultaneously press and hold for 1 second to get to the Test Mode Menu (Screen 1). NOTE: Oven must be in the Off or Cool-down State. Step: 3 : Changing the Fahrenheit/Celsius Option LEFT RIGHT Serial Number will be displayed. Step: 2 Step: 3/4 Step: 1 Step: 5 Step: 6 Simultaneously press and hold for 1 second to get to the Test Mode Menu (Screen 1).
The Control System
THE CONTROL SYSTEM The Control System signals, senses, commands, and actuates the oven’s other components. For a schematic that includes all Control System components, see Figure 61, page 61. For more comprehensive hardware descriptions, see page 69.
32 THE CONTROL SYSTEM Blower Motor Controller (Figure 39) The proprietary Brushless DC Blower Motor Controller actuates the Blower Motor. To replace a defective Blower Motor Controller: 1. Ensure “Cool Down” process is completed. (“Cool Down” message will disappear upon completion) and unplug the oven. 3. Disconnect Wiring Harness from the defective Blower Motor Controller. 4. Replace the defective Blower Motor Controller with P/N 100443. 5.
THE CONTROL SYSTEM Cooling Fans (Figure 40) Located on the back of the oven, the Cooling Fans ventilate air into the Electrical Compartment (via the inlet fan), then back out (via the exhaust fan). 4. Remove finger guard. To replace a defective fan: 1. Ensure “Cool Down” process is completed (“Cool Down” message will disappear upon completion) and unplug the oven. 5. Disconnect Wiring Harness from fan. 2. Remove side panel nearest to defective fan. 7. Reinstall finger guard(s)/covering. 3.
34 THE CONTROL SYSTEM Display (Figure 41) To replace a defective Display: 1. Ensure “Cool Down” process is completed (“Cool Down” message will disappear upon completion) and unplug the oven. 4. If ribbon cable is damaged, replace with P/N 103024 (not pictured) and jump to step 10. 2. Remove both side panels. 6. Remove Display Brackets from Display. 3. Remove Display Panel. 7. Replace Display with P/N 100505. 10 5. If Display is defective, remove from Display Panel.
THE CONTROL SYSTEM 8. Attach Display Brackets to the new Display. 9. Attach new Display to Display Panel. 10. Reinstall Display Panel and reattach side panels. Display Keypad (Figure 42) The keypad is connected to I/O Control Board via 14 Pin Flat Cable. To replace a defective keypad: 1. Ensure “Cool Down” process is completed (“Cool Down” message will disappear upon completion) and unplug the oven. 2. Remove Right Side Panel. 3. Disconnect keypad cable at I/O Control Board. (See page 61 for schematic.
36 THE CONTROL SYSTEM Door Switch (Figure 43) The Door Switch is a sensor that detects the Door Actuator and determines whether the door is open or closed. 3. At the I/O Control Board, disconnect Wiring Harness that routes to Door Switch. (See page 61 for schematic.) 4. Replace defective switch with P/N 102788. To replace a defective Door Switch: 1. Ensure “Cool Down” process is completed (“Cool Down” message will disappear upon completion) and unplug the oven.
THE CONTROL SYSTEM Fuses (Figure 44) The Aux Fuses protect the Control System and Blower Motor. CAUTION: Replace fuses with only class CC fuses of the same rating. To replace a fuse: 1. Ensure “Cool Down” process is completed (“Cool Down” message will disappear upon completion) and unplug the oven. 2. Remove the Fuse Cover. 3. Rotate fuse cap 90° counterclockwise to access the fuse. 4. Disconnect Wiring Harness from fuse. 5. Replace the defective fuse with P/N 100592. 6. Reattach Wiring Harness. 7.
38 THE CONTROL SYSTEM 29 28 30 40 39 31 37 32 38 36 33 35 34 PART PART NUMBER 28 Screw – I/O Control Board (x4) 102910 29 Standoff – I/O Control Board (x4) 101951 30 I/O Control Board NGC-1008 31 Solid State Relay 101286 32 Screw – Solid State Relay (x2) 101688 33 Standoff – Smart Card Reader (x4) 101947 34 Screw – Smart Card Reader (x4) 102911 35 Smart Card Reader 100506 36 Cable – Smart Card Reader 103023 37 Relay 101273 38 Screw – Relay (x2) 101687 39 Power
THE CONTROL SYSTEM Refer to the Component Plate Assembly (Figure 45) when replacing o I/O Control Board o Power Supply o Relay o Smart Card Reader o Solid State Relay I/O Control Board (Figure 45) The I/O Control Board controls all aspects of oven operation. To replace a defective I/O Control Board: 1. Ensure “Cool Down” process is completed (“Cool Down” message will disappear upon completion) and unplug the oven. 2. Record the Serial Number (see page 29 for viewing instructions). 4.
40 THE CONTROL SYSTEM Solid State Relay (SSR) (Figure 45, Page 38) The 240 VAC, Dual 40 Amp Solid State Relay actuates the Heater Element. When the SSR is actuated, the (-) control input will go to 0.00 VDC. When not actuated, the control input will read -24.00 VDC. 2. Remove Blower Motor Controller Bracket (see page 32 for instructions). This will allow access to Rack Oscillator Motor. To replace a defective SSR: 1.
THE CONTROL SYSTEM 43 44 42 41 45 46 47 PART PART NUMBER 41 Rack Oscillator Motor HHB-8135 42 Crank – Rack Oscillator Motor HHB-8045 43 Screw – Rack Oscillator Motor (x2) 101672 44 Washer – Rack Oscillator Motor 102451 45 Retaining Ring – Rack Oscillator Motor 101297 46 Bracket – Rack Oscillator Motor HHB-8049 47 Screw – Rack Oscillator Motor Bracket (x2) 101688 NUMBER : Removing the Rack Oscillator Motor 41
42 THE CONTROL SYSTEM Thermocouple – Cook Chamber (Figure 47) Type K Thermocouple. Thermocouple measures the temperature of the recirculating impingement airflow. If the display indicates 999ºF/C, the Thermocouple is “open,” resulting in an F7 Fault. Thermocouple – Electrical Compartment (EC) This Type K Thermocouple measures the temperature of the Electrical Compartment. If the temperature within the Electrical Compartment is above 158ºF (70°C), the control will display an F6 Fault.
THE CONTROL SYSTEM Thermostat – Cooling Fan (Figure 48) The Cooling Fan Thermostat actuates the cooling fans when the Electrical Compartment Temperature reaches 120°F (49°C). 3. Pull back insulation where necessary. To replace a defective Cooling Fan Thermostat: 1. Ensure “Cool Down” process is completed (“Cool Down” message will disappear upon completion) and unplug the oven. 5. Replace defective thermostat with P/N 102086. 4. Disconnect the Wiring Harness from the Cooling Fan Thermostat. 6.
44 THE CONTROL SYSTEM Thermostat – Hi-Limit (Figure 49) The Hi-Limit Thermostat is a 250VAC, 3-Pole, manual-reset thermostat with a trip point of 572ºF (300°C). The Thermostat, which interrupts power to the Heater Element, should never operate during normal operation. 3. Pull back insulation where necessary. To replace a defective Hi-Limit Thermostat: 1. Ensure “Cool Down” process is completed (“Cool Down” message will disappear upon completion) and unplug the oven. 6. Reconnect Wiring Harness. 4.
THE CONTROL SYSTEM Voltage Sensor (Figure 50) Proprietary device designed to measure incoming line voltage and distribute either 208 or 240 VAC operation. The sensor is only included in ovens operated in North and South America. To replace a defective Voltage Sensor: 1. Ensure “Cool Down” process is completed (“Cool Down” message will disappear upon completion) and unplug the oven. Voltage Sensor Screw. 4. Disconnect wiring from Voltage Sensor (2 wires to Wiring Harness and 2 wires to terminal block). 5.
46 THE CONTROL SYSTEM TROUBLESHOOTING Troubleshooting: No Keypad Input YES Replace Display Keypad. (page 35) If the problem persists, replace the I/O Control Board. (page 39) Is the keypad cable properly connected to the I/O Control Board? NO Correct wiring.
THE CONTROL SYSTEM Troubleshooting: No Display – Screen is Blank YES Does the Control beep when a key is pressed? Replace Fuses. (page 37) Is wiring from the I/O Control Board to Display OK? NO YES NO NO YES Correct wiring. If ribbon cable is damaged, replace with P/N 103024. Replace Power Supply. (page 39) Is the Power Supply receiving power? NO Is the Power Supply output correct VDC? (see page 2 for electrical specifications.
The Oven Door
THE OVEN DOOR This section contains information on the Oven Door as it pertains to o Serviceable Component Information and Replacement Instructions o Parts and Part Numbers o Troubleshooting To access these components, first remove the Oven Door (Figure 51): 1. Ensure “Cool Down” process is completed. (“Cool Down” message will disappear upon completion.) For more comprehensive hardware descriptions, see page 69. 3. Rotate hinge retainers to the unlocked state. 2. Open oven door. 4.
50 THE OVEN DOOR Door Gasket (Figure 52) To remove a damaged Door Gasket: 1. Ensure “Cool Down” process is completed. (“Cool Down” message will disappear upon completion.) 4. Replace damaged gasket with P/N HHB-8101. 5. Reinstall inner plate. 6. Reattach oven door. 2. Remove door (page 49). 7. Return hinge retainers to locked state and close oven door. 3. Remove inner plate.
THE OVEN DOOR Door Hinge (Figure 53) Spring-loaded hinge can be removed and replaced as an entire unit. To replace a Door Hinge: 1. Ensure “Cool Down” process is completed. (“Cool Down” message will disappear upon completion.) 4. Reattach oven door. 5. Return hinge retainers to locked state and close oven door. Door Switch See Control System for description and replacement instructions (page 36). 2. Remove Oven Door (page 49). 3. Replace hinge(s) with P/N 102807.
52 THE OVEN DOOR TROUBLESHOOTING Troubleshooting: “Cook Door Open” Message when Door is Closed YES Is the Door Switch properly installed? (Ensure it is not loose or cracked.) Is wiring from Door Switch to I/O Control Board OK? Replace Door Switch (page 36). YES NO Reset Door Switch. If problem persists, ensure Door Actuator (see Figure 54, below) is properly installed. If problem continues to persist, replace I/O Control Board (page 39). NO Correct wiring.
The Impingement Circuit
THE IMPINGEMENT CIRCUIT The Impingement Circuit provides the high temperature airflow necessary to brown and cook food items. For a schematic that includes all Impingement Circuit components, see Figure 61, page 61. For more comprehensive hardware descriptions, see page 69. This section contains Serviceable Component Information and Replacement Instructions o Parts and Part Numbers o Blower Motor (Figure 55) A Brushless DC Switch reluctance type. Its top speed is 7200 RPM at 3/4 HP.
54 THE IMPINGEMENT CIRCUIT 5. Pull back insulation where necessary. Heater Element (Figure 56) Sheathed-style/Calrod heaters. Attached to the same cartridge, Heaters A and B can be tested independently of one another. To replace a defective heater: 1. Ensure “Cool Down” process is completed (“Cool Down” message will disappear upon completion) and unplug the oven. 2. Remove Right Side Panel. 3. Disconnect Wiring Harness from heaters. 6. Replace defective heater cartridge with P/N HHB-8099. a.
THE IMPINGEMENT CIRCUIT 3. Remove Support Rails. 8. Reinstall Insulation Shield. 9. Reattach Right Side Panel. Jetplates (Figure 57) The Jetplates help maximize food quality. Different Jetplates facilitate different cooking results. To replace a Jetplate: 1. Ensure “Cool Down” process is completed. (“Cool Down” message will disappear upon completion.) NOTE: Removing hardware is not required – the Support Rails snap on and off.
56 THE IMPINGEMENT CIRCUIT Swing Arm Assembly (Figure 58) The Swing Arm Assembly is actuated by the Rack Oscillator Motor. The attached oven rack oscillates when the Swing Arm Assembly is in motion. 4. If problem persists, use the figure below to troubleshoot the Swing Arm Assembly. If the rack is not oscillating properly, 1. Ensure “Cool Down” process is completed. (“Cool Down” message will disappear upon completion.) 6.
The Filtering System
THE FILTERING SYSTEM The filtering system helps remove debris from the Cook Chamber. However, daily maintenance and deep cleaning are still required to ensure oven functions most efficiently. For more comprehensive hardware descriptions, see page 69. This section contains Serviceable Component Information and Replacement Instructions o Parts and Part Numbers o To service the Catalytic Converter: 1. Ensure “Cool Down” process is completed. (“Cool Down” message will disappear upon completion.
58 THE FILTERING SYSTEM 3. Remove Jetplates (page 55). 4. Remove Air Diverter Plate. 5. Remove the Catalytic Converter. 6. Clean the Catalytic Converter with TurboChef Oven Cleaner (P/N 103180). CAUTION: DO NOT use a substitute cleaner. 7. Rinse thoroughly with distilled water. CAUTION: Use distilled water only. Filters (Figure 59) The two Filters help prolong the life of the Catalytic Converter by trapping excess grease. They are attached to the Air Diverter Plate via the Filter Clips.
Cleaning the Oven
CLEANING THE OVEN DAILY MAINTENANCE DEEP CLEAN INSTRUCTIONS The procedures below will help in maintaining the High h Batch oven. Be sure to use only TurboChef Oven Cleaner. Using any other cleaning products can damage critical parts and may void warranty on those parts. Refer to Figure 60, page 60 to view the Cook Chamber components. TurboChef recommends deep cleaning the oven once a month (or more frequently, depending on use) to ensure optimal performance. Be sure to use only TurboChef Oven Cleaner.
60 CLEANING THE OVEN Top Jetplate Air Diverter Plate (covers the Catalytic Converter) Filter Oven Rack Bottom Jetplate : The Cook Chamber Step 5: Check Grease Filters. o Plate is attached via 4 screws. o Check to see if Filters (P/N HHB-8114) need to be replaced. To order Filters, call 800.90TURBO or your Authorized Distributor. o If necessary, remove Filters by first unhooking the Filter Clip (P/N HHB-8115) which is attached at the center of the Air Diverter Plate.
High h Batch Schematic
HIGH H BATCH SCHEMATIC 61 BK-20 RD-16 -V +V 24VDC POWER SUPPLY (101206) CN2 1 2 3 G N VFD DISPLAY 64 X 128 DOTS L P3 J6 1-9 +24V PS IN -24V PS IN -24V P&S INTER RTN -24V MONITOR RTN BMSC 0-10V OUT BMSC COMM (2) K6-B (VOLTS MOD OUT) K4 (B-) (CONV OUT) BMSC (3) (ENABLE OUT) BMSC (4) (COM RTN) -24V (VOLT MODULE RTN) CC A CABLE, SMART CARD (103023) 1 2 1 2 - - - - - - - - - 14 P6 J6 1 2 1 2 - - - - - - - - - 14 14 : High h Batch Schematic 9 6 B 3 4 A 7 RED RELA
HIGH H BATCH SCHEMATIC HHB OVEN SCHEMATIC Figure 61. Inside of fold-out page. Rev 2 Board, VFD Display, Single Phase, 280/240 VAC, 60 Hz NOTE: Schematic shows the oven with door open and without power applied.
RJ11 BR1 J6 + J2 U15 R51 P1 D6 P3 J3 SKP1 HIGH H BATCH SCHEMATIC J4 RJ11 64 : I/O Control Board and Test Point Locations
Comprehensive Part Listing
COMPREHENSIVE PART LISTING COMPREHENSIVE PART LISTING PART PART NUMBER ILLUSTRATION Air Diverter Plate HHB-8030 Figure 59, page 57 Blower Motor HHB-8106 Figure 55, page 53 Blower Motor Controller 100443 Figure 39, page 32 Blower Motor Cover NGC-1081 Figure 55, page 53 Blower Motor Mounting Plate HHB-8009 Not labeled Bracket – Blower Motor Controller HHB-8111 Figure 39, page 32 Bracket – Display (x2) HHB-8130 Figure 41, page 34 Bracket – Rack Oscillator Motor HHB-8049 Figure 46, pa
66 COMPREHENSIVE PART LISTING PART PART NUMBER ILLUSTRATION Electrical Plate HHB-8134 Figure 50, page 45 Filter (x2) HHB-8114 Figure 59, page 57 Filter Clip (x2) HHB-8115 Figure 59, page 57 Fuse – Class CC, 12 AMP (x2) 100592 Figure 44, page 37 Fuse Cover HHB-8136 Figure 44, page 37 Fuse Holder (x2) 100586 Figure 44, page 37 Grommet – Electrical Plate 100644 Figure 50, page 45 Heater Element HHB-8099 Figure 56, page 54 Heater Insulation Shield HHB-8097 Figure 56, page 54 Hole
COMPREHENSIVE PART LISTING PART PART NUMBER ILLUSTRATION Power Cord Mounting Bracket NGC-1167 Not labeled Power Supply 101206 Figure 45, page 38 Push Nut (x2) 101293 Figure 53, page 51 Rack HHB-8104 Figure 57, page 55 Rack – Offset (Accessory) HHB-8118 Not labeled Rack Oscillator Motor HHB-8135 Figure 46, page 41 Relay 101273 Figure 45, page 38 Retaining Ring – Rack Oscillator Motor 101297 Figure 46, page 41 Retaining Ring – Swing Arm Assembly 101297 Not labeled Ribbon Connect
68 COMPREHENSIVE PART LISTING PART PART NUMBER ILLUSTRATION Screw – Side Panel (8 per panel) 101688 Figure 41, page 34 Screw – Smart Card Reader (x4) 102911 Figure 45, page 38 Screw – Solid State Relay (x2) 101688 Figure 45, page 38 Screw – Terminal Block (x2) 102963 Not labeled Screw – Thermocouple – Cook Chamber 101688 Figure 47, page 42 Screw – Thermostat Clamp 101688 Figure 49, page 44 Screw – Thermostat – Cooling Fan (x2) 101687 Figure 48, page 43 Screw – Thermostat – Hi-Limit
COMPREHENSIVE PART LISTING HARDWARE DESCRIPTIONS PART NUMBER DESCRIPTION 100903 Nut – #10-32, Hex, Serrated, Flange, SS 100905 Nut – #1/4-20, Hex, Serrated, Flange,SS 101402 Screw – #10-32 X 1/4, PHFH 101421 Screw – #4-40 x 1/2, PHFH, 100 Deg, SS 101520 Screw – #4-40 X .25 Lg 101663 Screw – #8, Type A X 2-1/4, PHFH, Sheet Metal, SS 101672 Screw – M4 X .
Glossary of Terms
GLOSSARY OF TERMS Air Diffuser Plate Accessory plate that covers openings in the jetplate for very delicate cooking. Cook Cycle All operative aspects of cooking a product. Air Diverter Plate Covers the Catalytic Converter. Cook Time Function on Test Mode Menu that displays the cumulative time of Cook Cycles. Blower Motor Located in back of oven, the Blower Motor actuates the impingement process. Actuated by Blower Motor Controller.
72 GLOSSARY OF TERMS Diagnostic Mode Function that displays diagnostic information during all operative activities. Display Screen through which operator and oven interact. Display Keypad The primary interface for the operator. Done Screen Screen at the end of a Cook Cycle from which the operator can save an adjusted cook time or cook an item longer than its predetermined cook time. Door Actuator Magnet in oven door. Detected by Door Switch to determine if door is open or closed.
GLOSSARY OF TERMS Fault Log Located in Test Mode, the Fault Log (or “Fault Code Counter”) lists each fault code and number of times oven has encountered each. The Fault Log logs up to 255 instances per fault before rolling back to zero. Impingement Circuit System that provides the high temperature airflow necessary to brown and cook food items. Filter Easy-to-remove filters help prolong the life of the Catalytic Converter by trapping excess grease.
74 GLOSSARY OF TERMS Oven Rack See Rack Percentage (%) Air Function that allows operator/technician to specify the relative amount of impingement airflow (speed of Blower Motor) during each Cook Cycle event. Valid percentages are between 10 and 100%. Recipe Menu Highest superset of recipes, the menu consists of 12 food groups of 6 recipes, or 72 recipes total. Relay 240 VAC, 30 Amp, Double Pole, Double Throw, 24 VDC Relay Coil. Actuates Rack Oscillator Motor.
GLOSSARY OF TERMS Temperature Offset Feature that provides accurate temperature readings of where food actually cooks as opposed to where thermometer is located. Can be modified in Test Mode Menu. Voltage Sensor Proprietary device designed to measure incoming line voltage and switch between 208 and 240 VAC operation. The sensor is only included in ovens operated in North and South America. Test Mode Menu Menu from which technician can run diagnostics and check statistics.
Subject Index
SUBJECT INDEX Air Diverter Plate Part number Removing when servicing Catalytic Converter Blower Motor Cover Description Mounting Plate (part number) Part number Replacement instructions Testing Troubleshooting – F1 Fault 57, 65 Cook Counter Description Viewing instructions 27 27 Cook Time Description Viewing instructions 27 27 57-58 53 53 65 53, 65 53 24 17 Blower Motor Controller (BMSC) Bracket to which attached (part number) Description Illustration Part number Replacement instructions 32, 65 32
78 SUBJECT INDEX Display Bracket (part number) Illustration Part number Replacement instructions Troubleshooting Display Keypad Description Illustration Part number Replacement instructions Troubleshooting 34, 65 34 34, 65 34 34 35 35 35, 65 35 46 Display Panel See Panels Done Screen Description Enabling/disabling Options Door Receiver Part number 51 51, 67 65 Door Switch Description 36 Illustration 36 36, 65 Part number Replacement instructions 36 Troubleshooting: “Cook Door Open” 52 Message when
SUBJECT INDEX Electrical Specifications Canada Europe/Asia/Pacific North America (except Canada)/ South America United Kingdom/Ireland 2 2 2 2 Error Message F8 Fault Event Description Modifying Percentage Air Percentage Time 20 14 12-14 14 14 Fault Code – F1: Blower Running Status Bad Clearing instructions Description Table of when Fault occurs Troubleshooting 17 17 17 18 Fault Code – F2: Cook Temperature Low Clearing instruction Description Table of when Fault occurs Troubleshooting 17 17 17 19 F
80 SUBJECT INDEX Hardware Descriptions Heater Element Description Part number Replacement instructions Testing Heater Insulation Shield Illustration Part number 69 54 54, 66 54 25 54 54, 66 Hi-Limit Thermostat See Thermostat – Hi-Limit I/O Control Board Description Illustration Part number Replacement instructions Test point locations 39 38, 64 38, 66 39 64 Impingement Circuit Description Serviceable Components 53 53 Installation Jetplates Accessory part numbers Cleaning instructions Illustration
SUBJECT INDEX Programming Recipes Adjusting the Cook Chamber Temperature Checking Recipe Counter Loading a Menu from a Smart Card Modifying Recipes Saving a Menu to a Smart Card Rack Cleaning instructions Installing Offset (Accessory) part number Part number Rack Oscillator Motor Bracket to which attached (part number) Crank (part number) Description Illustration Part number Replacement instructions Retaining ring (part number) Washer (part number) Ready to Cook State Description Menus in which can access
82 SUBJECT INDEX Status Indicators Description Enabling/disabling for all operative activities (via Diagnostic Mode) Illustration Swing Arm Assembly Accessing Bushing (part number) Covers (part numbers) Description Drag Link (part number) Illustration Part number Part number (with Link Bar) Washer (part number) 23 27 23 56, 56, 56, 56, 56 65 65 56 65 56 68 68 68 Temperature Offset Description Modification instructions 24 24 Test Mode Menu Description Options Oven states in which accessible 6 23 6
For further information call: Customer Service at . Sales and Marketing at . Accelerating the World of Cooking TM Part Number: HHB-8707/Revision A/June 2005 Country Code: NA Headquarters Operations International Six Concourse Parkway Suite Atlanta, Georgia . . . . International Pkwy Suite Carrollton, Texas . . . .