
Residential Single and Double Wall Oven Service Manual


A.16 APPENDIX REPLACING OVEN COMPONENTS
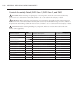
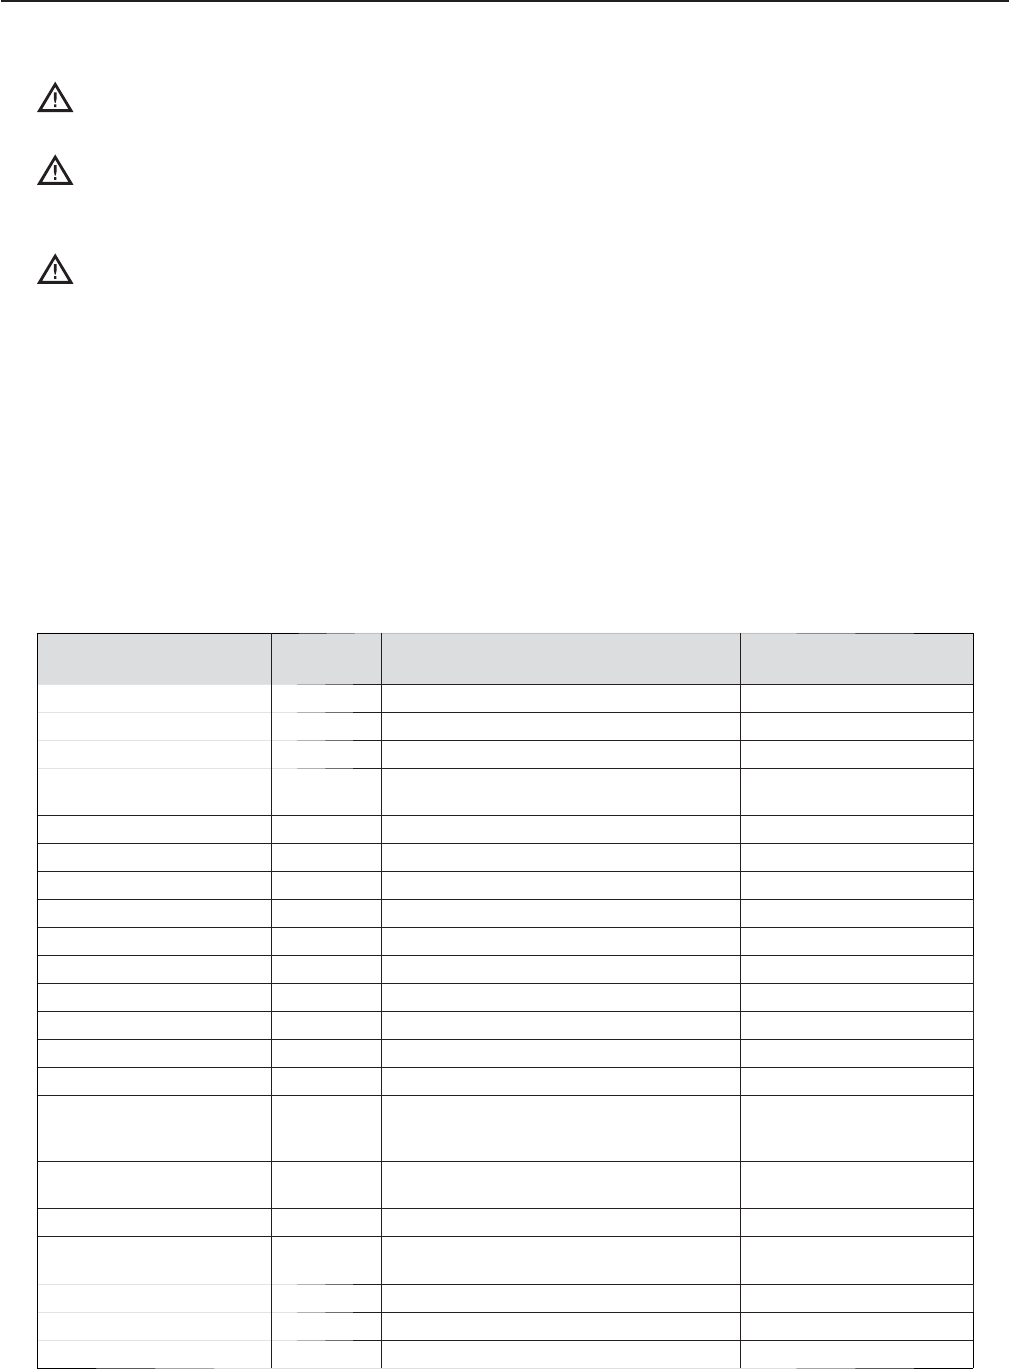
Item Description Item Part # Hardware Description Hardware Part Number(s)
Blower, Dual 104164 Screw, SH MTL, #8 x 1/2 Serrated PHTRH 101688 (x2)
Cable, Display, Upper RWD-9438 None None
Cable, Interconnect, Relay Board RWD-9542 None None
Controls Assembly, Gen 2
(see pages A.18-A.19)
N/A Screw, SH MTL, #8 x 1/2 Serrated PHTRH 101688 (x5)
Cooling Fan, EC, Upper 104114 Screw, SH MTL, #8 x 1/2 Serrated PHTRH 101688 (x3)
Cord, Power RWD-9412 None None
Duct, Mag Cooling, LHS RWD-9374 Screw, SH MTL, #8 x 1/2 Serrated PHTRH 101688 (x3)
Duct, Mag Cooling, RHS RWD-9373 Screw, SH MTL, #8 x 1/2 Serrated PHTRH 101688 (x3)
EMI Filter 104211 Screw, SH MTL, #8 x 1/2 Serrated PHTRH 101688 (x2)
Harness, Clock, Gen 2 RWD-9543 None None
Harness, L.V., Upper Oven, Gen 2 RWD-9540 None None
Harness, Power, Motor Controller RWD-9559 None None
Harness, Wire, Gen 2 RWD-9538 None None
Heater Cover Plate RWD-9156 Screw, SH MTL, #8 x 1/2 Serrated PHTRH 101688 (x8)
High Limit Switch 102075
Screw, SH MTL, #8 x 1/2 Serrated PHTRH
Bracket, Hi Limit
Screw, M4X 0.7 x 8, PPHD, INT Tooth, SS
101688 (x2)
RWD-9388
101672 (x2)
Mag Air Diverter Assembly,
Gen 2 (see page A.20)
N/A Screw, SH MTL, #8 x 1/2 Serrated PHTRH 101688 (x2)
Magnetron 104154 Nut, Hex Flanged, M5, Yellow Zinc 101001 (x4)
Relay/Power Assembly
(see page A.21)
N/A Screw, #8-32 x 5/8 LG, SEMS, PPHD, SS 102926 (x2)
Snubber, Electrical RWD-9497 None None
Stirrer Motor, Gear 104174 Screw, M3 x 8mm LG, PPHD, S.S. 101668 (x2)
Stirrer Motor, Hub 104175 None None
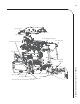
Upper Electrical Compartment, DWO Gen 2 and SWO
DANGER: Before removing or replacing any oven component, ensure the oven is removed from any
power source (i.e., the breaker is turned off ). Failure to do so can result in serious injury or death.
WARNING: Before removing or replacing any oven component, thoroughly read the safety instructions
found at the front of this manual and in Oven Systems (Section 5) and Troubleshooting (Section 6). Adhere to
all precautions and warnings outlined in these sections, as failure to do so could result in serious injury or death.
CAUTION: Before removing/installing any component, make sure it is disconnected from the wire
harness (where applicable).
Di erentiating Between DWO Gen 1 and DWO Gen 2
Use the serial number to tell if the oven being serviced is a DWO Gen 1 or DWO Gen 2 oven. To view the
serial number, open the Speedcook oven door and locate the serial plate (between the Speedcook oven door’s
hinges). If the serial number’s fi rst fi ve characters are “TDO2D” (or “TSO2D” for SWO models), the oven is a
Gen 2 oven. If the fi rst fi ve characters are NOT “TDO2D” (or “TSO2D”), the oven is a DWO Gen 1 oven.
If the oven being serviced is a DWO Gen 1 oven proceed to page A.14 for that model’s upper electrical
compartment illustrations.