
Residential Single and Double Wall Oven Service Manual


A.18 APPENDIX REPLACING OVEN COMPONENTS
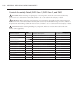
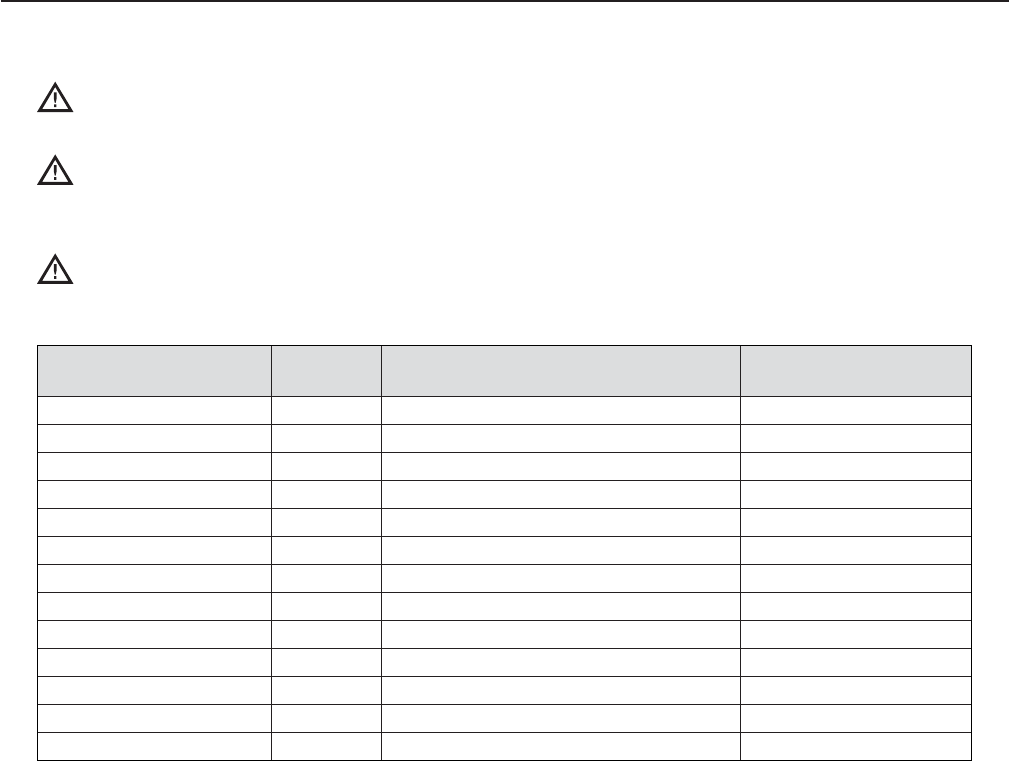
Item Description Item Part # Hardware Description Hardware Part Number(s)
Clock Transformer 104139 Screw, SH MTL, #8 x 1/2 Serrated PHTRH 101688 (x2)
Control Board, Gen 1 RWD-3003 Screw, #6-32 x 3/8, INT TOOTH, PPH, SS 102911 (x4)
Control Board, Gen 2 RWD-3015 Screw, #6-32 x 3/8, INT TOOTH, PPH, SS 102911 (x4)
Fuse, 15 Amp, Gen 2 100602 None None
Fuse, 20 Amp, Gen 2 100603 None None
Power Supply (12VDC) 104128 Screw, PPH, SS, 4-4OUNC x .25 LG 101520 (x4)
Power Supply (24VDC) 104166 Screw, #6-32 x 3/8, INT TOOTH, PPH, SS 102911 (x3)
Power Supply Assembly N/A Screw, SH MTL, #8 x 1/2 Serrated PHTRH 101688 (x2)
Power Supply Mounting Plate RWD-9262 None None
Relay Board RWD-9545-FRU Screw, #6-32 x 3/8, INT TOOTH, PPH, SS 102911 (x4)
SD Card, Gen 1 RWD-9500 None None
SD Card, Gen 2 RWD-9562 None None
Speaker 104214 Screw, SH MTL, #8 x 1/2 Serrated PHTRH 101688 (x2)
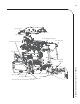
Controls Assembly Detail, DWO Gen 1, DWO Gen 2, and SWO
DANGER: Before removing or replacing any oven component, ensure the oven is removed from any
power source (i.e., the breaker is turned off ). Failure to do so can result in serious injury or death.
WARNING: Before removing or replacing any oven component, thoroughly read the safety instructions
found at the front of this manual and in Oven Systems (Section 5) and Troubleshooting (Section 6). Adhere to
all precautions and warnings outlined in these sections, as failure to do so could result in serious injury or death.
CAUTION: Before removing/installing any component, make sure it is disconnected from the wire
harness (where applicable).