
USER MANUAL Loudspeaker Management System LMS-D24, LMS-D26, LMS-D6


user manual
TA-890
TA-890 user manual
Page 89
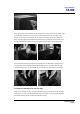
The high frequency diaphragm can now be removed and replaced if necessary.
Replacement is a straightforward reversal of the removal procedure, but be careful when
replacing the magnet assemblies - neodymium magnets are very strong and a steady hand
(preferably two) is required when aligning the magnet with the diaphragm.
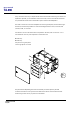
Removal of the high-mid frequency driver
In order to disassemble the 10” high-mid drive unit you will need to undo the M8 nylock nut
on the rear of the high-mid horn assembly with a 13mm spanner or socket. Remove the nut,
washer and nylon bushing and carefully pull the drive unit away and off the central threaded
spindle.
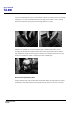
Replacement is a straightforward reversal of the removal procedure, but be careful when
replacing the drive unit - neodymium magnets are very strong and a steady hand (preferably
two) is required when aligning the drive unit onto the spindle.
Replace the nylon bushing and flat washer, and make sure that the drive unit frame locates
correctly inside the rim of the horn before tightening down the nylock nut.
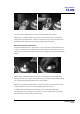
To replace the horn assembly back in the cabinet, rest it on the cabinet edge while
reconnecting the drivers, making sure you observe the correct polarity when reconnecting
the cables back into the terminals of the drive units.