
Owner's manual


______________________________________________________________ Response User’s Guide
9 | Page
Response Receiver
Along with the CPS Pulse, PRS RF or Cricket Student Response Pads,
you will need the USB Receiver. The Response and CPS RF
Receiver uses radio frequency (RF) technology. All
responses inputted into the Student Response
Pads are transmitted to the receiver and
recorded in the Response database.
Receiver Set Up
The receivers can accept signals from the CPS Pulse, PRS RF and the Cricket up to 150 feet
away.
1. Ensure the Response software is installed
first. Plug in the Response or CPS RF
receiver to an available USB port on your
computer.
2. Your operating system may run a wizard,
or search for the necessary drivers to
operate the receiver, the first time the
receiver is connected.
3. Open Response from your desktop icon. The Response main screen appears.
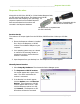
Manually Detect Receiver
1. Select Setup My Hardware. The eInstruction Device Manager opens.
2. The Response or CPS RF receiver
icon should appear with a green check
mark. The check mark shows the
receiver is connected.
3. If the Receiver icon doesn’t appear,
click the Options menu and Discover
Devices. If the Response or CPS RF
receiver appears with a red “X”, right-
click the Response receiver icon and
click Connect. The Response or CPS
RF receiver will then be connected.
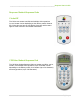
PRS Receiver (Compatible with the
PRS RF and the Cricket Pads)
CPS RF Receiver (Compatible with
the CPS Pulse Pads)