Advanced Sound Editor User Guide
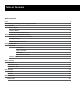
Table of Contents Table of Contents Intro 1 Downloading, Installing, and Setting Up Software 1 About Presets 2 Preset Types 2 Headset Modes 3 Preset & Headset Architecture 4 Presets: Selection, Saving and Loading 5 5 Selecting a Preset (Preset Buttons) Saving/Loading 5 6 Downloading New Presets Configuration Tab 6 6 Updating • Firmware 6 • Voice Prompts 7 • EEPROM 7 • Restore All Defaults 7 Headset Info
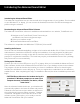
Introducing the Advanced Sound Editor Introducing the Advanced Sound Editor The Advanced Sound Editor lets you view and edit all of the parameters of your headset. Once installed on your Windows PC or laptop, you can connect the Headset/Control Unit via USB and manage the presets using the software. Downloading the Advanced Sound Editor Software The Advanced Sound Editor software is available as a download from our website, TurtleBeach.com 1. Navigate to the Turtle Beach Preset Community at: turtlebeach.
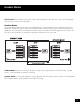
About the Presets Advanced Sound Editor Display Modes The Advanced Sound Editor can display in a compressed or expanded mode. The view can be selected by clicking on the “Advanced” button at the bottom of the program screen. Basic Mode: In this mode only preset selection and update options are shown. All sliders and adjustable parameters are hidden. Advanced Mode: This mode allows viewing of all adjustable parameters in the ASE. Everything available in the tool is visible.
Headset Modes Chat Presets: Chat Presets control the “Chat” (Other peoples voice) and “Mic” (Your voice) and apply effects only on these two audio paths. Headset Modes Some headsets may have an option for Speaker Mode. These headsets have a dedicated output for speakers, and when in this mode have a separate bank of Game Presets you can specifically tune for speakers. You may want to have different presets due to the different HRTF applied in this mode.
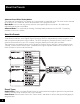
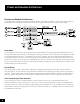
Preset and Headset Architecture Presets and Headset Architecture There are three categories of presets (Global, Game, Chat) that combine to control all signal paths in the headset. The illustration below shows the DSP signal flow and other system processing. Noise Gates A noise gate on each input of the three primary paths (Game, Chat, Mic) allows background noise to be removed from that channel. Controlling the settings on these “Gates” allows for an experience with very little background noise.
Presets: Selection, Saving and Loading Ear Guard™ Volume Limiter A volume limiter precedes the headset amplifier to set the maximum level of sounds sent to the speakers. This feature is referred to as “Ear Guard” since it reduces excessive sound levels during loud sections of the game to help protect the ears. This effect is stored as part of the Global Preset. Presets: Selection, Saving and Loading This section is identical in Basic and Advanced modes.
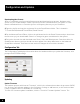
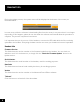
Configuration and Updates Downloading New Presets 1. Go to TurtleBeach.com/community/presets.aspx and download some presets. Navigate to the section for your model headset. Select Community Presets to download from your peers or Turtle Beach to download from us. Save the zip file to a temporary directory on your hard drive. 2. Open the zip file and copy the xml preset file to the SavedPresets folder. This is located in: “C:\Turtle Beach\Advanced Sound Editor\Saved Presets” 3.
Configuration and Updates Advanced Sound Editor software will check the Turtle Beach web site for the latest firmware release and compare it to what’s in your headset. If it’s newer, it will prompt you to download and install it. It is important that you do not turn off the headset or remove the USB cable while the firmware is being uploaded to the headset. Disrupting the data transfer can cause your headset to become inoperable.
Headset Info During the update process, the system status will be displayed at the bottom of the screen, as illustrated below. In some cases, while the software is downloading files from the server, it may seem that it is no longer responding. If this happens, please do not shut down the software and instead allow the procedure to complete. The process may take a few minutes. It is important that you do not turn off the headset or remove the USB cable while the files are being uploaded to the headset.
Presets: Game Tab Game Presets The following diagram illustrates the audio processing sections in the game channel: The parameters in each processing section are represented in the Game, Notch Filter, and Compressor tabs. All changes made in these three tabs are saved in the Game Preset and affect only the Game audio. REMEMBER: Any edits made in these tabs are not saved unless you either save your preset to headset or hard drive.
Presets: Game Tab Attack: This is how quickly the audio will be passed through after the level of the signal becomes louder than the set threshold. Measured in milliseconds. Release: This is how quickly the audio will shut off after the level of the signal becomes quieter than the set threshold. Measured in milliseconds. Threshold: This is the level that the audio needs to exceed for the audio to be passed through the headset.
Presets: Game Tab Active/ Pass Thru Button: When Active is enabled, the high and low pass filters are activated. When Pass Thru is enabled, the filters are disabled. Threshold: Sounds below the threshold setting will be boosted by up to the amount of gain set by the gain slider. Sounds above the threshold will not be affected. Measured in dB Gain: The gain setting determines how much the sounds below the threshold will be boosted. Measured in dB.
Presets: Game Tab Sound Field Expander The sound field expander can be used for widening a stereo sound field, boosting center sounds and accentuating sounds from the left and right sides. The signal flow of the expander is shown below. The left and right channels are processed independently and split into four paths. Igain: This sets the overall gain into the Sound Field Expander and should be set to a level that does not produce distortion, yet achieves adequate signal gain.
Presets: Game Tab Mgain: Controls whether to expand or contract the sound field. When positioned in the center, the M Gain slider does nothing, so the H Gain is a stereo signal. When positioned at the bottom, the M Gain slider adds the left and right channels together and routes them to the H Gain slider. So the H Gain controls a mono signal that is the sum of left and right signals. When positioned at the top, the M Gain slider subtracts the left and right channels and routes them to the H Gain slider.
Presets: Notch Filter Tab Notch Filters Although the notch filters are on their own tab, they are part of the Game Preset. Notch filters will allow you to take a specific frequency in the audio and completely remove it. For example you could remove the ringing effect of a flash-bang or a particular frequency of a bird chirping. Eight filters are available to use, they all operate the same way and independently from each other. Fc: This allows you to select the center frequency you want to notch.
Presets: Compressor Tab Compressors Although the compressor block is on its own tab, it is part of the Game Preset. The compressors in this block will allow you to dynamically adjust the levels of different frequency ranges while leaving others unaffected. Low Fc/High Fc: Sets a low and high frequency cutoff. This allows you to choose high/low crossover points and splits the frequency spectrum into three distinct sections.
Presets: Chat Tab Chat Presets The following diagram illustrates the audio processing sections in the chat and mic channels, these are controlled by the Chat Presets. Chat Tab Silencer The Silencer noise gate eliminates background noise from the chat input. When the chat level is below the threshold setting, the noise gate blocks the chat audio from passing, creating total silence.
Presets: Chat Tab Release: The release time determines how long the gain boost will remain after the game sound returns to a normal level. A typical setting is 9 seconds, meaning that if the game returns to normal sound for longer than 9 seconds, the chat gain will return to 0dB. Measured in seconds. Boost: Sets the amount of chat boost and ranges from 0dB (no boost) to 12dB (about a 4 times boost). Equalizer The equalizer modifies the tone of the chat signal.
Presets: Mic Tab Mic Tab Silencer: The Silencer noise gate eliminates background noise from being picked up by the mic. Attack: This is how quickly the audio will be passed through after the level of the signal becomes louder than the set threshold. Measured in milliseconds. Release: This is how quickly the audio will shut off after the level of the signal becomes quieter than the set threshold. Measured in milliseconds.
Presets: Mic Tab Ring Modulator This slider lets you choose a frequency to modulate your voice with. This will give it a robotic sound. Try different positions for unique sounding voice effects. Modulate This slider sets the balance between your normal voice and modulated voice. Moving the slider down passes more of your normal voice and moving it up adds the modulated sound you’ve selected. If you place it in the middle, you’ll get a 50/50 balance between normal and modulated voice.
Presets: Master Tab Global Preset Master Tab The global preset will allow you to set the final mix and tonal balance of the headset. It also includes the Ear Guard that will prevent the headset volume from exceeding a level that would hurt your ears. Final Mix This allows you to set the final mix of each path that you will hear in the headset. Chat: How loud you hear other people speak. * Mic Pre: Level of the Mic Monitor you hear without any voice effects applied.
Presets: Master Tab 12 Band Equalizer The band equalizer lets you change the overall tonal balance of the headset. The sliders will boost or cut the designated frequencies by +/-12dB at the following frequencies. 20: 20Hz shelving filter 27.5: Provides a resonant boost or cut at 27.5Hz. 55: Provides a resonant boost or cut at 55Hz. 110: Provides a resonant boost or cut at 110Hz. 220: Provides a resonant boost or cut at 220Hz. 440: Provides a resonant boost or cut at 440Hz.