
Owner's Manual


1
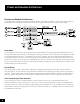
Introducing the Advanced Sound Editor
Introducing the Advanced Sound Editor
The Advanced Sound Editor lets you view and edit all of the parameters of your headset. Once installed
on your Windows PC or laptop, you can connect the Headset/Control Unit via USB and manage the
presets using the software.
Downloading the Advanced Sound Editor Software
The Advanced Sound Editor software is available as a download from our website, TurtleBeach.com
1. Navigate to the Turtle Beach Preset Community at:
turtlebeach.com/community/presets.aspx.
2. Select your headset model.
3. Download the Advanced Sound Editor.
The software is compatible with WWindows 7 (32/64 bit), Vista and XP.
Installing the Software
Once the le has nished downloading, navigate to its location and double click it. (Note: You must be
administrator to install the tool) Before running the installation, close any programs (including anti-
virus programs) that are running so they will not interfere with the installation process. Follow the
prompts to complete the installation. The install may require you download the latest .Net 4 package,
this process will occur automatically.
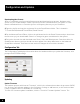
Setting up the Software
Connect your unit to a free USB port on your PC or laptop. After you’ve installed the Advanced Sound
Editor software, double click the Advanced Sound Editor icon on your desktop to launch the software.
The program can also be found at the location you chose for installation. When rst launching the
software, the initialization screen will pop up. Enter your registration credentials from the website to
enable the tool. After completing this step, if a headset is detected, the driver installation process will
begin.
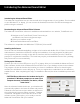
CAUTION: Do not disconnect the headset during this
procedure! If Windows prompts you to restart your
computer because it installed a new device, choose
“restart later”.
After the software installs the drivers, your headset will
automatically update to the latest rmware and presets.
Follow the onscreen instructions and do not disconnect
the unit during this process. When complete, “Headset
is attached” will appear in the lower left corner of the
software screen. At this point, you’re ready to use the
Advanced Sound Editor with your headset.