FOR / POUR XBOX 360® | PS3™ I PC I Mac Watch Turtle Beach product training videos at: product support and warranty information: youtube.com / TurtleBeachVideos TurtleBeach.com / support Copyright © 2012 Voyetra Turtle Beach, Inc. (VTB, Inc.) All rights reserved. No part of this package may be reproduced without permission. Turtle Beach, the Turtle Beach Logo, Voyetra, Ear Force, and Engineered for Gaming are either trademarks or registered trademarks of VTB, Inc.
L I M I T E D E D I T I O N User Guid Guide de
Congratulations on your purchase of the Call of Duty®: Black Ops II Sierra gaming headset from Turtle Beach. Well played (so far). This premium product is designed to bring unmatched realism and effects to your gaming experience, enhancing it in ways you haven’t known previously. Welcome to Turtle Beach excellence! DOWNLOAD GAME OPTIMIZED PRESETS TURTLEBEACH.COM / PRESETS Customize your own presets using tools available on our website.
Table of Contents Headset Overview 2 Package Contents 3 Feature/Function Map 4 Control Unit Functions 6 Using your Sierra Headset on XBOX 360 8 Using your Sierra Headset on PS3 10 Using your Sierra Headset on a PC 13 Using your Sierra Headset on a Mac 15 Using your Sierra Headset with Other Devices 16 Speaker Mode 17 Presets 18 Specifications 19 Compliance / Conformity 22 Warranty 24
Headset Overview Your Turtle Beach Call of Duty®: Black Ops II Sierra headset is compatible with XBOX, PS3 and PC or Mac gaming platforms. You can enjoy gaming at home or at tournaments and while on the go with portable game systems and mobile devices like smartphones and tablets. · Programmable presets that change your sound environment and allow you to hear sound cues you’d normally miss. Down load from turtlebeach.
Package Contents T U RT LEB E ACH.COM Sierra Headset Control Unit Console Interface Turtle Beach Sticker with Removable Mic Boom Console Interface USB Cable XBOX 360 Talkback Cable Digital Optical Cable FOR / POUR XBOX 360® I PS3™ I PC / MAC® Headset Breakaway Cable FOR / POUR XBOX 360® | PS3™ | PC | MAC® Quick Start Guide For the full user guide, please go to http://www.turtlebeach.
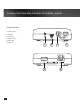
Feature / Function Map (Location of controls / inputs) Console Interface 1. Auxiliary Input 2. USB Input 3. Digital Input 4. Digital Pass Thru 5. USB In / Out 6.
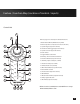
Feature / Function Map (Location of controls / inputs) Control Unit 1 2 Refer to page 6 for a description of button functions. 1.Game Volume Wheel (Multifunction) / Mute 2. External Speaker Jack (located on side of controller) 3 19 3. Speaker Angles (Capacitive Touch)* 4. Surround Sound Toggle (Capacitive Touch)* 4 18 5 17 5. Speaker Selection (Capacitive Touch) 6. Power Switch 7. Programmable Control Dial 8. Auxilliary / Phone Volume Control Dial 9. Chat Preset Button (Capacitive Touch) 10.
Control Unit Functions Game play with Turtle Beach Sierra headset is performed using the functions of the Control Unit. The Control Unit has the following functions: 1. Game Volume Wheel: This controls the master game volume as well as the individual 5.1 speaker volumes. Press the wheel to mute game audio and again to unmute. The circular LED around the knob lights RED when muted and ORANGE when functioning normally. Volume Knob Speaker Function LEDs/ 5.
Control Unit Functions 13. Main Preset Button: Toggle between default flat preset and the last active preset. In Chat Presets mode, toggles between default flat Chat preset and the last active Chat preset. 14. Chat Volume Control Dial: Sets the chat volume level. 15. Presets Switches (1 – 8): Select from Game Presets 1 – 8. 16. Mode Button: Press this button to select Headset or Speaker mode. LED lights ORANGE for Headset mode, and BLUE for Speaker mode.
Using your Sierra Headset on XBOX 360® 1. Connect the Console Interface to the Xbox 360 game console using the Digital Optical Cable and Console Interface USB cable as shown below. Connect the Digital Optical Cable to the Console Interface's DIGITAL IN jack. Note: Older Xbox 360 models will also require an Xbox 360 Audio Adapter Cable (sold separately). 2. Connect the Control Unit to the Console Interface as shown below. Utilize the Control Unit Extender Cable if necessary. 3.
Using your Sierra Headset on XBOX 360® XBOX 360 Audio Configuration Voice Digital Output Voice Volume 10 Game Volume 10 Current Setting Digital Stereo Dolby Digital Choose the digital output type for your system. Dolby Digital 5.1 Dolby Digital 5.1 with WMA Pro This setting only applies to optical digital and HDMI audio outputs. Mute Kinect Voice Output Play Through Headset Play Through Speakers Play Through Both Select Back 1. Go to XBOX Settings. 2.
Using your Sierra Headset on PS3 1. Connect the Console Interface to the PS3 game console using the Digital Optical Cable and Console Interface USB cable as shown below. Connect the Digital Optical Cable to the Console Interface's DIGITAL IN jack. 2. Connect the Control Unit to the Console Interface as shown below. Utilize the Control Unit Extender Cable as necessary. 3. Connect the Sierra Headset to the Control Unit using the Headset Breakaway Cable as shown below. 4.
Using your Sierra Headset on PS3 PS3 Audio Configuration Audio Device Settings Microphone Level 3 Input Device TURTLE BEACH SIERRA Output Device TURTLE BEACH SIERRA OK X Enter Back 1. Go to “Settings” - Choose “Accessory Settings - Choose “Audio Device Settings” - Choose “Input / Output Device” - Choose “Turtle Beach Sierra” 2. Adjust microphone level 0 12/14 12:15 PM Audio Output Settings Select the connector on the TV or AV amplifier (receiver).
Using your Sierra Headset on a PC / Mac 3.5mm Stereo Cable (not included) 3.
Using your Sierra Headset on a PC 1. Connect the Control Unit to your PC using the Digital Optical Cable. Allow five (5) minutes for Windows to automatically install drivers. 2. Once Windows successfully installs the drivers, power the unit OFF, then power ON again. 3. Using your mouse, right click the speaker icon on the task bar and select “Playback Devices.” 4. Then right click on “Turtle Beach Sierra Game” and select “Set as Default Device.
Using your Sierra Headset on a PC 5. Right click on “Turtle Beach Sierra Chat,” and select “Set as Default Communication Device.” 6. Left click “Turtle Beach Sierra Game,” and click, “Configure,” to confirm 5.1 channel audio. 7. Press “Next” two (2) times to ensure that “Front Left and Right,” and “Surround Speakers,” are set to full range. Then press “Next” again to confirm setting. 8. Click on the Recording tab followed by a right click on “Turtle Beach Sierra Chat,” Select, “Set as Default Device.
Using your Sierra Headset on a Mac 1. Connect the Control Unit to your Mac and go to System 3. Select “Turtle Beach Sierra Chat” on the Input tab. Preferences/ Sounds. 2. Select “Turtle Beach Sierra Game” on the Output tab. Chat program screens may differ depending on the operating system. ·Using Skype (download from www.skype.com), open your preferences. Go to Audio / Video and select, “Turtle Beach Sierra Chat,” for microphone, ringing and speakers.
Using your Sierra Headset with Other Devices The 4-pole, 3.5mm jack in your Sierra Headset’s Breakaway Cable allows you to enjoy great audio wherever you go by plugging into your mobile phone, portable game system, tablet, MP3 player and more. Utilize the attached mic boom for chat or remove it and add a Mobile Adapter Cable (sold separately) for a more streamlined inline mic and call controls.
Speaker Mode Turtle Beach Sierra Control Unit may be connected to a stereo speaker system. Note, the Headphone Jack is deactivated when in Speaker Mode. 1. Connect the Control Unit to a digital music player using a 3.5mm cable (not included) as shown. 2. Connect Desktop Speakers (not included) to the Control Unit using a 3.5mm cable as shown. 3. Connect PC to the Control Unit using USB cable as shown. 4. Press the Mode Button on the Control Unit until it lights blue indicating Speaker Mode is active.
Presets Your Sierra headset features several built-in presets on the Control Unit for enhanced gaming, voice and speaker effects. Simply tap the numbered preset on the Control Unit to switch Game Presets. Press the Chat Presets Button once to enable Chat Presets for buttons 1 – 8 to become Chat Presets (times out after 15 seconds). Press again to return to Game Presets. Speaker Presets are only available when in Speaker Mode.
Presets / Specifications Speaker Presets Main: Incorporates Dolby® Surround Sound processing for an immersive audio experience. 1. Flat: Hear stereo game sound without effects processing or Dolby Surround Sound. 2. Bass Boost: Hear and feel the rumble of deeper bass sound effects. 3. Treble Boost: Boost high frequencies for crisper sounds and greater clarity. 4. Bass Boost & Treble Boost: Rumbling lows and crisp highs come through clearly. 5.
Regulatory Compliance Federal Communications Commission (FCC) Compliance Notices This section includes the following FCC statements for the EAR FORCE SIERRA RX & TX Models: · FCC ID: XGB-TB2276 & XGB-TB2271 · Class B Interference Statement · RF Radiation Exposure & Hazard Warning · Non-Modification Statement · Deployment Statement Class B Interference Statement This equipment has been tested and found to comply with the limits for a Class B digital device, pursuant to Part 15 of the FCC Rules.
Regulatory Compliance Canadian ICES Statements IC: 3879A- TB2290 & 3879A- TB2291 This device complies with ICES-003 and RSS-210 of Industry Canada. Operation is subject to the following two conditions: 1. This device may not cause interference, and 2. This device must accept any interference, including interference that may cause undesired operation of the device. Ce dispositif est conforme aux normes NMB003 et CNR-210 d’Industrie Canada. 1.
Declaration of Conformity European Union and European Fair Trade Association Regulatory Compliance This equipment may be operated in the countries that comprise the member countries of the European Union and the European Fair Trade Association.
European Community Declaration of Conformity Bulgaria / български: С това, nortel обявява, че този модел на радио на Product A, е със съгласие с съществените изисквания и други важни условия на директива 1999/5 на европейски съюз Czech Republic I Èesky: Norteltímto prohlašuje, že tento Product A, je ve shodì se základními požadavky a dalšími pøíslušnými ustanoveními smìrnice 1999/5/ES.
LIMITED ONE YEAR WARRANTY FOR TURTLE BEACH PRODUCTS: Voyetra Turtle Beach, Inc. ("VTB") warrants to the original end-user purchaser ("Purchaser") that the retail Turtle Beach hardware product herein ("Product") will be free of defects in materials and workmanship for a period of one year from the date of purchase by the Purchaser ("Warranty Period"). Any Extended Warranty or Service Plans purchased through a Retail store are not honored by VTB.