User’s Guide Version 6 www.TurtleBeach.
Notices Riviera User’s Guide Version 6 Software and documentation copyright © 2005 - 2009 Voyetra Turtle Beach, Inc. All rights reserved. No part of this publication may be reproduced or transmitted by any means or in any form without prior written consent from Voyetra Turtle Beach, Inc. (“VTB”).
WWW.TURTLEBEACH.COM Contents INTRODUCING RIVIERA ........................................1 RIVIERA CD ...............................................2 Riviera Program Suite 2 RIVIERA CONNECTORS .........................................3 System Requirements 4 INSTALLING THE RIVIERA SOUND CARD ............................5 Installing the Riviera 5 Installing the Drivers and Software 6 To uninstall Riviera 7 Optimizing Playback Performance in Windows 2000 and XP 7 CHECKING RIVIERA AFTER INSTALLATION .........
WWW.TURTLEBEACH.COM INTRODUCING RIVIERA Riviera represents the latest generation in multi-channel PC audio and provides the following key features: DVD Playback with full 6-speaker surround sound. Surround sound available via digital audio connection to a home theater system or multiple analog audio outputs connected to a surround speaker system.
RIVIERA CD The Riviera CD includes the following components: Riviera Drivers Audio drivers for XP, Vista and Win 7. Riviera Control Panel Software A convenient utility for controlling the Riviera audio features. Adobe® Acrobat® Reader PDF Reference Manuals A limited version for use with the reference manuals. PDF versions of software reference manuals that can be viewed and printed with the Adobe Acrobat program included on the CD.
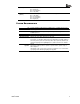
WWW.TURTLEBEACH.COM RIVIERA CONNECTORS Connector Function VersaJack™ / Line-In L/R This multi-function jack operates in two modes which are selected on the Riviera Control Panel (described in the previous section): Center/Sub Speaker Output Mode: When using Riviera for 5.1 surround sound playback, this jack provides analog signals for the center and sub speaker outputs.
(Stereo) Pin 1 - Ground (black) Pin 2 - Right (red) Pin 3 - Ground (black) Pin 4 - Left (white) Aux L/R In (Stereo) For internal analog audio from 2nd CD or DVD. Pin configuration: Pin 1 - Left (white) Pin 2 - Ground (black) Pin 3 - Ground (black) Pin 4 - Right (red) SYSTEM REQUIREMENTS PC RAM Hard Drive Display Operating Systems CD-ROM Drive Pentium 800 MHz or higher with one available PCI 2.
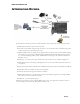
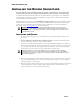
WWW.TURTLEBEACH.COM INSTALLING THE RIVIERA SOUND CARD If you’re replacing a sound card that’s already in your PC, or if your PC has a sound chip on the motherboard (i.e. if there are headphone and microphone jacks on the front or rear of your PC): Uninstall the drivers and associated software for the old sound card or sound chip on your motherboard before installing your Riviera sound card. This will help avoid any possible conflicts between the Riviera sound card drivers and the older drivers.
Remove the rear bracket 6. Gently install the sound card Replace the PC‟s cover, reconnect the power cord and peripherals. Connect your powered speakers, microphone, and any other audio peripherals to the appropriate inputs and outputs on the sound card.
WWW.TURTLEBEACH.COM 4. When prompted, reboot the system. While preparing for reboot, the PC may appear to be temporarily "frozen". Do not interrupt the computer at this time. Wait a few minutes for the installation to complete. The wait time will vary depending on the speed of your PC. Please wait for the system to reboot to properly complete the installation.
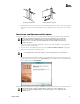
CHECKING RIVIERA AFTER INSTALLATION LAUNCHING THE RIVIERA CONTROL PANEL After running the software installation procedure from the Riviera CD, the Turtle Beach palm tree icon should appear in the Windows Systray at the bottom right of your PC screen. Clicking on this icon will bring up a menu from where you can launch the Riviera Control Panel. You can also launch the Riviera Control Panel by clicking Start All Programs Turtle Beach Riviera Run Riviera Control Panel.
WWW.TURTLEBEACH.COM NO SPEAKER SOUND If you don‟t hear any sound, check the following: Check that the speakers are turned on. Make sure you‟re not using passive speakers that require an amplifier. The Riviera analog outputs can only drive powered speakers, not passive speakers. Check that the speakers are properly connected to the Riviera analog outputs. See the Control Panel Speakers Tab section in this manual for details.
USING THE RIVIERA PLAYING DIGITAL MUSIC WITH WINDOWS MEDIA PLAYER Once you‟ve confirmed that the speakers are operating properly, launch Windows Media Player and play some music files from your digital song library. If you don‟t hear any sound even though Media Player indicates the song is playing: Check that Media Player‟s volume control is turned up. In Windows 2000/XP, Check that Media Player is configured to play from the Riviera by clicking Tools on the Windows Media Player menu.
WWW.TURTLEBEACH.COM Enable the Environments in the Equalizer Tab and select an Environment from the pull-down menu. This sends the stereo signal processed by reverb to the surround speakers. You can adjust the amount of this effect with the Surround speaker volume controls in the Speaker Tab. Use the Equalizer to alter the tone to suit the genre of music you‟re listening to.
LISTENING TO DVDS IN SURROUND SOUND Watching DVDs on your PC requires DVD software, such as Cyberlink PowerDVD or InterVideo WinDVD, that plays DVDs with 5.1 surround sound output. This software is usually included with the DVD player installed on your PC. Typically, these programs provide an audio option tab that lets you set the audio playback format. From this tab, you should set the audio playback format to 5.1 surround so that the DVD audio will play on all 6 channels of your multi-channel system.
WWW.TURTLEBEACH.COM USING EAR FORCE SURROUND SOUND HEADSET ® Turtle Beach Ear Force headphones are a perfect add-on for the Riviera. Be sure to check them out at www.TurtleBeach.com. The optional Turtle Beach Ear Force HPA2 surround-sound headset lets you experience surround-sound without having to set-up a 5.1 speaker system. The Ear Force HPA2 includes an amplifier unit that boosts the output level of the 5.
RIVIERA CONTROL PANEL The Control Panel lets you access all of the Riviera audio features. You can launch the control panel from the Turtle Beach palm tree icon located on the right side of the Windows Start menu or by clicking Start All Programs Turtle Beach Riviera Run Riviera Control Panel. The control panel includes a set of tabs which, when clicked, activate various controls for accessing Riviera‟s features.
WWW.TURTLEBEACH.COM USING THE CONTROL PANEL PRESETS SAVING AND RESTORING PRESETS The Control Panel lets you save the Tab settings as presets for easy recall. Once you‟ve set the controls for a particular configuration, click on the Preset button, then click Save to call up the Save Preset dialog. Select a category from the Preset Category menu, type in a name, then press OK. To restore a saved preset, click the Preset button and select the category name followed by the preset name.
SPEAKERS TAB The Speakers Tab is divided into the following sections: “Speaker Configuration” lets you test speaker operation and select speaker configuration modes. “Volume” sets the master volume and individual speaker volumes. “Settings Summary” indicates the status of important control panel settings. S/PDIF Settings sets the digital output configurations. “Speaker Mix Tuned For” (Vista/7 Only) allows for further multi-speaker configuration options available only in Windows Vista/7.
WWW.TURTLEBEACH.COM SPEAKER CONFIGURATIONS The Speaker Configuration pull-down menu sets the following speaker modes: Headphones (2-speakers) 2 Speakers (Stereo) 4 speakers (Quad) 5.1 Speakers (5.
5.1 Headphones (5.1 Surround) TESTING THE SPEAKER CONFIGURATION After selecting the speaker configuration to match your speaker system, you can check if the speakers are properly connected by clicking on the speaker icon to play a test signal on that speaker.
WWW.TURTLEBEACH.COM VOLUME SECTION Master Volume: Controls the volume of all speakers. Pan: Controls L/R balance. Mute: Mutes all outputs when lit. INDIVIDUAL SPEAKER VOLUMES The volume controls for each speaker in the selected configuration are located to the right of the Master Volume slider. The number of sliders will depend on the speaker configuration (2 sliders for stereo, 4 sliders for quad, etc.).
The S/PDIF Pull-down menu lets you select the following S/PDIF output modes: S/PDIF Out Off: S/PDIF output is turned off, so there is no digital signal. Note that whenever S/PDIF is turned on, a red light will be emitted from the S/PDIF output on the rear bracket. S/PDIF Out 44.1kHz: Digital audio is transmitted in S/PDIF format at 44.1kHz sample rate. S/PDIF Out 48kHz: Digital audio is transmitted in S/PDIF format at 48kHz sample rate.
WWW.TURTLEBEACH.COM GRAPHIC EQUALIZER TAB GRAPHIC EQUALIZER The Graphic Equalizer provides 10 frequency bands that can be boost or cut to tailor the system frequency response, or tone. Two rows of buttons at the top of the slider bank provides quick access to eight equalizer presets. The Flat setting returns the sliders to their zero (i.e unmodified) positions.
MIXER TAB Mixer Tab in Windows 2000/XP Mixer Tab in Windows Vista/7 PLAYBACK SETTINGS The Playback mixer provides an array of volume, mute and pan controls for balancing the sound sources when listening with headphones or speakers. Each slider controls a specific source of sound on the PC, including: Wave (not available in Vista/7): Sets the playback level of the PC‟s digital audio sources, such as MP3 files, Windows sounds, etc.
WWW.TURTLEBEACH.COM SW Synth (Software MIDI Synthesizer) (not available in Vista/7): Sets the volume of the Windows MIDI software synthesizer. Use the Pan control to balance the left and right signals. Microphone: Sets the volume of the microphone input. Since the microphone is a mono input, it does not have a pan control. The Microphone Options Button, labeled “…”, activates a dialog box with an option to boost the microphone volume by +20dB. CD Player: Sets the volume for the CD ROM audio.
HARDWARE WARRANTY Voyetra Turtle Beach, Inc. ("VTB") warrants to the original end-user purchaser ("Purchaser") that the Turtle Beach Riviera ("Product") will be free of defects in materials and workmanship for a period of one (1) year from the date of purchase by Purchaser ("Warranty Period"). If a defect should occur during the Warranty Period, the Purchaser must obtain a Return Merchandise Authorization ("RMA") from VTB.