WIRELESS NOISE-CANCELLING DTS SURROUND SOUND HEADSET USER GUIDE
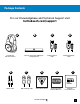
Package Contents For our Knowledgebase and Technical Support visit turtlebeach.
About the Elite 800 5 Parts and controls 7 Headset Charging 10 PS4™ and PS3™ Console Setup 11 PS4™ Setup 12 PS3™ Setup 14 Xbox One™ Setup 16 Windows® and Mac® OSX Computer Setup 20 Wired Setup 21 Bluetooth Pairing 22 Bluetooth Operation 23 Pairing the Headset and Transmitter 24 Active Noise Cancellation 25 Adjusting the Sound 26 Firmware Upgrades and Personalization 29 Replacing Rocker Plates 30 Specifications 31 Troubleshooting tips 32 Important safety information 34 R
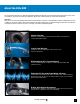
About the Elite 800 The Turtle Beach Elite 800 is a sophisticated gaming headset designed to unlock the audio potential of games, music, movies and more. To get the most from your Elite 800, please take a few moments to review this introduction. Overview Welcome to the future of gaming audio with Turtle Beach Elite. Powerful sound, abundant comfort and dynamic function combine to exceed your wildest expectations with the Turtle Beach Elite 800.
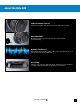
About the Elite 800 Magnetic Charging Stand Low profile magnetic charging stand keeps your Elite 800 fully charged without cables. Bluetooth Versatility Enjoy wireless Bluetooth connectivity with all your mobile devices including PS Vita™. Never Miss a Text or Call Pair your mobile phone to hear text notifications or take calls while gaming. Rechargeable Battery Built-in rechargeable battery delivers over 10 hours of wireless gaming.
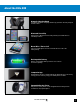
About the Elite 800 Separate Volume Controls Set your mix of game and chat volume levels right on the headset. Stop SHOUTING! Mic Monitoring lets you hear your own voice in the headset to avoid shouting. Dynamic Chat Boost™ Even during loud gameplay spikes, chat volume automatically rises to ensure you never miss a command.
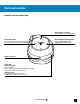
Parts and controls Headset Controls: Left Earcup Game Volume +/- Buttons Raise and lower the Game Volume. Bluetooth/Multi-Function Button See the “Bluetooth Pairing and Operation,” pages 22-23.
Parts and controls Headset Controls: Right Earcup Chat Volume +/- Buttons Raise and lower Chat Volume Mic Mute Button Press = Mic On/Off. A high tone in the Headset will confirm Mic On. A low tone will confirm Mic Off. Preset Button Press = Cycle through Turtle Beach Signature Audio Presets. A voice prompt in the Headset will confirm your selection. Press and Hold = Cycle through Mic Presets. Quiet Room > Normal Room > Loud Room > Outdoor. A voice prompt in the Headset will confirm your selection.
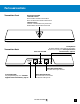
Parts and controls Transmitter: Front Bluetooth Status LED CHARGING STATUS Red = Headset Seated on Transmitter Blue = Headset Not Seated on Transmitter PAIRING STATUS Solid On = Headset Wirelessly Connected Double Blink = Headset Not Connected Transmitter: Back Power and Chat USB Pairing Button To initiate pairing, in the unlikely event that it becomes necessary. See “Pairing the Headset and Transmitter,” page 24.
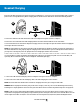
Headset Charging Even when the Elite 800 operates via wired connection to mobile devices, it can still use the internal amplifier and so requires power from its rechargeable battery. When charging, both the Headset Power LED and the Transmitter LED will glow Red. A B C 1.Connect the USB end of the USB Transmitter Cable to a USB port on the game console or computer. 2.Connect the micro-USB end of the USB Charging Cable to the Power and Chat USB Port on the Transmitter. 3.
PS4™ and PS3™ Console Setup The Elite 800 headset is designed for use with PS4™ and PS3™ consoles. B C F Console Console DIGITAL OUT (OPTICAL) 1. Connect the USB end of the USB Transmitter Cable to a USB port on the game console. 2. Connect the micro-USB end of the USB Transmitter Cable to the main USB port on the Transmitter. NOTE: Do not use the USB port labeled “PROGRAM ONLY.” 3.
PS4™ Setup Primary Output Port Select the input format supported by the device (TV, AV amplifier or receiver) that is connected using the DIGITAL OUT (OPTICAL) port. Note that if the device does not support the selected format, the speakers might be damaged. 4. In the PS4 menu, go to Settings > Sound and Screen > Audio Output Settings > Primary Output Port > Digital Out (OPTICAL). 5. In the check-off boxes, select ONLY Dolby Digital 5.1 ch. NOTE: Do not select DTS.
PS4™ Setup Microphone Level Speak into the microphone and adjust the microphone level so that the input volume is in the [Good] range. Increase the microphone level if the input volume is too low, and decrease the microphone level if the input volume is too high. 12. Go to Settings > Devices > Audio Devices > Headsets and Headphones > Microphone Level. 13.
PS3™ Setup 1. In the PS3 menus, go to Settings > Accessory Settings > Audio Device Settings. 2. Set the Input Device and Output Device fields to Turtle Beach Elite 800. Audio Device Settings Microphone Level 3 Input Device Turtle Beach Elite 800 Output Device Turtle Beach Elite 800 OK X Enter Back 3. Go to Settings > Sound Settings > Audio Output Settings > Optical Digital. Audio Output Settings Select the connector on the TV or AV amplifier (receiver). Turn on the power of the connected device.
PS3™ Setup 4. In the check-off boxes, select ONLY Dolby Digital 5.1 Ch. NOTE: Do not select DTS. While the Elite 800 features DTS Headphone:X surround sound, the system requires a Dolby Digital input signal. Audio Output Settings Select an output format supported by the TV or AV amplifier (receiver) in use. The system will automatically adjust the output to match the selected format. Dolby Digital 5.1 Ch. DTS 5.1 Ch. AAC Linear PCM 2CH. 44.1 kHz Linear PCM 2 Ch. 88.2 kHz Linear PCM 2 Ch. 176.
Xbox One Setup Requires Xbox One Headset Adapter (Sold Separately) B C F Console Console DIGITAL OUT (OPTICAL) 1. Connect the USB end of the USB Transmitter Cable to a USB port on the game console. 2. Connect the micro-USB end of the USB Transmitter Cable to the main USB port on the Transmitter. NOTE: Do not use the USB port labeled “PROGRAM ONLY.” 3.Connect the Digital Optical Cable from the S/PDIF port of the game console to the Digital In port of the Transmitter.
Xbox One Setup 4. Insert the Xbox One headset adapter, sold separately, into the Xbox One controller. Use the two long pins to properly align the adapter 5. Connect the Mobile Cable to the Xbox One headset adapter and the Mobile Connection on the left earcup of the Headset. 6. Connect the Xbox One Controller to the Xbox One Console using the Micro USB Update Cable.
Xbox One Setup 7. Follow the on-screen prompts to update your controller. Home FEATURED Your controller needs an update An update is available for a recently connected Xbox One controller. Would you like to update it? Update controller Cancel 8. Take this time to update additional controllers if necessary. Controller updated Note: If your adapter is not functioning correctly after these steps, try updating your controller again. To do this go to Settings >> System >> Update Controller.
Xbox One Setup 9. Go to the Xbox One Home Screen and Pres the button on the Xbox One Controller. Settings TESTING LAB CONSOLE FA M I LY About me OT H E R P E O P L E Add to family Sign-in, security & passkey Network Kinect Preferences TV & OneGuide Disc & Blu-ray System Display & sound Closed captioning Privacy & online safty Payment & billing Subscriptions Remove accounts Set up your family to manage your children’s Xbox experiences. CC My home Xbox Power & startup 10.
Windows® and Mac® OSX Computer Setup The Elite 800 can also be used on Windows or Mac OSX computers equipped with a Dolby Digital Live (DDL) sound card using a digital optical S/PDIF output. NOTE: Your computer must have a sound card with Dolby Digital Live installed in order to hear DTS Headphone:X surround sound through the headset. If your computer does not have that, you will only hear enhanced stereo audio. Connections for Windows and Mac computer game audio DIGITAL OUT (OPTICAL) 1.
Wired Setup The Turtle Beach Elite 800 is equipped to take advantage of game audio, music and video sound tracks from portable devices, including laptops, tablets, mobile phones and handheld gaming consoles, via the supplied Mobile Cable. Connect one end of the Mobile Cable to the Mobile Connection on the left earcup of the Headset and the other end to the headphone output jack of your mobile device. NOTE: You can continue to enjoy stereo audio via wired connection, even when the Headset power is off.
Bluetooth Pairing While the supplied Mobile Cable gives you wired connection to mobile devices, the Bluetooth feature enables wireless connections (HSP + A2DP). Enjoy the Turtle Beach Elite 800 with compatible mobile devices, such as tablets, smartphones and the PS Vita™ handheld system. 1. Power on your mobile device and go to Settings > Wireless and Networks, or the equivalent. 2. Power on the Elite 800 Headset. Press and hold the Bluetooth/Multi-Function button on the left earcup for four seconds.
Bluetooth Operation The effect of the Bluetooth Multifunction Button varies depending on whether you’re in call mode or stereo mode. Left Earcup Bluetooth Multifunction Button Action Call Mode Stereo Mode Single Press Answer/End call Play/Pause Double Press Redial Next Track In addition, three buttons on the right earcup change function when you’re using the Elite 800 exclusively via Bluetooth connection. NOTE: Functionality may vary by connected Bluetooth device.
Pairing the Headset and Transmitter The Elite 800 Headset and Transmitter come paired out of the box. When paired, with both the Headset and Transmitter powered on, the Transmitter’s LED will be on solid (lit, but not blinking). However, if your Transmitter’s LED is double-blinking, follow the steps below to pair your Headset and Transmitter. 4 seconds 1. Start this process with the headset powered OFF.
Active Noise Cancellation Active Noise Cancellation suppresses ambient noise, especially low-frequency noise such as aircraft engines and road noise. The system works by sensing outside noise with the built-in microphones and sending an equal-but-opposite signal into the headphones. The soft cushions of the Elite 800 also help block external sound, providing an added level of noise reduction. • To turn on Active Noise Cancellation (ANC), with the headset on, press the Power/ANC Button.
Adjusting the Sound If you want to... Then Adjust game/media volume. Use the Game Volume Up/Down buttons on the left earcup of the Headset. Adjust chat volume. Use the Chat Volume Up/Down buttons on the right earcup of the Headset. Turn the microphone on or off. Press the Mic Mute Button on the Headset. A high tone in the Headset will confirm Microphone On. A low tone will confirm Microphone Off. If you want to... Select Microphone Presets.
Adjusting the Sound If you want to... Then Adjust surround sound. The Elite 800 takes advantage of DTS® Headphone:X Surround Sound, which uses sophisticated processing to create surround sound using just two speakers. The system detects Dolby Digital® sound tracks from the PS4™ and PS3™ game consoles and compatible computers. The DTS system then processes these signals especially for headset playback. The system reproduces the sonic characteristics of rooms optimized for specific types of content.
Adjusting the Sound DTS Headphone:X 7.1 Surround Modes SURROUND MUSIC MODE Turtle Beach Signature Presets Signature Sound. Turtle Beach brings the music onto your personal stage. Scan your ticket for your own private concert. Stadium. Experience live concert music as it was meant to be heard. Feel the crowd around you as the band on stage turns it up to 11. Acoustic. Experience a personal concert for one: just you and your favorite artist. Dance.
Firmware Upgrades and Personalization Turtle Beach Windows Ear Force Audio Hub The Elite 800 is a highly programmable, microprocessor-based headset, designed to accept firmware upgrades from the Windows Ear Force Audio Hub. Firmware upgrades You can check to see that you have the latest, most advanced firmware at www.turtlebeach.com/Elite800. To upgrade the Elite 800, connect the Transmitter & Headset to an internet-connected computer using the USB Programming Cable.
Replacing Rocker Plates Customize your headset at www.turtlebeach.com/plates NOTE: The availability of additional speaker plates varies by market as is subject to local restrictions.
Specifications HEADSET Speakers: 50 mm with Neodymium Magnets Frequency Response: 20 Hz – 20 kHz Earcup Design: Around-Ear (Closed) Microphone Design: Dual Hidden Noise-Cancelling Microphones Bluetooth: Bluetooth Radio with Dual-Pairing Mode and A2DP Compatibility Battery: Rechargeable Lithium Polymer TRANSMITTER Game Input: Digital Optical (Toslink) with Digital Optical Pass-through Chat/Mic Input/Output: USB Surround Sound Processing: DTS Headphone:X 7.
Troubleshooting Tips No sound Possible cause Solution Power is off Confirm that the Headset is on. The Headset Power LED should be illuminated. Dead/low battery Recharge the Headset. See “Headset Charging,” page 10. NOTE: The Ear Force Audio Hub app for Android™ phones and tablets enables you to check battery status. Game Volume turned down Press the Game Volume Up Button on the Headset. Loose connection In game console and computer use, confirm that Transmitter is firmly connected.
Troubleshooting Tips Voice Chat Drops Possible cause Not selected as an Input Device Solution Select the Elite 800 as an Input Device. Depending on your platform, see “PS4 Setup”on page 12, “PS3 Setup” on page 14, “Xbox One Setup” on page 16 or “Windows and Mac OSX Computer Setup” on page 20. When using the Elite 800 with a computer, you may also need to check the Audio Settings in the specific software program you are using. Mic muted Press the Mic Mute Button on the right earcup of the Headset.
Important Safety Information To avoid potential damage to the device, always disconnect all cables before transporting it. WARNING: Permanent hearing damage can occur if a headset is used at high volumes for extended periods of time, so it is important to keep the volume at a safe level. Over time, your ears adapt to loud volume levels, so a level that may not cause initial discomfort can still damage your hearing.
Regulatory Compliance Statements for the Elite 800 RX & TX Models Federal Communications Commission (FCC) Compliance Notices This section includes the following FCC statements for the Elite 800 RX & TX Models: • FCC ID: XGB-TB3390 & XGB-TB3391 • Class B Interference Statement • RF Radiation Exposure & Hazard Warning • Non-Modification Statement • Deployment Statement Class B Interference Statement This equipment has been tested and found to comply with the limits for a Class B digital device, pursuant to Pa
Canadian ICES Statements IC: 3879A-3390 & 3879A-3391 This device complies with ICES-003 and RSS-210 of Industry Canada. Operation is subject to the following two conditions: 1. This device may not cause interference, and 2. This device must accept any interference, including interference that may cause undesired operation of the device. Ce dispositif est conforme aux normes NMB003 et CNR-210 d’Industrie Canada. 1. L’utilisation de ce dispositif est autorisée seulement aux conditions suivantes : 2.
European Union and European Fair Trade Association Regulatory Compliance This equipment may be operated in the countries that comprise the member countries of the European Union and the European Fair Trade Association.
Bulgaria: С това, Turtle Beach обявява, че този модел на радио на ELITE 800 RX & TX, е със съгласие с съществените изисквания и други важни условия на директива 1999/5 на европейски съюз Czech Republic: Turtle Beach tímto prohlašuje, že tento ELITE 800 RX & TX, je ve shodì se základními požadavky a dalšími pøíslušnými ustanoveními smìrnice 1999/5/ES.
Portugal: Turtle Beach declara que este ELITE 800 RX & TX, está conforme com os requisitos essenciais e outras disposições da Directiva 1999/5/CE. Romania: Astfel, Turtle Beach declarã acel acest ELITE 800 RX & TX, este în conformitate cu cerinþele necesare ºi proviziile alte semnificative de Directive 1999 5 EC. Slovakia: Turtle Beach týmto vyhlasuje, že ELITE 800 RX & TX spåòa základné požiadavky a všetky príslušné ustanovenia Smernice 1999/5/ES.
LIMITED ONE YEAR WARRANTY FOR TURTLE BEACH PRODUCTS: Voyetra Turtle Beach, Inc. (“VTB”) warrants to the original end-user purchaser (“Purchaser”) that the retail Turtle Beach hardware product herein (“Product”) will be free of defects in materials and workmanship for a period of one year from the date of purchase by the Purchaser (“Warranty Period”). Any Extended Warranty or Service Plans purchased through a Retail store are not honored by VTB.
EXCLUSIONS FROM LIMITED WARRANTY: This Limited Warranty shall not apply and VTB has no liability under this Limited Warranty if the Turtle Beach Product: - is used for commercial purposes such as “LAN, Call Centers” (including rental or lease); - is modified or tampered with; - is damaged by Acts of God, power surge, misuse, abuse, negligence, accident, wear and tear, mishandling, misapplication, or other causes unrelated to defective materials or workmanship; - serial number is defaced, altered or remov
For: PS4™ I PS3™ I Mobile* Watch Turtle Beach product training videos at: youtube.com/TurtleBeachVideos Product support and warranty information: TurtleBeach.com/support © 2014 Voyetra Turtle Beach, Inc. Turtle Beach, the Palm Tree Logo, Voyetra, Ear Force, and Audio Advantage are trademarks of Voyetra Turtle Beach, Inc. For DTS patents, see http://patents.dts.com. Manufactured under license from DTS Licensing Limited.