Tools Needed For Models : 6736198, 6736199 Adjustable Wrench Groove Joint Puller Phillips Screwdriver « Silicone Sealant Teflon Tape FONDER 6736257, 6736258 Single Handle Bathroom Faucet Maintenance Your new faucet Is designed for years of trouble-free performance. Keep It looking new by cleaning It periodically with a soft, damp cloth. Av old abrasive cleaners, steel wool and harsh chemicals as these will dull the finish and void your warranty.
Parts Diagram / List 5 ;5325\1 Part Name Handle Bar Handle Cap Screw Handle Button Trim Cap Lock Nut Cartridge O-ring Waterway Screw Body O-ring Aerator Core Aerator Collar Base O-ring Rubber Washer Metal Washer 312 24—l Threaded Shank Cover Stopper Cora Housekeeping {Without Overflow Hole) Stopper Housing {With Overflow Hale} Washer Washer Wearing Ring Lock Nut O-ring Outlet Pipe Nut Lock Nut Screw Allen Wrench Aerator Assembly Aerator Wrench Have a question? DON'T GO BACK TO THE STORE, WE CAN HELP, just c
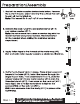
Preparation/Assembly faucet will be installed on. Note: This faucet flees 3 counter tops. . Remove the lock nut (#31) and metal washer (#18) and rubber washer Note: Do not remove the customer service tag with the model number and phone number. This information . will be needed when calling the customer service ; =18 department. o . Apply Teflon tape to the threads of the waterway (#9) (hot and cold water supply tubes) in a clockwise direction. . Verify the O-ring (#16) is in place.
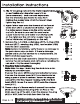
Installation Instructions 5. Slip 2" coupling nuts onto the water supply pubes% or use flexible stainless steel supply lines (recommended) both are sold separately. 2t Use two wrenches (as shown) to keep from twisting the supply tube off of the faucet when tightening the nut. 6. Apply Teflon tape onto the threads of the faucet water shut offs in a clockwise direction. Tighten the water supply hoses onto the water supply shut offs.
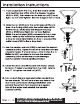
Installation Instructions 11. From underneath the sink, slide the washer (#25) and wearing ring (#26) onto the stopper housing (#22 or #23), then screw on the lock nut (#27) hand tight. Do not over tighten. See the diagram for a visual. Slide the nut (#30) over the outlet pipe (#29) and ~ insert the O-ring (#28) onto the outlet pipe Screw the nut (#30) onto the stopper housing (#22 or #23) hand tight. Do not over tighten. Note: The outlet pipe (#29) connects to the p-trap drain.
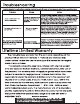
Troubleshooting If you've followed the Instructions carefully and your faucet still does not work properly, take these corrective steps. handle assembly. Problem Cause Acton Turn off the water supplies. Remove the handle assembly and trim cap If the lock nut {#6) is loose tighten it. If the| Leaksundemeaththe | lees nut (#6} s it, remove the lock nut (#6) and cartridge cartridge {#7) is dirty or misaligned.