Tools Adjustable Wrench(2) 5 Teflon Tape « Groove Jolt Puller « Phillips Screwdriver « Silicone Sealant Maintenance Your new faucet Is designed for years of trouble-free performance. Keep It looking new by cleaning It periodically with a doff cloth. Avoid abrasive cleaners, steel wool and harsh chemicals as these will dull the finish and cold your warranty. Safety Tips « If you use soldering for the installation of the faucet, the seats, cartridges and washers well have to be removed before using flame.
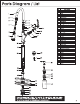
Parts Diagram / List z 8 Part Name Spout Hose Glued Ring Hose Stop Valve Spray Head O-dings O-rings o|oo|wfonen|a oo na|— Connector Retainer O-rings Handle Set Screw 14 14 | Handle 15 | Tim Cap e—I11 % 16 | Lock Nut 5 = 15 17_| Cartridge 14 18 | Cartridge Base 19 | Body O-inf 18 21 | screw 22 | Waterway 23 | stop Valve 24 | Quick Connect Assembly 20 25 | Threaded Shank 26 | Deck Plate 27_| Under-plate 21— 28 | Under-plate Seal 29 | Protective Sleeve 30_| Gasket Assembly 31 Lock Nut 32 | Screw Weight 34 | Al
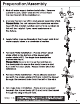
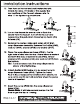
Preparation/Assembly . Shut off water supply before installation. Remove current faucet, clean and dry the sink surface the new faucet will be installed on. . Unscrew the lock nut (#31) and gasket assembly Please Note: Do not remove the customer service tag with the model number and phone number as this will be helpful if you need assistance in . the future. } . Apply Teflon tape on threads of the faucet cold & hot water supply tubes in a clockwise direction. .
Installation Instructions Slip 1/2" coupling nuts onto water supply tubes . Attach the hose (#4) to the hose quick connect Attach gasket assembly (#30) and lock nut (#31) from the bottom. Please Note: Please assemble in numerical order. Tighten but do not over tighten. Use a fillips screwdriver to tighten the 3-screws (#32) on the lock nut See diagram for visual. Hint: Have someone hold the body of the deck plate in place while tightening. . . .
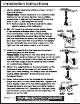
Installation Instructions 12. Then turn on the hot and cold water shut offs. Check for leaks. If it leaks at the supply line connections at the faucet, please refer to step 11 for tightening procedure. 13. Turn on the faucet for one minute to flush the debris from the faucet. Turn off the faucet and reassemble the pull-down faucet spray head (#6) to hose i 14. Remove the pump nozzle and pump (#35) from \@—w soap dispenser assembly. Unscrew the bottle lock nut washer (#38) and washer 15.
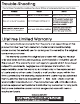
Trouble-Shooting If you've followed the instructions carefully and your faucet still does not work properly. take these corrective steps. Problem Cause Action Leaks underneath handle, Lock nut (#146) has come loose. Tighten the lock nut Remove handle (#14) ond cartridge (#17) 1o check if ceramic disks Water will not shut off completely, | Dirty or damaged cartridge (#17) | damaged permanently or dory. Re-install the cartridge (#17) or replace the cartridge.