For Models : 675-1295, 675-1304, 675-1350, 675-1345 Borden Robe Hook Tools « Level « Power Drill « 1/4” Drill Bit « 1/16” Drill Bit « Masking Tape « Pencil « Hammer « Phillips Screw Driver « Safety Glasses « Stud Finder Maintenance Your new Bath Accessory is designed for years of trouble-free performance. Keep it looking new by cleaning it periodically with a soft cloth. Avoid abrasive cleaners, steel wool and harsh chemicals as these will dull the finish and void your warranty.
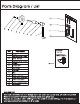
Parts Diagram / List No.| Suriname | overview 1 Hook Post ion Bracket and 2 Decorative Head Drill Holes as Indicated 3 |Allen Screw |Decorative Tube £ 8 5 |Screw 14— 6 setscrew 7 Patrica 8 |Washer 9 |Nut 10 |Allen Wrench 11 |Mounting Bracket 12 |Insert Anchors 13 |Mounting Screws 14 |Template WARNING This bath accessory is not designed to be used as a grab bar. Do not mount this item in a location where it could be used as a grab bar.
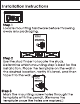
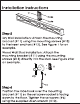
Installation Instructions Step 1 Locate mounting hardware before throwing away any packaging. Template Front View Position Bracket and Dill Holes as Indicated 118 (18mm) v, IEEE Use the stud finder to locate the studs. Determine which mounting step is best for the installation. Place the template on the wall in the desired location, verify iris level, and then tape it to the wall. /f template Front View Step 3 Mark the mounting screw holes through the template with the pencil.
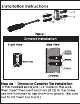
Installation Instructions Figure 1 Drywall Installation Front View Side View Drywall Step 4a Drywall or Ceramic Tile Installation In the marked spots drill 1/4" hole sin the wall, then insert the insert anchors (#12) in the holes, use the hammer to tap them into place. (Be sure not to hit them too hard.
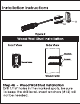
Installation Instructions o i 1 Figure 2 Wood Wall Stud Installation Front View Side View Wood wall Step 4b Wood Wall Stud Installation Drill 1/16" hole sin the marked spots, be sure To keep the drill level. Insert anchors (#12) will not be needed.
Installation Instructions Step 5 Dry Wall Installation: Attach the mounting bracket (#11) using the mounting screws (#13) to the insert anchors See Figure 1 fora example. Wood Wall Stud Installation: Attach the mounting bracket (#11) using the mounting screws (#13) directly into the stud. See Figure 2 for an example. LB 8 J\lo Step 6 Position the robe hook over the mounting bracket (#11) so the set screw sockets facing down to the floor.
Lifetime Limited Warranty The manufacturer warrants that the parts and assemblies of this product will be free from defects in material and workmanship under normal household use fora long as it is owned by the original consumer purchaser. This warranty covers the original consumer purchaser only and does not include business, commercial or industrial use of this product. This warranty shall not apply to goods which have been subject to accidents, negligence or improper installation.