
Installation Instructions

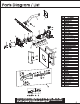

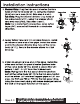

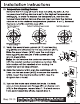
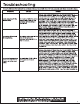
Table Of Contents
- 页 1
- 页 2
- 书签9930A7C9 45
- 书签1BF54CD5 46
- 书签A7571949 O-ring
- 书签6596DF7B O-ring
- 书签7A68A8B3 Plastic Core
- 书签080BAF72 Ring
- 书签9A1C2337 Core Cover
- 书签56B06970 Pulling Core
- 书签A67F8D2C Sealing Plate
- 书签790A10B9 Washer
- 书签622B0388 Washer
- 书签41834034 End Cap
- 书签FE6D5C02 Washer
- 书签E8A2A7A7 Stop Valve
- 书签0DA87390 Spout Assembly
- 书签5EB21C42 Protective Sleeve
- 书签02560355 Screw
- 书签11A27000 Knob
- 书签AA223AE6 Spout
- 书签1F6B6D88 1
- 书签7F13DF9F 2
- 书签1B440F5C 3
- 书签179F5CAA 4
- 书签E70A7581 5
- 书签F86F4765 6
- 书签C2EDC600 7
- 书签481C21B9 8
- 书签0E873416 9
- 书签8BFCEB0C 10
- 书签5FEC8DC5 11
- 书签8D1E5BDF 12
- 书签5F61A63E 13
- 书签971AEB6E 14
- 书签C7900FF6 15
- 书签2D3EC9F6 16
- 书签C32A8C41 17
- 书签541E89D0 18
- 书签E7A3F39B 19
- 书签576EE620 20
- 书签423DADF0 21
- 书签9D1A2BB1 22
- 书签44BD07BD 23
- 书签BB79CB06 24
- 书签47C4EE2A 25
- 书签BDB34DD4 26
- 书签59167508 27
- 书签933C576E 28
- 书签14F8F28F 29
- 书签EE8B5A65 30
- 书签879FC585 31
- 书签CE8D5650 32
- 书签E365B0A8 33
- 书签66E2C1BB 34
- 书签CA21BBDB 35
- 书签BA68F6D0 36
- 书签E85F2FE9 37
- 书签9F11D900 38
- 书签A587D2D7 39
- 书签DF424999 40
- 书签674658A8 41
- 书签B67664B8 42
- 书签2B0FD20D 43
- 书签5B208B73 44
- 书签FA12CC91 45
- 书签7F77E792 46
- 书签29FCF749 Part Name
- 书签8D34EEA0 No.
- 书签77D2D390 Shower Arm Flange
- 书签88748F5D Shower Arm
- 书签6296AAE3 Shower Head
- 书签60C5F5CE Screws
- 书签A72D731A Plaster Guard
- 书签3A87A4A0 Trim Cap
- 书签DF5651B9 Lock Nut
- 书签FECC2CEC Cartridge
- 书签DA347CCC Cartridge Housing
- 书签B216AC4B Valve Body
- 书签ED4ABBC3 O-rings
- 书签D5A25832 Sealing Washer
- 书签78DAA2B5 Stop Valve Core
- 书签1E251931 Stop Valve Spring
- 书签793120B6 Adjuster Seat
- 书签C0646D3A Escutcheon
- 书签C2FEA697 Set Screw
- 书签28621830 O-ring
- 书签2E63A220 Handle
- 书签06FE4954 Allen Wrench
- 书签45532397 Teflon Tape
- 书签70EEFA1C Adjuster
- 书签F3BBFC6D O-ring
- 书签3905DD5D 1
- 书签9CC0A30D 2
- 书签AC55A044 3
- 书签3BE13816 4
- 书签37AE448D 5
- 书签7C014E99 6
- 书签169CD452 7
- 书签44DAA3B1 8
- 书签1F6626FF 9
- 书签958EE9AA 10
- 书签876F44F5 11
- 书签5E54F92D 12
- 书签7A0F8637 13
- 书签31E0D445 14
- 书签5AC5EB96 15
- 书签43969802 16
- 书签FA1C5F02 17
- 书签45D5842A 18
- 书签00A2A148 19
- 书签3BDB7A1D 20
- 书签3E1EFD4D 21
- 书签D3A653AF 22
- 书签B36A30FD 23
- 书签235249DC 24
- 书签CF41F2D9 25
- 书签CCFE80A0 27
- 书签E889903B 28
- 书签53E18B97 29
- 书签0123CC42 30
- 书签75B91555 32
- 书签7D98391D 33
- 书签5B2CC082 30
- 书签46BF5800 34
- 书签D9B2A0DE 35
- 书签AE599593 36
- 书签3E13EB0D 42
- 书签4EC8E9B2 37
- 书签EC331D78 22
- 书签D1251629 38
- 书签E6E9E3BF 39
- 书签6A5EA7AC 40
- 书签192AE3A9 41
- 书签837F0F48 Escutcheon Gasket
- 书签54365239 Sealing Ring
- 书签A39A2DE9 26
- 书签9B68F9B5 31
- 书签4F23430A O-ring
- 书签86943EB4 Handle Button
- 书签98462274 O-rings
- 书签C1AC3440 Screws
- 书签E2865E9D 43
- 书签27524F03 44
- 页 3
- 书签EB0B1F80 Step 1-2
- 书签52691EA9 1. Note the minimum/maximum installation dimensions between the shower arm \(#2\), handle \(#23\) and spout \(#26\). Also note, if this is a thin wall mounting, the hole for the valve body \(#11\) must be 3-1/8" high x 5-1/8" long.
- 书签C5895553 2. If this is not a thin wall mounting, the plaster guard \(#6\) may be removed from the valve body \(#11\). Note: Secure the valve body \(#11\) to the support cross board for stability.
- 书签F501419F 6
- 书签50542F3B 11
- 书签19352823 3-1/8" \(80mm\)
- 书签4DFC6CA6 5-1/8" \(130mm\)
- 书签63DC9FAF 1-1/2"-2-3/16" \(38mm-56mm\)
- 书签9BFE82D6 4-1/2-14NPT
- 书签0ED1DE9A 3-11/16" \(94mm\)
- 书签7B29FE56 3-1/8" \(80mm\)
- 书签E3BA1155 11/16" \(18mm\)
- 书签81210C87 78''min to finished floor
- 书签2E319C66 Floor
- 书签F06FEB21 Tub Rim
- 书签032E2950 1/2-14NPT
- 书签A6EFFAEA 5-3/16" \(132mm\)
- 书签D31EB743 Min 8"-Max 12" \(203mm-305mm\)
- 书签396A6803 Recommended 74” \(1880mm\) Minimum From Floor To Showerhead, Or Greater As Desired
- 书签E9FDF69E 6-1/2" \(165mm\)
- 书签6E82C022 5-11/16" \(144mm\)
- 书签EE9EFBF3 2-13/16" \(72mm\)
- 书签B3C056F8 6-1/4" \(158mm\)
- 书签F1C88917 4"min-6''max
- 书签8711DEE6 3/8"-3/4
- 页 4
- 书签F27B7A48 11
- 书签14EC7F12 41
- 书签B763487A Installation Instructions
- 书签E7A6230C 5. Install an elbow at one end of the pipe. Install the other end to the tub spout diverter \(bottom hole of the valve body \(#11\)\). Install a nipple that will extend 1-5/8" - 3-1/8" from the finished wall. Note: Piping from the tub spout diverter \(bottom port of the valve body \(#11\)\) to the tub spout outlet must be either 1/2" nominal copper pipe or 1/2" iron pipe. Do NOT use PEX or PVC for the tub spout drop. Using the incorrect piping will cause leakage behind the wall or improper function of the spout.
- 书签F1939A9B 11
- 书签700E259C 11
- 书签0AF2066E 41
- 书签8E671061 45
- 书签54294051 46
- 书签30DB0AC0 11
- 书签325AA0E8 41
- 书签59AD85CF 46
- 书签65DF14A7 45
- 书签4068C01D 4. Apply Teflon tape \(#41\) to all pipe threads. Install an elbow at one end of the pipe. Install the other end to the shower diverter \(top hole of the valve body \(#11\)\). Secure the shower elbow to a 2x4 bracing.
- 书签9A8B51FA 4
- 书签0DA79357 Step 3-5
- 书签70731594 3. Shower Only: Plug the tub spout diverter \(bottom hole\) of the valve body \(#11\), using the washer \(#46\) and end cap \(#45\). Skip step 5 and 8. Tub Only: Plug the shower diverter \(top hole\) of the valve body \(#11\), using the washer \(#46\) and end cap \(#45\). Skip step 4 and 7. Note: For a watertight connection, wrap Teflon tape \(#41\) around all threads in a clockwise direction.
- 书签661563A9 Shower Only
- 书签601EB6D2 Tub Only
- 页 5
- 书签F9631EB2 1
- 书签912A99DC 2
- 书签0F9EFF74 3
- 书签F1E235EE 43
- 书签A8F29A36 Installation Instructions
- 书签AD1A11A4 6. Turn on the hot and cold water shut offs and check for leaks. If leaks occur, refer to steps 4 or 5. Turn on the faucet and let the water run for one minute. This will help clear any debris that may have come loose during installation and prevent the system from becoming clogged. Turn off the water. Note: Turn on both the hot and cold water shut offs before turning the faucet on. Not turning on both will cause your cartridge \(#10\) to become pressure locked. If this occurs, see the troubleshooting guide.
- 书签7BACB8B3 8. Slide the spout assembly \(#42\) over the nipple and attach to the nipple with screw \(#36\), using Allen wrench \(#40\). See the diagram for a visual. Note: The spout \(#26\) can be screwed directly onto a threaded nipple. If this option is being used, unscrew the plastic core \(#32\). The plastic core \(#32\), ring \(#33\) and screw \(#36\) will not be needed. Measure the spout \(#26\) from the threads to the back of the spout \(#26\) to determine the length of nipple needed. Screw the spout \(#26\) directly onto the nipple.
- 书签36D13C50 42
- 书签A2B7541C 40
- 书签46F10E29 7. Slide the shower arm flange \(#1\) onto the longer end of the shower arm \(#2\). Wrap the threads of the longer end of the shower arm \(#2\) with Teflon tape \(#41\) and install to the shower drop. Wrap the threads in Teflon tape \(#41\). Verify the washer \(#43\) is in place between the shower head \(#3\) and the shower arm \(#2\). Install the shower head \(#3\) onto the shower arm \(#2\).
- 书签75BE1254 9. If still attached, remove the protective sleeve \(#5\) from the plaster guard \(#6\) by twisting the protective sleeve \(#5\) counterclockwise.
- 书签6F7317A5 Step 6-9
- 书签93B3F3AE 5
- 书签C5327C4E 6
- 书签15504D5A 36
- 书签B47E3B77 26
- 书签4377F3AD 41
- 页 6
- 书签FAF022ED Installation Instructions
- 书签B3191201 10. Temperature Limiting Device: Remove the trim cap \(#7\) and lock nut \(#8\). By default, the temperature limiting device is set to the highest temperature setting \(A\). In order to reduce the temperature, remove the temperature limiting device \(the red cap\) and turn the device clockwise to the desired temperature \(position B or C\). Reinstall the lock nut \(#8\) and trim cap \(#7\).
- 书签144A01A5 21
- 书签30A836FB 38
- 书签D2E7F562 39
- 书签553E2C04 19
- 书签77CAF6A1 13. Turn on the water and check for leaks. If a leak occurs from shower arm flange \(#1\) or shower arm \(#2\) in the diagram, repeat step 7. If a leak occurs from spout assembly \(#42\), repeat step 8.
- 书签5801D2EB Step 10-13
- 书签D5BB3163 20
- 书签076DE15E 9
- 书签92DD752F 23
- 书签80C57A71 22
- 书签F1018C9A 37
- 书签4C87E885 10
- 书签BFB8A676 11. Verify the escutcheon gasket \(#19\) and sealing ring \(#20\) are attached to the escutcheon \(#21\). Slide the escutcheon \(#21\) over the cartridge housing \(#9\) and secure it with screws \(#39\) and O-rings \(#38\). Note: Do not remove the customer service tag with the model number and phone number. This information will be needed when calling the customer service department.
- 书签03C463A1 12. Slide the handle \(#23\) onto the cartridge \(#10\). Then use the set screw \(#22\) to secure the handle \(#23\). Insert the handle button \(#37\). See the diagram for a visual.
- 书签32D5B25C 1
- 书签343D5B95 2
- 书签59268BDF 42
- 页 7
- 书签91B16F11 Troubleshooting
- 书签DB20F2BE The lock nut \(#8\) has come loose or the O-ring on the cartridge \(#10\) is dirty or misaligned.
- 书签82C32A86 The rubber valve seat at the base of the pressure balance cartridge \(#10\) is dirty or broken.
- 书签5658D59F The cartridge \(#10\) is dirty, damaged, or pressure locked.
- 书签297FBB10 Turn off the water supplies. Turn on the handle \(#23\) to release the pressure, then close the handle \(#23\). Remove the handle button \(#37\), set screw \(#22\), handle \(#23\) and trim cap \(#7\). If the lock nut \(#8\) is loose tighten it. If the lock nut \(#8\) is tight, remove the lock nut \(#8\) and cartridge \(#10\). Verify the O-ring is clean and in proper alignment on the cartridge \(#10\). If the O-ring is dirty, rinse in warm water. Reinstall the O-ring onto the cartridge \(#10\). Reinstall the cartridge \(#10\), lock nut \(#8\), trim cap \(#7\), handle \(#23\), set screw \(#22\) and handle button \(#37\). Turn the water supplies on.
- 书签0A80A36A Turn off the water supplies. Turn on the handle \(#23\) to release the pressure, then close the handle \(#23\). Remove the handle button \(#37\), set screw \(#22\), handle \(#23\) and trim cap \(#7\), lock nut \(#8\), and the cartridge \(#10\). Verify the rubber valve seat is damange free, clean, and in proper alignment on the cartridge \(#10\). If the rubber valve seat is damaged replace the cartridge \(#10\). If the rubber valve seat is dirty rinse in warm water. Reinstall the rubber valve seat onto the cartridge \(#10\). Reinstall the cartridge \(#10\), lock nut \(#8\), trim cap \(#7\), handle \(#23\), set screw \(#22\) and handle button \(#37\). Turn the water supplies on.
- 书签07F9210D Turn off the water supplies. Turn on the handle \(#23\) to release the pressure, then close the handle \(#23\). Remove the handle button \(#37\), set screw \(#22\), handle \(#23\) and trim cap \(#7\), lock nut \(#8\), and the cartridge \(#10\). Inspect the cartridge \(#10\) for dirt and damage. Replace the cartridge \(#10\) if damaged. Shake the cartridge \(#10\) and verify the pressure balance spool \(located at the bottom of the cartridge \(#10\)\) is moving freely \(clicks when shaken\). If the spool is not moving, tap it on your hand until it begins to click. If the cartridge \(#10\) is dirty, soak it in warm white vinegar for 4 hours. Every 30 minutes, while the cartridge \(#10\) is submerged in the vinegar, rotate the stem on and off 10 times. Reinstall the cartridge \(#10\), lock nut \(#8\), trim cap \(#7\), handle \(#23\), set screw \(#22\) and handle button \(#37\). Turn the water supplies on.
- 书签FA063BF8 Leaks underneath the handle \(#23\).
- 书签5E50F0C1 The water will not shut off completely.
- 书签4725A341 The water temperature cannot be adjusted or there is no hot or cold water.
- 书签2369AD85 7
- 页 8
- 书签5A283DD5 The manufacturer warrants that the parts and assemblies of this product will be free from defects in material and workmanship under normal household use for as long as it is owned by the original consumer purchaser. This warranty covers the original purchaser with original receipt only and does not include business, commercial or industrial use of this product. This warranty shall not apply to goods which have been subject to accidents, negligence or improper installation. Our responsibility under this warranty is limited only to the replacement of parts and no other costs. Should a malfunction occur within the time covered by this warranty, replacement parts may be obtained from Customer Service Department 1-800-626-3525 or email warranty@cmiproduct.com. The manufacturer will, at its discretion, provide replacement parts for installation by consumer for any parts that prove defective under normal usage and care with new or equivalent parts.
- 书签2A5F5AD0 Revised on 05/16/2020
- 书签A6C0AE87 8
