
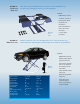
Installation Guide


5
INSTALLATION INSTRUCTION
STEP 1: (Selecting Site) Before installing your new lift, check the following:
1. LIFT LOCATION: Always use architects plans when available. Check layout dimension against floor
plan requirements making sure that adequate space is available.
2. OVERHEAD OBSTRUCTIONS: The area where the lift is to be located should be free of
overhead obstructions such as heaters, building supports, electrical lines etc.
3. DEFECTIVE CONCRETE: Visually inspect the site where the lift is to be installed and check for
cracked or defective concrete.
4. FLOOR REQUIREMNETS: The lift should be installed on a 3000 PSI concrete with little gradients.
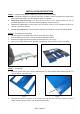
STEP 2: (Unloading and Unpacking)
1. The lift package can be lifted with a fork lift in both directions. (Fig1)
2. After unloading the lift, place it near the intended installation location.
3. Remove the shipping bands and packing materials from the unit. ( Fig 2)
4. Take out the rubber pads from the package. If anything is missing, please contact your dealer.
Fig 1 Fig2
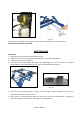
STEP 3: (Anchoring)
1. Drill each anchor hole in the concrete approximately 5
1
/
2
” deep using a rotary hammer drill and
3
/
4
”
concrete drill-bit. (Fig 3 & Fig. 4)
Fig 3 Fig 4
2. Assemble the washers and nuts on the anchors then tap into each hole with a block of wood or
rubber hammer until the washer rests against the base plate.
REV A-090413