
Installation Guide


19
TP11KC-DX
Jun 2017
14. Install Lifting Arms
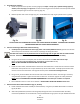
A. Position the gears with pin against the bottom of the arms in the orientation shown in Fig.13a. Attach the
gears to the arms with bolts. Do not tighten at this time.
Fig. 13a Fig. 13b
B. Position the restraint pawls on the carriage to mate with the gears on the arms.
C. Install the swing arms and pins.
Suggestion:
The longer arms go to the rear or drive in side of the lift, and the short arms go to the front.
DON’T FORCE THE GEARS, IT MAY BE NECESSARY TO PULL UP ON THE RESTRAINT ACTUATOR PIN
IN ORDER TO INSTALL THE SWING ARM PIN.
D. Tighten the gear bolts to 30 – 34 ft. lbs.
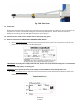
E. Assemble the arm extensions and lifting pads. Limit arm extensions with bolts & nuts. ( Figs. 14a & 14b)
Fig. 14a - Front Arm
Lifting Pad