
Installation Guide


21
TP11KC-DX
Jun 2017
18. Testing
(1) In this step A, there is no load on the lift.
(2) Cycle up and down must be with interval rest of 2 min.
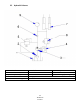
A. Without a load, raise the lift empty to the top of its travel and lower it to the floor three (3) times to remove
the remaining air from the hydraulic system.
(IF POWER UNIT RUNS FINE BUT WILL NOT PUMP, SEE PAGE 32 FOR PRIMING PROCEDURE)
B. The latches should click close together as the lift is being raised. If not, adjust the equalization cable by turn
the nuts.
C. When the carriages are lowered onto the locks, the Latch Release Handle should NOT be capable of being
pulled down. Prior to lowering down carriages, always raise up enough to free the latches, then pull down
the latch release handle to unlock the carriages to lower.
D. The first time a vehicle is placed on the lift, raise it no higher than three feet. Lower the vehicle onto the
safety latches. Raise the lift a few inches and pull latch release lever then lower the vehicle to the floor.
E. Raise the vehicle to full height and lower the carriages onto the safety latches. Lower the vehicle to the
floor.
F. After cycling the lift ten times with a vehicle on it, recheck the tightness of the anchors to at least 110 ft-lbs.
Now the lift is ready for operation.