
Installation Guide


23
TP11KC-DX
Jun 2017
4. Operation
BE SURE TO READ AND FAMILIARIZE YOURSELF WITH THE SAFETY INSTRUCTIONS AT THE BEGINNING OF
THIS MANUAL. FAILURE TO FOLLOW SAFETY INSTRUCTIONS MAY RESULT IN PROPERTY DAMAGE,
PERSONAL INJURY OR DEATH.
4.1 Operating Instructions
BE SURE TO READ AND FAMILIARIZE YOURSELF WITH THE SAFETY INSTRUCTIONS AT THE
BEGINNING OF THIS MANUAL. FAILURE TO FOLLOW SAFETY INSTRUCTIONS MAY RESULT IN
PROPER DAMAGE, PERSONAL INJURY OR DEATH.
TO AVOID PERSONAL INJURY AND/OR PROPERTY DAMAGE, PERMIT ONLY TRAINED PERSONNEL
TO OPERATE LIFT. AFTER REVIEWING THESE INSTRUCTIONS, GET FAMILIAR WITH LIFT CONTROLS
BY RUNNING THE LIFT THROUGH A FEW CYCLES BEFORE LOADING VEHICLE ON THE LIFT.
ALWAYS LIFT THE VEHICLE USING ALL FOUR ADAPTERS. NEVER RAISE JUST ONE END, ONE
CORNER, OR ONE SIDE OF VEHICLE.
THE HEAVY END OF THE VEHICLE MUST PUT ON THE SHORT / FRONT / CURVED ARMS.
4.1.1 Lift Preparation
Lift arms must be fully lowered and service bay clear of all personnel before the vehicle be brought into the bay.
Swing arms out to full drive-thru position
4.1.2 Loading Lift
Swing arms under vehicle and position adapters at vehicle manufacturer’s recommended lift points. Use intermediate,
high step, or optional adapters for under body clearance when required.
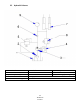
Typical Lifting Points. Some Vehicle may have the manufacturer’s Service Garage Lift Point
locations identified by triangle shape marks on its undercarriage. Also, there may be a label
located on the right front door lock face showing specific vehicle lift points. If the specific vehicle
lift points are not identified, refer to the vehicle operation manual or consult the vehicle agent.
ALWAYS follow the operating instructions supplied with the lift.
4.1.3 To Raise Lift
a. Push START button of the motor pump.
b. Stop before arms making contact with vehicle. Check arm restraint pins for engagement. If required,
slightly move arm to allow restraint gear and pawl to match. DO NOT hammer pin down, as this will
damage the restraint gear teeth.
c. Raise vehicle until the wheels slightly clear the floor, then release the START button.