TV Ears 5.
Keep these instructions in a safe place for future reference. v1.1.2013.5.0S TV Ears logos, pictures, design, and content ©2013 TV Ears, Inc. All rights reserved.
Table of Contents Important Safety Information Introduction 2 3 Product Diagram What’s Included Ideal TV Ears Placement 4 5 6 Installation Step 1 - Place & Power the Transmitter Step 2 - Optical Digital Installation Step 2.1 - RCA Analog Installation Step 2.2 - 3.5mm Cord Analog Installation Step 2.
! Important Safety Information TV Ears, Inc. asks that you read all instructions completely and heed all warnings to insure proper handling and prevent any injuries. Failure to act in accordance with TV Ears, Inc.’s instructions can lead to physical harm or injury. For safety purposes, do not deface the prongs on the AC adapters. If the provided plug does not fit into your outlet, purchase the correct adapter or consult an electrician for further assistance.
Introduction Thank you for purchasing from TV Ears and welcome to the family! This User Manual is designed to give you the most information possible and answer all the questions you might have when installing and using your new product. In this manual, we will demonstrate the ideal set up as well as show you how to successfully install your product with illustrated step-by-step instructions.
Product Diagram Speaker Headphone Ports (front) 360º Receiver Volume Knob Speaker 360º Receiver (back) Power Port Transmitter Music Port Digital Connectivity Light Charging Cradles Charging Lights 4 Infrared Signal Lights
What’s Included 5.0 Dual Digital Transmitter Wireless 5.0 Speaker Optical Digital Audio Cord RCA Analog Audio Cord 3.
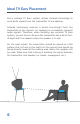
Ideal TV Ears Placement Every wireless TV Ears system utilizes infrared technology to send audio signals from the transmitter to the speaker. Infrared technology requires a direct line-of-sight from the transmitter to the receiver (or speaker) to successfully transmit audio signals. Therefore, when installing any wireless TV Ears system, you will have to be sure the transmitter has a direct lineof-sight with the speaker when the speaker is in use.
Installation pgs.
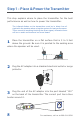
Step 1 - Place & Power the Transmitter This step explains where to place the transmitter for the best performance as well as how to power the transmitter. The infrared diodes on the transmitter must be in direct line-ofsight with the speaker when using the system for best performance. There cannot be anything blocking the direct signal, otherwise there will be no audio received and no sound heard. 1 Place the transmitter on a flat surface that is 3 to 5 feet above the ground.
Step 2 - Optical Digital Installation This step will instruct you on how to connect the TV Ears transmitter to your television, satellite, or cable box using an optical digital audio cord. • If you cannot get to the back of your TV, you can also use these instructions to install the system to your cable or satellite box. • Be aware that the “Audio” ports on the front of your television are typically “Audio In” ports and will not send audio to your speaker.
Step 2.1 RCA Analog Installation This step is an alternative to Step 2 on page 9. This step will explain how to connect the TV Ears transmitter to your television, satellite, or cable box using an RCA analog audio cord. • If you cannot get to the back of your TV, you can also use these instructions to install the system to your cable or satellite box. • Be aware that the “Audio” ports on the front of your television are typically “Audio In” ports and will not send audio to your speaker.
Step 2.2 3.5mm Cord Analog Installation This step is an alternative to Step 2 on page 9. This step will explain how to connect the TV Ears transmitter to your television, satellite, or cable box using a 3.5mm analog audio cord. • If you cannot get to the back of your TV, you can also use these instructions to install the system to your cable or satellite box. • If you connect the 3.
Step 2.3 Coaxial Digital Installation This step is an alternative to Step 2 on page 9. This step will explain how to connect the TV Ears transmitter to your television, satellite, or cable box using an coaxial digital audio cord (not included). • If you cannot get to the back of your TV, you can also use these instructions to install the system to your cable or satellite box.
Step 3 - Place and Power the Speaker This step will instruct you on how to power up the speaker. • On the top of the 5.0 Speaker there is a 360º signal receiving dome for strong audio reception wherever it is placed and regardless of the direction it is facing. 1 For best audio performance, place the speaker next to where you will be sitting while watching TV with the front of the speaker directly facing you.
Using the System & Features The Speaker On/Off and Volume Control Knob To turn the speaker on, rotate the large volume dial (on the front of the speaker) clockwise. When the speaker is on, a blue backlight will glow around the volume knob. Rotate back and forth to your desired volume level. To turn the speaker off, rotate the volume dial counter clockwise towards the “off” position until you hear or feel a ‘click’. The glowing blue backlight around the volume knob will turn off when the speaker is off.
Using the System & Features The Transmitter Digital Connectivity Light The Digital Connectivity light is the rightmost light on the front of the transmitter. This light will illuminate an amber color when the transmitter is correctly connected using the digital optical or digital coaxial cords. Infrared Lights There are thirteen infrared lights located on the front of the transmitter between the charging lights and the Digital Connectivity light.
Caring for your Product Do not use or submerge TV Ears products near water, moisture, or other liquids. Clean with a dry cloth. Do not install near any heat sources such as radiators, heat registers, stoves, or any other apparatus (including amplifiers) that produce heat. Protect the power cord from being walked on or pinched particularly at plugs, convenience receptacles, and the point where the cord exits from the transmitter.
Troubleshooting Why does my speaker mute when I mute the TV? Setting the TV’s audio settings to “Fixed audio out” will allow the television volume and TV Ears speaker volume to work independently from one another. Some televisions have to be manually switched from the “Variable” audio setting to the “Fixed” audio setting by using your TV menu. Not all TVs have the ability to switch from a variable to a fixed audio out (consult your television manual or manufacturer).
This page left blank intentionally.
Warranty Information 5 Year Limited Warranty This 5 year limited warranty will cover defects in manufacturing and product failure for a period of five years after the original purchase date. If your product fails or breaks for any reason within 180 days of the original purchase it will be replaced with a new product of the same model at no charge.
Manufacturer Declarations TV Ears Declaration All content, marks, and brand logos are property of TV Ears, Inc. TV Ears, Inc. reserves the right to change product content and product specifications without notice. CE Declaration of Conformity TV Ears is in compliance with the essential safety requirements and other relevant provisions of Standard IEC 60065:2001 + Ammd 1:2005 / EN 60065:2002 and Directive 2004/108/EC; 2006/95/EC, 89/336/EEC, 92/31/ EC, 93/68/ EEC.
Technical Specifications Speaker Specifications Power Supply - DC Switching Power Supply 12V, 0.8A Max SPL - 90 dB Weight - 3.15 lbs (50.4 oz) Dimensions (H x W x D) - 4.25” x 11” x 6.5” (10.8cm x 28cm x 16.5cm) Transmitter Specifications Audio Microphone Connection - Optical Digital/Coaxial Digital/RCA Analog/Mini Headphone Analog Dimensions (H x W x D) - 1.75” x 4.4” x 3.625” (4.5cm x 11.18cm x 9.2cm) Power Supply - DC Switching Power Supply 12v, 400mA Weight - 4.
TV Ears 5.0 Product Line TV Ears 5.0 Analog Item Number - 11641 | MSRP $129.95 This is our basic television listening system with analog connectivity. Includes one 5.0 Headset and one Analog Transmitter. TV Ears 5.0 Digital Item Number - 11741 | MSRP 229.95 This is our mid-level television listening system with analog and digital connectivity. Includes one 5.0 Headset, one Digital Transmitter, and accessories. TV Ears 5.0 Dual Digital Item Number - 11841 | MSRP $299.
Hamilton CapTel® Captioned Telephone See what they say...as they say it! Hearing loss can be frustrating, especially when using the phone. It’s not just frustrating for the individual experiencing difficulty hearing on the phone - it’s frustrating on both sides of the call. Fortunately, Hamilton CapTel has a proven solution - it’s called Captioned Telephone. More than an amplified phone, the Captioned Telephone delivers accurate, real-time captions of what is being said to the user.
This page left blank intentionally.
This page left blank intentionally.
Contact Information Register Your Product Online at www.tvears.com/warranty www.tvears.com www.facebook.com/tvearsinc twitter: @tvears 888-883-3277 - Sales Main Line 866-611-9934 - Support 888-958-7899 - Fax info@tvears.com - Email TV Ears, Inc.