
Instruction manual


6
4.3 Connecting Power to the Unit
The Video Scaler is shipped with an In-Plug Power Adapter to convert 100~240VAC
@50-60Hz to 5VDC. Connect the DC Output Cord from the Power Adapter to the back
of the unit and then plug the Power Adapter into an AC Receptacle. When the unit’s
front panel Power Switch is turned On, the Power LED indicator will illuminate.
5.0 OPERATING THE UNIT
The Scaler is controlled via three buttons with status indicated by On Screen Display.
Menu Button: This Button displays the Menu Options via the On Screen Display
on the display device connected to the output.
+ and - Buttons: These Buttons allow navigation within the Menu and
adjustments of the parameters available.
XGA Reset: Simultaneously depressing the – and + buttons returns settings to
factory defaults and sets the output to XGA@60 Hz.
Pressing the Menu Button results brings up the Initial or
Main Menu. Move the cursor to the desired setup
option by using the + and – buttons. Press the Menu
Button again to call up that option. Once the desired
option is reached and selected, a new Menu will appear
and you once again use the + & - Keys to select the
parameter you wish to change or adjust.
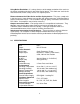
5.1 OSD Menus
If you select the first item on the main menu, Input Set up, a secondary menu will show
the following items:
5.1.1 Input set up - When it is selected, a simple, two-selection sub menu will appear.
This menu allows you to manually select the type of input you are feeding to the scaler.
You can select either YPbPr or RGB as the input type. Selecting the wrong type of input
will cause unpredictable results on the output. Pressing the + or - buttons to select the
input type, press menu to save your selection, press + and – as required to navigate to
the Exit word and, once there, press Menu again to exit this menu.
5.1.2 Output set up - When Output Set Up is selected, a new sub-menu appears.
This OSD choice will give you a display showing all the possible output resolutions and
formats. Use the + and – buttons to navigate to your choice, pres the menu key to save
your choice then use the + and – buttons again to navigate to the exit command and
press the menu button to exit the OSD display.
Input Set up
Output Set up
Picture Adjust
HV Adjust
OSD Adjust
System Information
Auto Adjust
Exit