
Instruction manual


6
parameters have only one associated adjustment -- e.g. BRIGHTNESS -- whereas
others may have several: e.g. OUTPUT.)
When you have reached the parameter you wish to adjust, press the Menu button again
to select that item. If there is only one item in the second tier associated with the
parameter, you can use the + and – buttons to make an adjustment. If there are more
than one item associated with the parameter, use the + and – buttons to move to the
item you wish to adjust, press the Menu button again to select that item and then use
the + and – buttons to make the adjustment.
Once the adjustment has been made, use the Menu button and + and – buttons to
navigate to where you can exit the OSD.
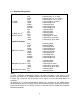
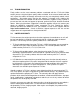
5.1 Menu Structure
1st Tier Option 2nd Tier Option Adjustment
CONTRAST - 0 ~ 100 of Contrast Level
BRIGHTNESS - 0 ~ 100 of Brightness Level
- HUE 0 ~ 100 of Hue Level
- SATURATION 0 ~ 100 of Saturation Level
- SHARPNESS 0 ~ 100 of Sharpness Level
FINETUNE
- EXIT Back to 1st Tier
- RED 0 ~ 100 of Red Color Level
- GREEN 0 ~ 100 of Green Color Level
- BLUE 0 ~ 100 of Blue Color Level
COLOR
- EXIT Back to 1st Tier
SIZE - FULL / OVERSCAN / UNDERSCAN / LETTERBOX /
PANSCAN
OUTPUT -
NATIVE / VGA / SVGA / XGA / SXGA / SXGA+
WXGA+ / WSXGA / UXGA / WUXGA
480i / 480p / 720p@60Hz / 1080i@60Hz / 1080p@60Hz
576i / 576p / 720p@50Hz / 1080i@50Hz / 1080p@50Hz
AUDIO - EAR PHONE / OPTICAL (Source selection)
- HPOSITION 0 ~ 100 of OSD Horizontal Position
- VPOSITION 0 ~ 100 of OSD Vertical Position
- TIMER 0 ~ 100 of OSD Existing Time (sec.)
- TRANSP 0 ~ 100 of OSD Transparent Level
OSD
- EXIT Back to 1st Tier
INFORMATION -
SOURCE (Input Interface)INPUT (Input Resolution)
OUTPUT (Output Resolution) VERSION (Firmware
Version)
EXIT - Close OSD Menu
Reset Function: To reset the unit, press and hold the MENU button then plug the DC power
into the unit. This will reset the unit to factory default.