
User Manual

Mfg: Yamaha Make: R6
Year: 2001+
Product: Scotts Damper/TBR Bracket Kit
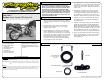
6- 5mm x 10mm Set Screws
1- 2.5mm Allen Wrench
2- 6mm x 25mm Bolts
1- Tower Pin
1- Tank Mount Bracket
1- Base Bracket
1- Steering Nut
1- Packet of Threadlock
1- Packet of Anti-Seize
You will also need a Scotts Rotary
Damper with the STRAIGHT arm,
TBR Part # 009-4200-08. This is a
seperate part and needs to ordered
as such.
Parts List
Care & Cleaning
Keep system free of dirt and moisture. Store in a cool, dry place. For cleaning use a mild spray cleaner. Always
apply cleaner or polish with a soft, clean cloth.
Tower Pin (DP001) - This is an unplated, hardened steel, high precision pin that requires a light coat of grease to
keep it rust free. Be sure to lightly grease the slot in the wiper arm to ensure proper working
order.
W
arranty
Two Brothers Racing products are intended for closed course competition purposes only, and therefore are sold “as
is” without warranty. Two Brothers Racing specifically disclaims any warranties of merchantability or fitness for a
particular purpose and disclaims all responsibility for consequential and incidental damages or any other losses
arising from the use of these products or parts.
Parts
Care & Cleaning / Warranty
R6 (2001)-TBR Rotary Damper Instructions.qxd
We recommend that this steering damper be installed
by a qualified motorcycle technician. If you have any
doubts as to your ability to install this steering damper,
please consult with your local motorcycle dealer. Read
all instructions first before starting installation. Make
sure the motorcycle and exhaust system are completely
cool before starting the installation. Also, make sure the
bike is secure on the sidestand or ideally a rear service
stand during installation. Be sure to save all stock com-
ponents for possible use later.
1. Remove the OE steering nut and install the TBR steer-
ing nut. The grove side faces down. Torque steering nut
to factory settings or 85 ft/lbs. Be sure to apply ant-seize
to the nut.
2. Partially install the 5mm x 10mm set screws into the
base bracket if not already done. Be sure to apply
threadlock to the screws.
3. Before installing the base bracket be sure nothing will
interfere with its fitment (i.e. triple clamp cover). Install
the base bracket onto the steering nut. The machined lip
on the bottom side of the base bracket must extend over
the back of the triple clamp. Ideally the set screws in the
base bracket should sit in the machined holes in the
steering nut. This can be achieved by further tightening
the nut slightly if needed, do not loosen.
4. Before tightening the set screws be sure the base brack-
et is sitting flush on the upper triple clamp. Began tight-
ening the set screws at the 5 o’clock and the 7 o’clock
position on the base bracket. Tighten the remaining set
screws evenly.
5. Install the tank mount bracket on top of the gas tank
mounting tabs, reusing the stock mounting bolts. Be
sure to apply threadlock to the bolts. Refer to photo for
proper fitment. The counter bores on the tank mount
bracket face upward and the raised tower faces foward.
6. Lightly grease the tower pin and install it into the tank
mount bracket. This pin is designed to float within the
tank mount bracket.
7. Install the Scotts Damper using the 6mm x 25mm bolts.
(NOTE- Do not use the 6mm x 20mm bolt that come
with the Scotts Damper, they do not provide sufficent
thread overlap.) Be sure to apply threadlock to the bolts.
Refer to photo for proper fitment. The flats on the tower
pin align with the wiper arm. Be sure to lightly grease
the slot in the wiper arm to ensure proper working order.
8. Refer to the manual that came with the Scotts Damper
for fine tuning instructions. You will need to recheck all
fasteners after the initial ride to ensure they are still
properly tightened.
IMPORTANT - PLEASE READ CAREFULLY
Installation Instructions
6mm x 25mm Bolts
Base Bracket w/
5mm x 10 Set
Screws
2.5mm Allen Wrench
Steering Nut
Tower Pin
Tank Mount Bracket