
Users Manual


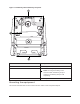
Table Of Contents
- Contents
- Safety instructions
- Introduction
- Electrical ratings
- Installing the equipment
- Enrolling the module
- Enrolling devices
- Attaching the cover
- Status LEDs
- Troubleshooting
- FCC and ISED Canada Information
- FCC class B digital device notice
- UL and ULC notes
- European CE Compliance and CERTALARM Certification
- EULA
- Limited warranty

Mounting the enclosure
To mount the enclosure, complete the following steps:
1. Use the four screws provided to secure the enclosure to the wall. For more information, see the
highlighted areas in Figure 2.
Note: Screws are provided only for the model PG9WLSHW8.
2. To enable the wall tamper, secure the tamper screw to the wall. For more information, see
callout 3 in Figure 2.
Mounting the power adapter
You must mount the power adapter outside the PGXWLSHW8 enclosure. To mount the power
adapter, complete the following step:
• Use two screws to secure the power adapter to the wall. For more information see callout 4 in
Figure 2.
Figure 2: Mounting locations
+
-
PG8WLSHW8 and PG9WLSHW8 PowerG Wired to Wireless Converter6