
Install Guide


Preliminary
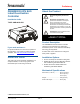
ZBAMB9010-IPS EAS LABEL DEACTIVATION CONTROLLER 8200-0747-24 REV. 3A
INSTALLATION GUIDE
5 OF 7
Installation
The controller can be placed on the countertop, or
using an optional ZBSMP-B1 mounting bracket
attached to the underside of the countertop or
sidewall of the counter.
WARNING! When the controller is
mounted to a sidewall of a counter, its
cable connectors MUST NOT face down.
Procedure
CAUTION: To avoid damaging the
controller:
Perform the next three steps in order.
DO NOT reverse the steps.
DO NOT plug or unplug any cable with
power on.
1. Connect the deactivation pad or coil EEPROM
cable to the cable port of the controller.
2. Plug the barcode scanner interface cable (if
used) into the scanner port of the controller.
Plug the ZPSTP-RA Remote Alarm Module
cable (if used) into the remote port of the
controller.
3. Plug the AC power cord into the power supply
and its other end into an unswitched AC outlet
having less than 0.5Vac between neutral and
ground. The Status LED should be solid green.
Note: While the controller auto-synchronizes,
the Status LED may briefly flash amber. Auto-
sync can take up to ten seconds.
If the Status LED is solid red—
STOP— return the controller to an
authorized repair center.
Leave the coil EEPROM cable in
place if removing the controller for
service. The EEPROM maintains
system settings for the coil location
and will automatically update the new
controller.
4. Refer to setup instructions for the deactivation
coil.
!
Secure using
a cable tie.