
User's Manual


Preliminary
AMS-9060 CONTROLLER 8200-1014-01, REV. 1A
INSTALLATION GUIDE
11 of 13
Configuring the System
The AMS-9060 controller enables you to change
controller parameters using your laptop computer
and the ADS 4 service configurator.
1. Turn on the service laptop and launch the ADS
4 service configurator.
Note: For how to use configurator settings, click
Help on the configurator.
IMPORTANT! Ensure the controller power is off.
Never restart or boot up a computer connected
to an active controller. Doing so disables the
mouse function on the computer.
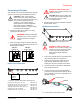
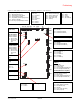
2. Connect the DB-9-to-RJ-11/12 connector to
the DB-9 serial port on your laptop computer.
Only pins 2, 3, and 5 are used.
3. Connect the RJ-11/12 connector of the service
cable to the DB-9 connector and the RJ-10/22
connector on its other end to the RS-232 port
(J3) on the controller.
4. Turn on the controller.
5. Using the “Setup” page on the configurator:
Check that antenna selections match
antennas physically installed. If not, check
antenna connections to the controller.
Setup parameters for lamps, audio, relays,
and remote alarms.
6. Using the “Tx Configuration” page, set Tx
current for each antenna and enable/disable
transmitters, if necessary.
Verifying Operation
1. Pass an active security tag by each antenna to
verify antenna performance. Refer to Help if
monitoring or adjustments are necessary.
2. Check that the antenna alarm lamp lights when
a tag/label is passed through the checkout
aisle, or if the system is covering adjacent
aisles, that the lamp lights only in the aisle the
tag/label was in.
3. If the pick rate is acceptable, installation is
complete. Reattach the top cover.
4. If you are installing this controller in Japan and
the Japanese regulatory label (0352-0398-07)
has not been affixed, attach it to a flat surface
on the controller.
DB-9
RJ-11/12
RJ-10/22 to
RS-232 port on
controller