
User's Manual


Preliminary
ULTRA MAX PHASING TOOL 8000-2579-49 REV. B
USER GUIDE
7 of 9
8000-2579-49
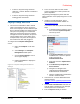
Figure 7. M4K Controller
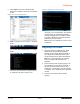
4. Open the PuTTY screen. The Console Menu
will display. See Figure 8.
Figure 8. PuTTY Screen
On the PuTTY screen, enter the capital letter L for
Legacy mode. The screen will display Phasing
Tool (Legacy)>. See image below.
5. Enter number 1 for Phase Summary display
information. See Figure 9.
Figure 9. PuTTY screen
6. Make adjustments to the potentiometer as per
turns on the PuTTY Phase Summary display.
Continue to enter 1 to get the system Phased.
LED Status Indications
Led Status Phasing State
LED 1 On Phasing is leading
LED 2 On System is In-phased
LED 3 On Phasing is lagging
Note: If Level LED 2 is On, the system is
In-Phased and the procedure is complete.
Note: If Level LED 1 or 3 are On, press 1 on
PuTTY and continue to make adjustments.
Phasing tool firmware update
procedure
Upgrading the Phasing tool application (.s19
file)
Note: Restart the ADS4 configurator between the
update fo the application and the radio.
1. Open the ADS4 Configurator before powering
on the phase tool.
2. If this is the first time running the configurator
with the phasing tool, create a USB endpoint.
Select Communications>Local>USB. In the
New USB Name field enter “Test Port 255”.
Click OK.
Figure 10 Configurator screen
3. Connect the USB cable to the phasing tool and
power on the phasing tool in boot loader mode.
Press both sw1 and sw2 simultaneously to
power on in boot loader mode; the three level
LED’s will be flashing.
4. Choose the COM port. Select
Communications>Local>Select Port. Port
varies on each computer check device
manager.
Location of
potentiometer
Adjustments in turns