
User's Manual


ZBAMB2010T TABLETOP DEACTIVATOR INSTALLATION GUIDE (8200-0185-01, REV. A)
2 of 3
Installation
Positioning the deactivator so the LED window
faces away from the sales associate:
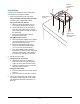
1. Mount the deactivator to the countertop.
Using a ZPCM mounting bracket (optional):
See instructions supplied with bracket.
Using hook and loop material:
a. Mate hook and loop material, then cut
hook and loop material into two strips.
b. Remove the liner from the hook side of
each strip, then fasten a strip to the flat
area on the bottom front and rear edges of
the deactivator.
c. Place the deactivator in the desired
location and press down.
Using M5 machine screws:
a. Place the template supplied in the desired
mounting location and use it to drill four
holes for M5 machine screws.
b. Select the appropriate length for the
screws. Screw length should be 8mm
(.31 in.) plus the counter thickness.
c. From the underside of the countertop,
insert the four machine screws, mate them
with the mounting holes in the bottom of
the deactivator, and tighten from below.
2. Secure the power cable.
Using cable ties (not shown):
a. Remove the liner from the adhesive-
backed mount and run a tie through the
hole in the mount and around the cable.
b. Fasten the cable tie securely around the
cable and remove excess.
Using the cable clamp:
a. Place the clamp around the cable near the
antenna.
b. Secure the clamp in place using a screw.
3. Connect the deactivator to the power supply
and plug the power supply into an ac outlet.
The deactivator will produce a brief tone at
power up.
Cable Clamp,
if used.
Hook and
Loop Material,
if used.
Holes for M5
Machine Screws
(4), if used.