
User's Manual


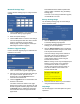


Table Of Contents

RFID READER MODEL IDR-3000 INSTALLATION AND SERVICE GUIDE (8200-0222-02, REV. 1/A)
4 of 9
Connect the Reader
WARNING: Each UHF antenna port
MUST be connected to an antenna or a
dummy load terminator before powering
the reader. Failure to follow this warning
may cause irreparable damage to the
reader.
One to four antennas can be connected to the
reader.
1. Connect required UHF antennas to antenna
ports UHF1 and/or UHF2.
IMPORTANT: Never power the reader without
an antenna or a dummy load terminator
connected to each UHF antenna port.
2. Connect required HF antennas to antenna
ports HF1 and/or HF2.
3. Verify that all antennas and/or terminators are
securely connected.
4. Plug the transformer provided with the reader
into the DC power input connector. Then
connect the transformer to a power outlet.
Wait for at least 60 seconds for the reader to
boot up. The Power/Heartbeat LED is solid
green while the reader boots. When the LED
begins blinking, the boot process is complete
and you may now connect to the reader.
5. Connect the reader to the network by plugging
an Ethernet cable into the Ethernet port.
Or…
Connect the reader to a PC (personal
computer) by plugging a crossover Ethernet
cable into the Ethernet port.
Configure the Reader
In some cases, the application software may
provide support for reader configuration. If so,
follow the instructions provided with the application.
The following procedure describes how to
configure the reader directly from a network PC
using the browser-based interface.
The reader is shipped with the following default
network configuration:
IP Address: 10.0.0.101
Subnet Mask: 255.0.0.0
Gateway: 10.0.0.1
You must know the IP address and subnet mask
settings for the network environment in which the
reader will be running.
1. Exit any reader applications that are running
on the network.
IMPORTANT: Running another RFID reader
application while using the browser-based
interface may cause a reader error. If this
happens, reboot the reader or restart it using
the browser-based interface.
2. Verify that the RFID reader is operational. The
green Power/Heartbeat LED must be blinking.
3. Start a Java-enabled web browser from any
network-enabled PC.
This PC must be configured with an IP address
and subnet mask compatible with the reader
default settings. For example: IP address
10.0.0.10, net mask 255.0.0.0.
4. Browse to…
http://10.0.0.101
The EPC/Multi-Band Reader browser-based
interface is displayed.
5. Click the Network link in the navigation menu.
The Network Settings page appears.
6. Enter the required network settings in the IP
Address, Subnet Mask, and Gateway fields.
Then, click the Save button.
7. Click the Restart link in the navigation menu.
The Startup Settings page appears.
A = RJ-45 Ethernet port
B = Not available for use
C = Safe mode button
D = Power/Heartbeat LED
A
C B D E F G
E = UHF antenna ports
F = HF antenna ports
G = DC power input
!