
User's Manual
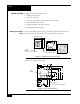
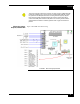
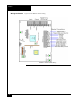
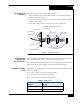
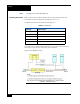
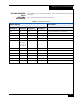
Table Of Contents

Installation
7
Figure 7 shows RM installation
.
FIGURE 7. RM Installation
Heater Strip Application
To avoid problems such as placing the strips too far away from the thermostat, not
allowing the thermostat to shut off, or locating the strips too close to the PCB and
causing component over-temperature concerns, follow mounting diagram and
heater strip application instructions.
To apply the heater strip:
1. Clean the attachment surface of the back plate with a solvent such as alcohol (use all
required precautions when handling solvents).
2. Carefully remove the release film from the adhesive.
3. Locate the heater on the clean surface of the back plate exactly as shown in Figure 6.
4. Gently roll in place to remove air bubbles.
5. Allow to remain for 72 hours before use, for maximum adhesion.
Air gaps or bubbles under the heater cause localized overheating and possible heater
burnout. Also, application of adhesives at temperatures below 50° F is not
recommended.
Installing the Thermostat
To install the thermostat:
1. Fasten the thermostat to the RM plate with the body of the device facing the junction
box and the face sitting flat against the RM plate surface.
2. With the back (or outside) surface facing up, align the thermostat such that the screw
holes of the thermostat allow for the 6-32 x 1/4" screws to secure the device to the
RM plate.