
Installation Guide


Made in the U.S.A.
Fiberweb, Inc.
70 Old Hickory Blvd.
Old Hickory, TN 37138 USA
1-615-847-7000 Fax 1-615-847-7068
www.Typar.com
Flashing Penetrations
Penetrations such as exhaust fans, exterior electrical outlets, dryer vents, exterior lights, and gas outlets
are a common entrance for bulk water into the wall cavity. Using Typar flashing will ensure proper water
hold out and maintain the integrity of the structure.
The method is similar to the flashing a window. Start by flashing the bottom of the penetration. Ensure
to shingle the upper tape over the bottom tape.
Some penetrations have flanges, such as dryer vents. These penetrations should be flashed according to
the details below.
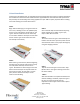
STEP 1
Install the vent according to the manufacturer’s
recommendations. Trim the housewrap as close
as possible around the perimeter of the vent.
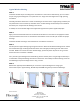
STEP 2
Flash the vent using the same method as
windows. Starting at the bottom flange; cut the
flashing so that it extends past the flanges by 1”
on both sides. Now apply the flashing to the
sides of the vent. Remember to extend the
flashing 1” on both top and bottom. Make sure
to smooth out wrinkles and air bubbles. The use
of a J-roller is optional.
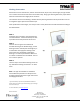
STEP 3
The Final step is to install the flashing across the
top. Extend the flashing out at least 1” on both
sides.
Note: This type of installation is suitable for
several different penetrations. Always use the
shingling method and ensure a tight seal around
the flange/penetration.
Typar
®
HouseWrap is part of a complete Weather Protection
System, which also includes Typar
®
Metro Wrap, Typar
®
Flashings
and Construction tape
For more information, visit www.Typar.com
1)
3
)
2)