
Installation Guide


Made in the U.S.A.
Fiberweb, Inc.
70 Old Hickory Blvd.
Old Hickory, TN 37138 USA
1-615-847-7000 Fax 1-615-847-7068
www.Typar.com
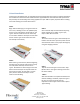
Vertical wall Installation
Install Typar® HouseWrap over an approved exterior sheathing after the framing is complete and before
the windows and doors have been installed. Plastic capped fasteners should be used and spaced at 32”
OC (vertically and horizontally) when being applied over 7/16” OSB or 15/32” plywood. When installing
over metal framing use screws with washers. If the windows and doors have already been installed, trim
the Typar WRB close to the window frame and flash according to the Typar Flashing instructions.
STEP 1
Start at the bottom of one end of the wall with
the printed side facing out. When starting at a
corner, overlap by a minimum of 12”.
Place the housewrap roll horizontally and roll
out the first course evenly, covering rough
window and door openings. Allowing for a 2-4”
(51-102 mm) overlap on the sill plate.
Pull the Typar® snug and avoiding wrinkles and
creases. Ensure that the product is level.
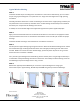
STEP 2
Fasten the Typar to the stud using plastic
capped nails or staples at 32” O.C. both
horizontally and vertically.
STEP 3
The upper layer of Typar housewrap should
overlap the bottom layer by a minimum of 6”
(152 mm) vertically and horizontally. Ensure
proper shingling throughout the installation to
properly shed water. Once the structure is
completely covered, tape all seams and
penetrations using Typar® construction tape.
(Please refer to the Typar® flashing instructions
for more detailed instruction on penetrations
and window flashing installation).
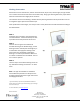
STEP 4
After the installation complete and before the
exterior cladding is installed, inspect the Typar®
for tears. Repair the issues with Typar
Construction tape or Typar Flashing.