
Installation Guide


Made in the U.S.A.
Fiberweb, Inc.
70 Old Hickory Blvd.
Old Hickory, TN 37138 USA
1-615-847-7000 Fax 1-615-847-7068
www.Typar.com
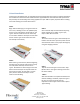
Flashing Arched Windows
STEP 1
Start with the Typar Flashing Flex, cut a piece that is 12” longer than the length of the rough opening
window sill.
Carefully pull off the release liner. Center the Flashing in the center of the rough opening and work your
way toward the corners and then up the sides. Note: the flex flashing should overlap to the outside of
the wall by 2-3”. Only stretch the flashing in the corners.
If needed, secure the fanned edges of the Typar Flashing Flex with a plastic capped nail/staple.
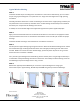
STEP 2
Apply a continuous bead of sealant to the back of the window or on the wall. Do not apply the sealant
across the bottom of the sill or on the bottom of the window. This area is left open to allow for proper
drainage.
Install the window according to the manufacturer’s installation instructions.
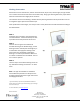
STEP 3
Cut two pieces of Typar Flashing long enough to extend 1” above the window head flange and 1” below
the window sill flange. Carefully peel off the release liner and apply the flashing on both sides of the
window. Make sure to cover the entire window mounting flange, press firmly either by hand or using a
J-roller. Ensure there are no wrinkles or bubbles.
For the head flashing, cut a piece of Typar Flashing Flex 12” longer than the length on the window arc.
Carefully begin to peel of the release liner and installing the flashing to the contour of the window
flange as you go. The head flashing should overlap the jamb flashing by at least 6”. If needed, use
button fasteners to secure the outer edges.
STEP 4
Flip down the WRB that you cut earlier. Trim the WRB tight to the window arc if needed. Tape the seams
using Typar Construction Tape. DO NOT tape along the window arc.
1) 2) 3) 4)