TYPAR ® Weather Protection System Installation Instructions Made in the U.S.A. Fiberweb, Inc. 70 Old Hickory Blvd. Old Hickory, TN 37138 USA 1-615-847-7000 Fax 1-615-847-7068 www.Typar.
Table of Contents Table of Contents ......................................................................................................................................................................... 2 Special Installation Considerations .............................................................................................................................................. 2 Code Requirements .........................................................................................................
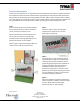
Vertical wall Installation Install Typar® HouseWrap over an approved exterior sheathing after the framing is complete and before the windows and doors have been installed. Plastic capped fasteners should be used and spaced at 32” OC (vertically and horizontally) when being applied over 7/16” OSB or 15/32” plywood. When installing over metal framing use screws with washers.
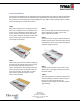
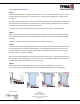
Tilt wall Installation Install Typar® HouseWrap over an approved exterior sheathing after the framing is complete and before the windows and doors have been installed. Plastic capped fasteners should be used and spaced at 32” OC (vertically and horizontally) when being applied over 7/16” OSB or 15/32” plywood. When installing over metal framing use screws with washers. STEP 1 Begin with the wall lying on the ground.
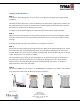
Window and Door Preparation Preparing for Window Installation STEP 1 After wrapping the structure and covering all rough openings. Cut a horizontal line across the top of the window opening. The cut should not extend past the rough opening. STEP 2 Start at the top center and make a vertical cut running two-thirds of the way down the opening. STEP3 From that stopping point, cut diagonally to both lower left and right corners of the opening.
Window Flashing General Instructions Installations methods approved by the American Architectural Manufacturers Association (AAMA) are acceptable for TYPAR products and system warrantee. Flashing products should always be installed on a dry surface that is free of dirt and debris. Wipe surfaces to remove moisture, grease and other contaminants that could interfere with adhesion. Avoid placing fasteners where the Typar flashing will be installed; however, the fasteners can be installed over the flashing.
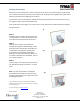
Typical Window Flashing STEP 1 Install the window sill pan according to the manufacturer’s instructions. Alternatively, you can create a sill pan using Typar Flashing Flex. Cut a piece that is 12” longer than the length of the rough opening window sill. Carefully pull off the release liner. Center the Flashing in the center of the rough opening and work your way toward the corners and then up the sides. Note: the flex flashing should overlap to the outside of the wall by 2-3”.
Flashing Arched Windows STEP 1 Start with the Typar Flashing Flex, cut a piece that is 12” longer than the length of the rough opening window sill. Carefully pull off the release liner. Center the Flashing in the center of the rough opening and work your way toward the corners and then up the sides. Note: the flex flashing should overlap to the outside of the wall by 2-3”. Only stretch the flashing in the corners.
Flashing Penetrations Penetrations such as exhaust fans, exterior electrical outlets, dryer vents, exterior lights, and gas outlets are a common entrance for bulk water into the wall cavity. Using Typar flashing will ensure proper water hold out and maintain the integrity of the structure. The method is similar to the flashing a window. Start by flashing the bottom of the penetration. Ensure to shingle the upper tape over the bottom tape. Some penetrations have flanges, such as dryer vents.