
Installation Guide


Made in the U.S.A.
Fiberweb, Inc.
70 Old Hickory Blvd.
Old Hickory, TN 37138 USA
1-615-847-7000 Fax 1-615-847-7068
www.Typar.com
Tilt wall Installation
Install Typar® HouseWrap over an approved exterior sheathing after the framing is complete and before
the windows and doors have been installed. Plastic capped fasteners should be used and spaced at 32”
OC (vertically and horizontally) when being applied over 7/16” OSB or 15/32” plywood. When installing
over metal framing use screws with washers.
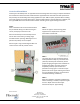
STEP 1
Begin with the wall lying on the ground. Start at
one corner, allowing an extra 12” (304mm) flap
for the corner and align the guide marks on the
Typar® with the studs. Ensure a 6” excess flap
on one side to allow for overlap to the next wall
section. Fasten Typar to the wall at 32” both
horizontally and vertically.
STEP 2
When starting a new section, fold the beginning
side flap over the vertical stud and secure (only
one side). After fastened, trim the excess
Typar®. Remember to allow enough so that the
bottom excess overlaps the sill plate when the
wall is put into place. As each wall is put into
place, ensure that each side flap is on the
exterior of the building.
STEP 3
Secure the side flaps and the bottom flap using
plastic capped nail or staples, Typar® tape,
and/or a Non-Silicone Caulk.
STEP 4
The second course of Typar® should overlap the
bottom sheet at least 6” (152 mm). Both vertical
and horizontal seams ensure proper drainage by
using the shingling method.
STEP 5
Tape all seems with Typar® Construction Tape.
(Please refer to the Typar® flashing instructions
for further detail).
STEP 6
After the installation is complete and before the
exterior cladding is installed, inspect the Typar®
for tears. If issues are found, tape the
imperfections with Typar® Construction Tape or
Typar Flashing.