Final size: Final size: 8.5 8.5 × × 11 11 inches inches (215.9 (215.9 × × 279.4 279.4 mm) mm) Tytus-Grills_19-0238_MAN_V1_ENG.fm Page 1 Friday, August 9, 2019 10:44 AM Transform Your Outdoors. 2 people No tools About 5 minutes 4-BURNER GAS GRILL T400SSBLP-0.0.0 4-BURNER ISLAND GAS GRILL WITH SIDE CABINETS TI400SSBLP-3.4.
Tytus-Grills_19-0238_MAN_V1_ENG.fm Page 2 Friday, August 9, 2019 10:44 AM ! T IS IS M R T AN A GRILL. - S WARNING ! 1. Do not store or use gasoline or other flammable liquids or vapors in the vicinity of this or any other appliance. 2. An LP cylinder not connected for use shall not be stored in the vicinity of this or any other appliance.
Tytus-Grills_19-0238_MAN_V1_ENG.fm Page 3 Friday, August 9, 2019 10:44 AM CONTENTS Important Safety Instructions . . . . . . . . . . . . . . . . . . . . . . . . . . . . . . . . . . . . . . . . . . . . . . . . . . . . . . . . 4 Package Contents. . . . . . . . . . . . . . . . . . . . . . . . . . . . . . . . . . . . . . . . . . . . . . . . . . . . . . . . . . . . . . . . . . 7 Assemble the Grill. . . . . . . . . . . . . . . . . . . . . . . . . . . . . . . . . . . . . . . . . . . . . . . . . . . . . . . . . .
Tytus-Grills_19-0238_MAN_V1_ENG.fm Page 4 Friday, August 9, 2019 10:44 AM IMPORTANT SAFETY INSTRUCTIONS Free Help From the Grill Experts Your TYTUS grill is designed for quick assembly and ease of use. If you have problems, do not return it to the store. We're the experts on this product and are trained to help you with assembly questions, grill operation, and replacement of damaged or missing parts. Email support@tytusgrills.com or call (952) 807-9690.
Tytus-Grills_19-0238_MAN_V1_ENG.fm Page 5 Friday, August 9, 2019 10:44 AM TYTUS 4-Burner Gas Grill & 4-Burner Island Gas Grill • NEVER cover slots, holes, or passages in the grill bowl or cover an entire rack with material such as aluminum foil. Doing so blocks air flow through the grill and may cause carbon monoxide poisoning. Aluminum foil linings may trap heat, causing a fire hazard. If the instructions above are not followed exactly, a fire may cause death or serious injury.
Tytus-Grills_19-0238_MAN_V1_ENG.fm Page 6 Friday, August 9, 2019 10:44 AM • • • • • • • • Use your grill on a level, stable surface in an area clear of combustible materials. Do not leave the grill unattended when in use. Do not move the appliance when in use. Allow the grill to cool before moving or storing. Do not use your grill as a heater. This grill is not intended to be installed in or on recreational vehicles and/or boats. This grill is not intended for commercial use.
Tytus-Grills_19-0238_MAN_V1_ENG.fm Page 7 Friday, August 9, 2019 10:44 AM TYTUS 4-Burner Gas Grill & 4-Burner Island Gas Grill PACKAGE CONTENTS Remove your grill from the packaging, and lay out the contents. Make sure that your grill is not damaged and that you have all parts. Gas Grill T400SSBLP-0.0.0 Island Gas Grill TI400SSBLP-3.4.
Tytus-Grills_19-0238_MAN_V1_ENG.fm Page 8 Friday, August 9, 2019 10:44 AM ASSEMBLE THE GRILL Before Grill Assembly • Make sure that you have assistance from another person to handle the grill box and other large, heavy parts. • Open the lid of the shipping box, and remove the top sheet of cardboard and packing materials. Lay the cardboard sheet on the floor and use it as a work surface to protect the floor and grill parts from scratches.
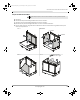
Tytus-Grills_19-0238_MAN_V1_ENG.fm Page 9 Friday, August 9, 2019 10:44 AM TYTUS 4-Burner Gas Grill & 4-Burner Island Gas Grill Step 2: Assemble the Grill Base ! A) B) C) D) E) TIP: When lifting the panels, make sure that the handles are in the up/unlocked position. Lift Panel A. Lift Panel B, then push the locking handle down to secure it to Panel A. Lift Panel C, then push the locking handle down to secure it to Panel A.
Tytus-Grills_19-0238_MAN_V1_ENG.fm Page 10 Friday, August 9, 2019 10:44 AM Step 3: Attach the Grill Box to the Grill Base A) With another person, grasp the handholds on the sides of the grill box, then lift it on top of the grill base and align the latches on the sides. The grill base’s cabinet doors should face the same direction as the front of the grill box. TIP: Keep the grill box level as you lower it straight down. Don’t torque or twist it. Lower it slowly to align the latches.
Tytus-Grills_19-0238_MAN_V1_ENG.fm Page 11 Friday, August 9, 2019 10:44 AM TYTUS 4-Burner Gas Grill & 4-Burner Island Gas Grill Step 4: Choose your Grill Model If you have the 4-Burner Gas Grill (T400SSBLP-0.0.0): Go to “Grill-Only Model: Attach side shelves and Propane” (page 12). If you have the 4-Burner Island Gas Grillwith Side Cabinets (TI400SSBLP-3.4.1 ): Go to “Island Grill Model: Attach Side Carts and Propane” (page 16). www.tytusgrills.
Tytus-Grills_19-0238_MAN_V1_ENG.fm Page 12 Friday, August 9, 2019 10:44 AM GRILL-ONLY MODEL: ATTACH SIDE SHELVES AND PROPANE The grill side shelves are included with the grill models (T400SSBLP-0.0.0). If you have the island grill model instead TI400SSBLP-3.4.1 , go to “Island Grill Model: Attach Side Carts and Propane” (page 16). Step 5: Attach the Side Shelves A) Select the left (labeled “L”) or right (labeled “R”) side shelf.
Tytus-Grills_19-0238_MAN_V1_ENG.fm Page 13 Friday, August 9, 2019 10:44 AM TYTUS 4-Burner Gas Grill & 4-Burner Island Gas Grill Step 6: Connect the Propane Tank A) Feed the regulator hose through the opening in Panel B. Gas line B) Place a propane tank (not included) into the cabinet with the tank valve facing the front left corner. Tighten the wing bolt behind the grill base (near the bottom) to secure the propane tank in place. Wing bolt www.tytusgrills.
Tytus-Grills_19-0238_MAN_V1_ENG.fm Page 14 Friday, August 9, 2019 10:44 AM C) Attach the regulator hose to the propane tank. Gas line Step 7: Install the Cooking Components A) Insert the flame tamers into the grill box. The notches at the end of each flame tamer should fit into the slots at the back of the grill box. Flame tamer Slots in the grill box 14 www.tytusgrills.
Tytus-Grills_19-0238_MAN_V1_ENG.fm Page 15 Friday, August 9, 2019 10:44 AM TYTUS 4-Burner Gas Grill & 4-Burner Island Gas Grill B) Place the two stainless steel cooking grates over the flame tamers. C) Insert the ends of the warming rack into the holes in the rear of the grill box. Cooking grates Warming rack D) You’re finished! Enjoy good food, family, and friends with your TYTUS grill. Your grill is designed to be a high-quality, solid construction that will last for years to come.
Tytus-Grills_19-0238_MAN_V1_ENG.fm Page 16 Friday, August 9, 2019 10:44 AM ISLAND GRILL MODEL: ATTACH SIDE CARTS AND PROPANE The grill side carts are included with the Grill Island models TI400SSBLP-3.4.1 . If you have the grill-only model instead, go to “Grill-Only Model: Attach side shelves and Propane” (page 12). Step 5: Expand the Side Carts A) Pull the captive pin on the side of a cart, then pull panels apart. The pin can’t be completely removed from the side cart.
Tytus-Grills_19-0238_MAN_V1_ENG.fm Page 17 Friday, August 9, 2019 10:44 AM TYTUS 4-Burner Gas Grill & 4-Burner Island Gas Grill D) Repeat steps 6A through 6C to install the panel on the other side cart. Step 7: Install the Top Caps A) Identify which top cap fits into the left or right side cart. The ice bucket is for the left side cart. The sear burner is for the right side cart.
Tytus-Grills_19-0238_MAN_V1_ENG.fm Page 18 Friday, August 9, 2019 10:44 AM Step 8: Attach the Left Side Cart A) Have your partner hold the grill base steady. B) Line up the notches on the left side cart (ice bucket side) with the grill base. The two pieces should be about one to two inches from one another. C) Push the side cart toward the grill base. As you push them together, the side cart will rise up slightly, and then drop into place. 18 www.tytusgrills.
Tytus-Grills_19-0238_MAN_V1_ENG.fm Page 19 Friday, August 9, 2019 10:44 AM TYTUS 4-Burner Gas Grill & 4-Burner Island Gas Grill Step 9: Install the Gas Line and Right Side Cart A) Feed the regulator hose through the opening in the grill base, and the gas line hose through the opening in the right side cart. Gas line hose Regulator hose B) Have your partner hold the grill base steady. C) Line up the notches on the right side cart with the grill base.
Tytus-Grills_19-0238_MAN_V1_ENG.fm Page 20 Friday, August 9, 2019 10:44 AM E) Under the right side cart cap, pull the quick connect ring back, insert the gas line hose, then release the quick connect. The quick connect springs back into place, and the hose attaches to the right side cart. Gas line hose 20 www.tytusgrills.
Tytus-Grills_19-0238_MAN_V1_ENG.fm Page 21 Friday, August 9, 2019 10:44 AM TYTUS 4-Burner Gas Grill & 4-Burner Island Gas Grill F) Place a propane tank (not included) into the grill base with the tank valve facing the front left corner. Tighten the wing bolt behind the grill base (near the bottom) to secure the propane tank in place. Wing bolt www.tytusgrills.
Tytus-Grills_19-0238_MAN_V1_ENG.fm Page 22 Friday, August 9, 2019 10:44 AM G) Attach the regulator hose to the propane tank. Regulator hose 22 www.tytusgrills.
Tytus-Grills_19-0238_MAN_V1_ENG.fm Page 23 Friday, August 9, 2019 10:44 AM TYTUS 4-Burner Gas Grill & 4-Burner Island Gas Grill Step 10: Install the Cooking Components A) Insert the flame tamers into the grill box. The notch at the end of each flame tamer should fit into the slots at the back of the grill box. Flame tamer Slots in the grill box B) Place the two stainless steel cooking grates over the flame tamers. C) Insert the ends of the warming rack into the holes in the rear of the grill box.
Tytus-Grills_19-0238_MAN_V1_ENG.fm Page 24 Friday, August 9, 2019 10:44 AM USE THE GRILL Before lighting or using your grill, familiarize yourself with the safety guidelines at the front of this manual. See “Important Safety Instructions” (page 4). WARNING: Do not smoke while lighting the grill or checking gas supply connections. LIGHT THE GRILL Note: If your grill does not light properly, see “What should I do if my grill won’t light?” (page 47).
Tytus-Grills_19-0238_MAN_V1_ENG.fm Page 25 Friday, August 9, 2019 10:44 AM TYTUS 4-Burner Gas Grill & 4-Burner Island Gas Grill 6) Push and turn the RIGHT control knob slowly to HI. Keep the control knob pushed in until the burner. ignitor lights the WARNING: Failure to open the grill lid while lighting could result in a fire or explosion that could cause serious bodily injury, death, or property damage.
Tytus-Grills_19-0238_MAN_V1_ENG.fm Page 26 Friday, August 9, 2019 10:44 AM 5) Push and turn the control knob to HI. The built-in ignitor lights the burner automatically. OFF HI LOW If the grill doesn’t light in five seconds, turn the burner control off, wait five minutes, and repeat the lighting procedure. If the grill still does not light: A) Turn the burner control and gas source OFF, and wait five minutes for the gas to clear. B) Conduct a leak test of ALL gas connections and gas sources.
Tytus-Grills_19-0238_MAN_V1_ENG.fm Page 27 Friday, August 9, 2019 10:44 AM TYTUS 4-Burner Gas Grill & 4-Burner Island Gas Grill Manually Lighting with a Match 1) 2) 3) 4) 5) Insert a match into the manual lighting stick (included in the bag with the User Guide). Make sure that your propane gas tank is filled. Make sure that the end of each burner tube is properly located over each valve orifice. Make sure that all gas connections are tightened securely. Open the grill lid.
Tytus-Grills_19-0238_MAN_V1_ENG.fm Page 28 Friday, August 9, 2019 10:44 AM 7) Light the match, insert the manual lighting stick through the lighting hole, then turn the nearest main burner control knob to the HIGH setting to release gas. The burner should light immediately. WARNING: Never lean over the cooking area while lighting your gas grill. Keep your face and body a safe distance (at least 18 inches) from the lighting hole or burners when lighting your grill with a match.
Tytus-Grills_19-0238_MAN_V1_ENG.fm Page 29 Friday, August 9, 2019 10:44 AM TYTUS 4-Burner Gas Grill & 4-Burner Island Gas Grill COOK WITH THE GRILL WARNING: Your grill will get very hot. Never lean over the cooking area while using your grill. Do not touch cooking surfaces, grill housing, lid, or any other parts while the grill is in operation or until the grill has cooled down after use. Failure to comply with these instructions may result in serious bodily injury.
Tytus-Grills_19-0238_MAN_V1_ENG.fm Page 30 Friday, August 9, 2019 10:44 AM CHECK FOR GAS LEAKS Before first use, at the beginning of each season, or every time your propane tank is changed, you must check for gas leaks. WARNING: • Your grill must be leak tested outdoors in a well-ventilated area, away from ignition sources such as gas-fired or electrical appliances. During the leak test, keep your grill away from open flames or sparks. • Do not smoke when checking for gas leaks.
Tytus-Grills_19-0238_MAN_V1_ENG.fm Page 31 Friday, August 9, 2019 10:44 AM TYTUS 4-Burner Gas Grill & 4-Burner Island Gas Grill PURGE AIR FROM THE GAS LINE/RESET THE REGULATOR Note: This procedure should be done every time a new propane gas tank is connected to your grill. 1) 2) 3) 4) 5) 6) 7) 8) Turn the control knobs OFF. Turn off the gas at the tank valve. Disconnect the regulator from propane tank. Let the gas line and regulator stand for five minutes to allow air to purge.
Tytus-Grills_19-0238_MAN_V1_ENG.fm Page 32 Friday, August 9, 2019 10:44 AM DISASSEMBLE THE GRILL GRILL-ONLY MODEL (T400SSBLP-0.0.0) 1) Make sure that the grill’s control knobs and the propane tank’s gas knob are turned off and that the grill is clean. ! TIP: If you want, remove the warming rack, cooking grates, and flame tamers. OFF 2) Disconnect the regulator hose from the propane tank and grill. 32 www.tytusgrills.
Tytus-Grills_19-0238_MAN_V1_ENG.fm Page 33 Friday, August 9, 2019 10:44 AM TYTUS 4-Burner Gas Grill & 4-Burner Island Gas Grill 3) Loosen the wing bolt behind the grill base (near the bottom), and remove the propane tank from the grill cabinet. Wing bolt 4) Feed the regulator hose back out through the opening in Panel B. www.tytusgrills.
Tytus-Grills_19-0238_MAN_V1_ENG.fm Page 34 Friday, August 9, 2019 10:44 AM 5) To remove the side shelves, lift a shelf, let the end rotate down (45°), then lift it off the grill. 6) Unlock the four latches on the sides of the grill, then lift the grill straight up (with another person) and set it to the side. ! 34 www.tytusgrills.com TIP: Lift with these handholds.
Tytus-Grills_19-0238_MAN_V1_ENG.fm Page 35 Friday, August 9, 2019 10:44 AM TYTUS 4-Burner Gas Grill & 4-Burner Island Gas Grill 7) To fold down the grill base: A) Lift up Panel E, rotate the top inward (45°), then pull it off the grill base. Lay Panel E flat inside the grill base for easy storage. B) Unlock Panel B and Panel C from Panel D, then lay Panel D flat into the base. C) Unlock Panel C from Panel A, then lay it flat into the base. D) Unlock Panel B from Panel A, then lay it flat into the base.
Tytus-Grills_19-0238_MAN_V1_ENG.fm Page 36 Friday, August 9, 2019 10:44 AM 8) Make sure that the base is completely flat. With another person, grasp the handholds on the sides of the grill box, then lift onto the folded base. The front of the grill box should face the same direction as the overhanging panel lock handle. Lock the four latches on the sides of the grill. 36 www.tytusgrills.
Tytus-Grills_19-0238_MAN_V1_ENG.fm Page 37 Friday, August 9, 2019 10:44 AM TYTUS 4-Burner Gas Grill & 4-Burner Island Gas Grill GRILL ISLAND M D L (TI400SSBLP-3.4.1 ) 1) Make sure that the grill’s control knobs and the propane tank’s gas knob are turned off and that the grill is clean. ! TIP: If you want, remove the warming rack, cooking grates, and flame tamers. OFF 2) Disconnect the regulator hose from the propane tank. www.tytusgrills.
Tytus-Grills_19-0238_MAN_V1_ENG.fm Page 38 Friday, August 9, 2019 10:44 AM 3) Loosen the wing bolt behind the grill base (near the bottom), and remove the propane tank from the grill cabinet. Wing bolt 38 www.tytusgrills.
Tytus-Grills_19-0238_MAN_V1_ENG.fm Page 39 Friday, August 9, 2019 10:44 AM TYTUS 4-Burner Gas Grill & 4-Burner Island Gas Grill 4) Disconnect the gas line hose underneath the right, sear-side cabinet. Carefully feed the hoses back through the openings in the sides of the grill base and right side cart. Gas line hose www.tytusgrills.
Tytus-Grills_19-0238_MAN_V1_ENG.fm Page 40 Friday, August 9, 2019 10:44 AM 5) Gently lift each side cart up and out to disconnect them from the main grill base. The easiest way to do this is to lift with your foot, disconnecting first the front of the cart and then the back: A) At the front of the grill, insert your foot under the side cart next to the wheel near the grill base. B) Use your foot to lift the cart up, then slide the cart slightly away from the base.
Tytus-Grills_19-0238_MAN_V1_ENG.fm Page 41 Friday, August 9, 2019 10:44 AM TYTUS 4-Burner Gas Grill & 4-Burner Island Gas Grill 4) Unlock the four latches on the sides of the grill, then lift the grill off (with another person) and set it to the side. ! www.tytusgrills.com TIP: Lift with these handholds.
Tytus-Grills_19-0238_MAN_V1_ENG.fm Page 42 Friday, August 9, 2019 10:44 AM 5) To fold down the main grill base: A) Lift up Panel E, rotate the top inward (45°), then pull it off the grill base. Lay Panel E flat inside the grill base for easy storage. B) Unlock Panel B and Panel C from Panel D, then lay Panel D flat into the base. C) Unlock Panel C from Panel A, then lay it flat into the base. D) Unlock Panel B from Panel A, then lay it flat into the base. E) Lay Panel A flat into the base.
Tytus-Grills_19-0238_MAN_V1_ENG.fm Page 43 Friday, August 9, 2019 10:44 AM TYTUS 4-Burner Gas Grill & 4-Burner Island Gas Grill 8) Make sure that the base is completely flat. Lift the grill box (with another person), place it on top of the base, and lock the four latches on the sides of the grill. 9) To fold down the side cart: A) Press the two red buttons inside the cabinet to unlock the top cap, then lift the top cap off and set aside. www.tytusgrills.
Tytus-Grills_19-0238_MAN_V1_ENG.fm Page 44 Friday, August 9, 2019 10:44 AM B) Lift the side panel up and off the cart. C) Pull the locking pin, then push the cart together until the cart locking pin locks the cart. D) Repeat to fold down the second side cart. 44 www.tytusgrills.
Tytus-Grills_19-0238_MAN_V1_ENG.fm Page 45 Friday, August 9, 2019 10:44 AM TYTUS 4-Burner Gas Grill & 4-Burner Island Gas Grill CLEAN AND MAINTAIN THE GRILL WARNING: • Always wear protective gloves and safety glasses when cleaning your grill. • Turn off the gas supply at the source and disconnect the unit before servicing. To avoid the possibility of burns, cleaning and maintenance should be done only when the grill is cool and off.
Tytus-Grills_19-0238_MAN_V1_ENG.fm Page 46 Friday, August 9, 2019 10:44 AM 6) Carefully lift each burner up and away from the gas valve orifice. Burner tube 7) Clean the burner tubes with one of these three cleaning methods: • Bend a stiff wire (a lightweight coat hanger works well) into a small hook, then run the hook through the burner tube and inside the burner several times to remove any debris.
Tytus-Grills_19-0238_MAN_V1_ENG.fm Page 47 Friday, August 9, 2019 10:44 AM TYTUS 4-Burner Gas Grill & 4-Burner Island Gas Grill ANNUAL CLEANING Use a fiber or brass cleaning brush to clean the interior grill box, cooking grills, flame tamers, and grease containers. Never use a wire brush or metal scraper on the porcelain finished parts as it can scratch or chip the porcelain finish and promote rusting. 1) Turn all the control knobs to OFF. 2) Turn the propane tank valve off.
Tytus-Grills_19-0238_MAN_V1_ENG.fm Page 48 Friday, August 9, 2019 10:44 AM Why doesn’t the hose and regulator supplied with my grill fit the older propane tank I’ve used for years? U.S. Government regulates gas appliances and propane gas tanks. When regulations are changed, propane gas tank fittings are altered to ensure compliance. If your propane gas tank does not fit the hose and regulator supplied with your new grill, the tank is outdated and must be replaced.
Tytus-Grills_19-0238_MAN_V1_ENG.fm Page 49 Friday, August 9, 2019 10:44 AM TYTUS 4-Burner Gas Grill & 4-Burner Island Gas Grill Sometimes I hear a humming sound coming from the regulator. What causes this? The humming sound is gas flowing through the regulator. A low volume of sound is normal and will not interfere with the operation of your grill. If the humming sound is loud and excessive you need to purge air from the gas line or reset the regulator excess gas flow device.
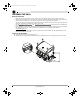
Tytus-Grills_19-0238_MAN_V1_ENG.fm Page 50 Friday, August 9, 2019 10:44 AM PART DIAGRAMS AND LISTS GRILL-ONLY PARTS (T400SSBLP-0.0.0) Grill Parts Diagram 50 www.tytusgrills.
Tytus-Grills_19-0238_MAN_V1_ENG.
Tytus-Grills_19-0238_MAN_V1_ENG.fm Page 52 Friday, August 9, 2019 10:44 AM GRILL ISLAND PARTS (TI400SSBLP-3.4.1 ) Grill Island Parts Diagram 17 52 www.tytusgrills.
Tytus-Grills_19-0238_MAN_V1_ENG.
Tytus-Grills_19-0238_MAN_V1_ENG.fm Page 54 Friday, August 9, 2019 10:44 AM Ice Bucket Cabinet Parts Diagram 54 www.tytusgrills.
Tytus-Grills_19-0238_MAN_V1_ENG.
Tytus-Grills_19-0238_MAN_V1_ENG.fm Page 56 Friday, August 9, 2019 10:44 AM Side Burner Cabinet Parts Diagram 56 www.tytusgrills.
Tytus-Grills_19-0238_MAN_V1_ENG.
Tytus-Grills_19-0238_MAN_V1_ENG.fm Page 58 Friday, August 9, 2019 10:44 AM WARRANTY Model Numbers: T400SSBLP-0.0.0 ; TI400SSBLP-3.4.
Tytus-Grills_19-0238_MAN_V1_ENG.
Tytus-Grills_19-0238_MAN_V1_ENG.fm Page 61 Friday, August 9, 2019 10:44 AM TYTUS GRILLS, LLC Eden Prairie, MN 55344 www.tytusgrills.com Patents: www.tytusgrills.com/patents © 2019 TYTUS GRILLS, LLC.