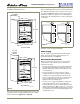
Installation Guide 2175BEVS Beverage Center and 2175BEVOL2 Beverage Center with Overlay www.U-LineService.com Phone (414) 354-0300 • FAX (414) 354-7905 Service & Parts Tech Lines Phone (800) 779-2547 • FAX (414) 354-5696 OnlineService@U-Line.
175BEVS/2175BEVOL2 Beverage Center Contents 1-Follow Safety Precautions . . . . . . . . . . . . . . . . . . . . . 2-Inspect and Plan . . . . . . . . . . . . . . . . . . . . . . . . . . . . . Exterior Cleaning . . . . . . . . . . . . . . . . . . . . . . . . . . 3-Prepare Site . . . . . . . . . . . . . . . . . . . . . . . . . . . . . . . . Cut-Out Dimensions . . . . . . . . . . . . . . . . . . . . . . . . Product Dimensions . . . . . . . . . . . . . . . . . . . . . . . . Door Swing/Clearances Information .
2175BEV/2175BEVOL2 Beverage Center General Precautions 2 Inspect and Plan Use this appliance for its intended purpose only and follow these general precautions along with those listed throughout this guide: You have received a carton containing your 2175BEVS or 2175BEVOL2 Beverage Center with a package inside containing a Use and Care Guide, a Product Registration Card and an Anti-Tip Bracket Installation Kit. 2175BEVOL2 units are shipped with an additional package of hardware.
2175BEVS/2175BEVOL2 Beverage Center After all the protective coating has been removed from the unit/door, clean all Stainless Steel surfaces with Claire Stainless Steel Polish and Cleaner or comparable product or a mild detergent and warm water solution and soft cloth. Do NOT use abrasive cleaning agents. 3 Prepare Site Your U-Line product has been designed for either freestanding or built-in installation. When built-in, your unit does not require additional air space for top, sides or rear.
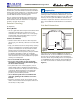
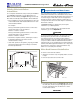
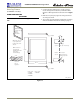
2175BEV/2175BEVOL2 Beverage Center Product Dimensions Door Swing/Clearances Information Wood Overlay units have a zero clearance for the door to open 90° (see Figure 3). Stainless Steel models require a minimum of 2-1/8" door clearance to accommodate the handle if the unit is installed next to a wall or similar type of structure. 25 - 3/8" Including Handle Wall 1/4" Min. Wall 2-1/8" Min.
2175BEVS/2175BEVOL2 Beverage Center Side-By-Side Installation Instructions 4 Prepare Racks and Door Frame The U-Line Beverage Center is equipped with woodtrimmed wine racks that are coated at the factory with a clear vinyl sealer, which will adequately protect the wood in normal usage. A final finish coat was not applied so that the wood trim could be stained to match décor or overlay frame. The trim on the racks may be coated with a final finish or stained.
2175BEV/2175BEVOL2 Beverage Center To insert a rack in the cabinet: WARNING 1. Align the left and right rack channels with the tracks in the cabinet, and ensuring an even track engagement on both sides, gently push the rack into the cabinet until it stops. To prevent permanent damage to the inner liner of your unit, the wood trim MUST be removed from the unit for staining and/or finishing.
2175BEVS/2175BEVOL2 Beverage Center Final finish-only application: 1. Remove all screws securing wood trim to interior components, and remove the trim. 2. Lightly scruff sand the wood trim with 280 or finer grit sandpaper. 3. Remove sanding dust with a clean, dry cloth. Hinge plugs 4. The factory-applied seal is compatible with virtually all finishes.
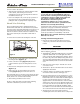
2175BEV/2175BEVOL2 Beverage Center 7. With bottom of door facing up, remove pivot plate (2 screws), flip over, and remount on opposite side of door (Figure 11). Be sure angled side of plate faces center. 10. Install metal hinge plugs removed in step 2 in old hinge holes (3 each, top and bottom). door pivot plate bottom hinge screw pin ULIN_0274_A Figure 12 Figure 11 8. Holding door upright with top of door tilted forward, place hole of door pivot plate on bottom hinge screw pin (Figure 12). 9.
2175BEVS/2175BEVOL2 Beverage Center Overlay Frame 1. Use the following instructions to create or have a wood overlay panel created for your Échelon Wine Captain or Beverage Center model as shown in Figure 13. (2175BEVOL2 Units Only) FRAME PREPARATION 2. Drill holes for pivot pins, upper door hinge and lower door hinge as shown. IMPORTANT The thickness of the wood overlay panel must be 3/4". 3. The overlay door panel must be installed in accordance with the Installation Instructions starting on page 9.
2175BEV/2175BEVOL2 Beverage Center PREPARE THE NEW OVERLAY PANEL IMPORTANT The overlay door panel must not weigh more than 20 lbs. The thickness of the door panel must be 3/4". 1. Place a towel, or other similar, soft, non-marking material out on a flat clean surface. Be sure the material is large enough to have the wood panel not touch the hard, marking surface. 2. Lay the wood panel out with the front side of the wood facing down. 3.
2175BEVS/2175BEVOL2 Beverage Center Note: After attaching the wood to the door, double check the bottom pivot hole location. If the hole in the pivot bracket is covered by any wood, chase thru the hole with a 11/32” drill to open hole in door panel. DO NOT drill deeper than 1/4” deep. DOOR FRAME TAPE ASSEMBLING DOOR TO CABINET 14. Starting at the corners and working toward the center, push the door gasket back into place. Make sure gasket is fully seated on all four sides and corners. 15.
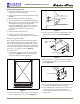
2175BEV/2175BEVOL2 Beverage Center 5 Adjust Door Checking Door Alignment Slotted Mounting Holes The unit’s door is aligned at the factory before shipment. However, its alignment could have been disturbed during shipment or during overlay frame installation. Angled Edge Towards Center of Door IMPORTANT Properly aligned, the door should be 1/8" below the top of the unit’s cabinet, NOT flush with the top (see Figure 20). Raise Outside Door Edge Lower Outside Door Edge Figure 22 1/8" 3. See Figure 22.
2175BEVS/2175BEVOL2 Beverage Center should be placed along top edge and side edge as shown (see Figure 25). 6 Prepare Power Supply Electrical Specifications CAUTION Electrical installation must observe all state and local codes. This unit requires connection to a grounded (threeprong), polarized receptacle that has been placed by a qualified electrician. 1 The unit requires a grounded and polarized 115 VAC, 60 Hz, 15A power supply (normal household current).
2175BEV/2175BEVOL2 Beverage Center 2. Place the unit into the area where it will be installed. Check the door, sides and top for a proper fit. Also test the make sure the door opens and closes freely. 3. Remove grille and place mark on the floor at the front of the unit. Also place a mark on the floor in the center of the unit (Figure 27).
2175BEV/2175BEVOL2 Beverage Center SIDE-BY-SIDE INSTALLATION 9 Start-Up for the First Time 1. Remove screws shown (Figure 31). Initial Start-Up CAUTION The unit is shipped with the control preset. No adjustments should be necessary at this time. For information about Adjusting the Temperature Control, see the Use and Care Guide. Be sure to remove and discard screw shown. Failure to do so may cause damage to the bracket and/or unit.
For more than four decades, U-Line has distinguished itself as the leader in built-in undercounter ice making, refrigeration and wine storage appliances. U-Line Corporation, located in Milwaukee, WI, is a family operated manufacturer of built-in undercounter icemakers, Combo® icemaker/refrigerators, Wine Captain® wine storage units, refrigerators, refrigerated drawers and refrigerator/freezers. ©2008 U-Line Corporation Publication No. 30225E 03/2008 Rev.