QUICK START GUIDE 2000 Series • 115 V / 60 Hz
QUICK START GUIDE u-line.com WELCOME TO U-LINE Congratulations on your U-Line purchase. Your product comes from a company with over five decades of premium modular ice making, refrigeration, and wine preservation experience. U-Line continues to be the American leader, delivering versatility and flexibility for multiple applications including residential, light commercial, outdoor and marine use.
QUICK START GUIDE u-line.com This Quick Start Guide covers the basics of installation and general use of your product. For more details, see the complete User Guide & Service Manual on u-line.com. Contents 1. Safety and Warning 2. Environmental Requirements 2. Electrical 3. Door Swing 4. Door Adjustments 5. General Installation 6. Integrated Panel Installation 8. Control Operation 10. First Use 10.
QUICK QUICK START START GUIDE GUIDE u-line.com u-line.com Safety and Warning ! DANGER NOTICE This unit contains R600a (Isobutane) which is a Please read all instructions before installing, flammable hydrocarbon. It is safe for regular operating, or servicing the appliance. use. Do not use sharp objects to expedite defrosting.
START GUIDE GUIDE QUICK START u-line.com u-line.com Environmental Requirements Electrical This model is intended for indoor/interior applications only ! WARNING and is not to be used in installations that are open/ exposed to natural elements. SHOCK HAZARD — Electrical Grounding Required. Never attempt to repair or perform This unit is designed to operate between 50°F (10°C) and maintenance on the unit until the electricity has 100°F (38°C).
QUICK START START GUIDE GUIDE QUICK u-line.com u-line.com Door Swing Wall For Integrated models that are installed adjacent to a wall, 1/2" (13 mm) 1/4" (6 mm) clearance is recommended from wall on hinge side to allow the door to open 90°. Allow for additional space for any knobs or pulls installed on the integrated panel/frame. Stainless Steel models that are installed adjacent to a wall require 2-1/4" (57 mm) door clearance on hinge side to allow for door handle.
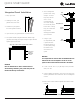
QUICK START START GUIDE GUIDE u-line.com u-line.com Door Adjustments DOOR ALIGNMENT AND ADJUSTMENT Align and adjust the door if it is not level or is not sealing properly. If the door is not sealed, the unit may not cool T-25 Torx Screw properly, or excessive frost or condensation may form in the interior. Properly aligned, the door’s gasket should be firmly in contact with the cabinet all the way around the door (no gaps).
QUICK START START GUIDE GUIDE u-line.com u-line.com 3. Using T-25 Torx bit loosen screw #1 and remove screw #2 on top and bottom hinge. Slide and remove the door from unit. Completely remove screw #1 on top and bottom. Rotate Front and Back Legs to Adjust 3. Confirm the unit is level after each adjustment and repeat the previous steps until the unit is level.
QUICK START START GUIDE GUIDE u-line.com u-line.com Integrated Panel Installation 6. Secure integrated panel to door using Bar Clamp clamps. A robust 1. Fully open door. tape may also be used. U-Line 2. Starting at corner, pull recommends the gasket away from door. use of bar clamps to secure the panel to the door. If using 3. Continue to pull gasket tape, be certain the free from gasket channel. Door/Drawer Wood Panel tape will not damage panel finish 4.
QUICK QUICK START START GUIDE GUIDE u-line.com u-line.com 11.Remove clamps from door. NOTICE If panel requires additional adjustment after removing clamps, slightly loosen each screw and adjust panel as necessary. Tighten screws upon completion. 12.Starting at the corners, re-install the gasket into the gasket channel in the frame. Make sure the gasket is fully seated.
QUICK START START GUIDE GUIDE u-line.com u-line.com Control Operation ALL 2200 SERIES EXCEPT ZWC Not Light Power Used LED Up Down CONTROL FUNCTION GUIDE FUNCTION COMMAND DISPLAY/OPTIONS ON/OFF Press and release Unit will immediately turn ON or OFF.
QUICK QUICK START START GUIDE GUIDE u-line.com u-line.com 2200 SERIES ZWC Light Power Auxiliary LED Up Down CONTROL FUNCTION GUIDE FUNCTION COMMAND DISPLAY/OPTIONS ON/OFF Press and release Unit will immediately turn ON or OFF. Toggle lights Press and release Leave interior light on for 3 hours. Press or and release Press or to adjust set point The zone you are setting will have its light turned on (top zone first).
QUICK START GUIDE u-line.com u-line.com First Use All U-Line controls are preset at the factory. Initial startup requires no adjustments. NOTICE U-Line recommends allowing the unit to run overnight before loading with product. When plugged in, the unit will begin operating under the factory default settings. If the unit was turned off during installation, simply press and the unit will immediately switch on. To turn the unit off, press .
U-Line Corporation (U-Line) Limited Warranty One Year Limited Warranty For one year from the date of original purchase, this warranty covers all parts and labor to repair or replace any part of the product that proves to be defective in materials or workmanship. For products installed and used for normal residential use, material cosmetic defects are included in this warranty, with coverage limited to 60 days from the date of original purchase.